Know How to Prevent Auto Pagination Happening On Blogger

Prevent Auto Pagination On Blogger
Did you encounter a sudden change in the number of posts displaying on your homepage? If yes, then you are just facing the auto pagination happening on your blogger blog.

Auto pagination is more of like a nightmarish problem and when you will encounter it for the first time, you will run back to your blogger settings area and try to change the number of posts to be displayed on homepage.

No matter how hard you play the game of changing numbers but the result will be same.

Blogger does not provide any one-click control to its users to stop it directly from the dashboard. When you will not find the solution, you'll run back to your best friend Google and search about it and find out the solution provided on blogs like this one. :)

Why Auto Pagination Happens on Blogger?

You need to understand the reason of problem first. So it happens just because of the size of the content on the page and blogger controls it directly to make your blog load fast and for robots to crawl easily and for cache as google only cache a full page if the size of the HTML on page is less than 101 KB.

If your content on the homepage is more in size, auto pagination will take effect and remove the number of posts to the minimum posts within the limit of its content size.

Content size on your posts increases highly due to images and longer posts.

How Much Does it Affect Your Blog?

If you're facing this problem, then you might have noticed the changes and how they make your blog look like a dull page.

Any visitor who lands on your homepage will see it because there will be anywhere 1 to less than 7 number of posts displaying and your sidebar will look long enough so:- 

1. Your blog will look like a blog of an unprofessional blogger (kid).
2. It will give a bad user experience.
3. The bounce rate on your blog home page will increase insanely.

How to Prevent Happening of Auto Pagination on Blogger?

Well if there is a problem, there is the solution too.

So as of now you know why it happens and you are ready to get rid of it. That is possible only by reducing the content size to be loaded on the homepage from your total number of posts.

Don't worry we don't have to remove anything from our posts and solution is really simple enough and it will give you the instant results as soon as you apply it.

Did you ever hear about Jump Break option in blogger post editor? If yes then you must start using it by now. If auto pagination happened on your blog then it simply means you never used the Jump Break feature on any of your posts.

Jump break does all the magic it needs to get our desired number of posts to be displayed on the homepage again, read below carefully.

SO What Does Jump Break Really Do?

Jump break breaks our content into two parts and then the only content which is before the jump break in our posts, loaded on homepage and rest is ignored.

Wait!
That does not mean the rest of the content will not get crawled and also it does not affect the SEO of your blog in any way.

After the jump break part, read more link will be displayed automatically on your home page.

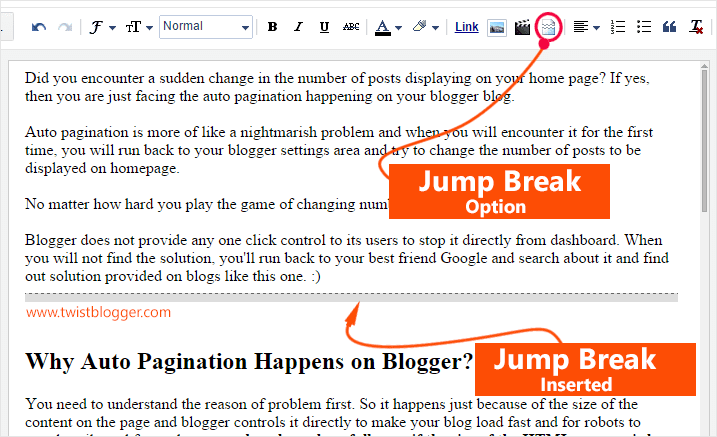
Even if you're using an auto read more JavaScript code or default blogger snippets, you must add the Jump break and to see the example of inserting the Jump Break into your post, I have taken the screenshot given below of my this post where I have added the jump break to my this post from blogger post editor.
Insert Jump Break Option


Note: Jump break will be added in your article where your cursor is blinking at the time you will click on the Jump Break button. So first of all point your cursor by clicking where you want to add it and finally to get all your posts displaying back on the homepage.
Go back to edit them now and add Jump Break right after the first paragraph of each post and save.

Others Things to Consider Along With Adding Jump Break

Use compressed images which mean low in size. I use PNG images and mostly use Photoshop for creating my images, but the problem with Photoshop is that it produces PNG images in very high size which can be compressed to almost half in size without losing their quality.

My Favorite Tool: - For compressing my PNG and JPEG images created with Photoshop to almost 70% less in size, I use a free online tool called Tinypng and they have also released the plugin for Photoshop. But Plugin will cost you around 50$. :)

Try to add fewer images with low in size and only when genuinely required. Do not use images from direct web URLs and always use the proper way to upload the images from your desktop. Avoid drop and drag feature.

I had encountered this problem and slowly I noticed that my posts started disappearing from homepage one after one as I was publishing new articles (longer articles in size).
I was displaying 12 posts by default back then and suddenly they went back to 9 and then only 8 were remaining.

I just went back to edit posts, inserted the jump break to nearly all of my posts and I saw the change instantly.
I got all the settings back as they were before as soon as I applied the Jump Break. Results were almost instant so the same would be in your case too. Just do it and see what happens.

So let me know about your experience with auto pagination and what worked for you to stop it.

Did this tutorial help you? Your feedback is really appreciated. Stay Blessed!
Floating Social Media Buttons Bar for Blogger with Total Shares Count and Show Hide Button

Floating Social Media Buttons bar for Blogger
Last time I had shared Social media share buttons bar to add below post titles for blogger and right now I am sharing floating social media share buttons bar with cool total shares count box, flip animation effect  and a tiny show hide button in bottom of it.

Social media platforms play a vital role in the success of our content to go viral and generate massive traffic in very short span of time than to start getting organic traffic from search engines because they take time and you need to generate some quality backlinks to hold rankings on first page and outrank your competitors.

So there is no reason for not to use friendly social media share buttons on our blogs.

You can see the hell lot of plugins like this available for WordPress on Codecanyon.net selling like crazy which inspired me to make one for blogger and that is for free. :)

It took me almost 4 days to design my floating social media share buttons bar with a bunch of powerful features and cool animation effects with CSS3.


Important Note: Respect copyrights. You do Not have Permission to copy and share my code on your blog. There is no credit backlink included, just what you need, but you can Not Remove the Comments added to CSS code, keep them intact. You can use it on any number of your blogs or websites for both, personal & commercial.
Total Share Count Box Credit: donReach.com code issued under GNU General Public License.
Icons credit: FontAwesome 4.0.3

Quick Note:-
*New Version Available: Add Floating Social Media Share Buttons Widget For Blogger With Custom Buttons and Shares Count Option.

Features of Floating Social Media Share Buttons Bar

It is full of powerful features and you need to know them to understand how it works so I have made a little Infographic, see below.

Demo of Floating Social Media Buttons bar for Blogger

1) Total Shares Count Box: It counts all the shares of URL on different social media platforms and shows them in the total count box.

2) FontAwesome Icons: I have used font Awesome icons on button overlay with cool CSS effects.

3) Flip Animation effect: On mouse hover, button's overlay flips to the right side and the hovered social media button becomes visible.

4) Show Hide Button: There is little "hide button" in the bottom of social media bar which allows users to hide the social media buttons on click and then "Show button" becomes visible.

5) Less JavaScript More HTML and CSS3: I have tried by best and used HTML and CSS3 to make the most of its design. Show hide button is purely made with HTML and CSS3.

So did it impress you? Let's move on to installation.

Update 1:-
Problem: Total Shares API uses cache and they are cleared after 24 hrs so total shares count box may take maximum up to 24 hrs to update total shares.

Solution: You can download the PHP scripts from the Github project page (links are given above in credits) and upload them on a Free hosting service like as OpenShift and change cache time inside configuration.php file in seconds to minimum time you want to request update of total shares (correct me if I am wrong).

I don't know how to make it work and you can find the information on the respected website or at Github project.

Update 2:-
I found the solution: Now there is no problem of not updating the total shares count live because I have downloaded these scripts and uploaded them to my OpenShift account. I did not use any cache file so your total count of shares will fetch live counts from all major social media platforms.

Although the task was really daunting for me to upload these scripts as OpenShift does not allow to upload anything to our applications directly from their server. Instead, they allow it offline from two software programs called Git and Ruby. These both software work from the command prompt and then connect to your  OpenShift account.

Ultimately I made it and now I learned to use Git and Ruby too. :)

Add Floating Social Media Share Buttons Bar to Blogger

Adding it to your blogger blog is super easy and will not take much of your time so follow some boring steps and get your stylish floating social media buttons bar ready.

Step 1) Login to your Blogger account - Select your blog - go to Template section - click on Edit HTML - now click anywhere inside your template code box - press Ctrl+a and save a backup of your template code first.

You can also download your template code backup in .xml format by going to Template - click on Top Right Side link Backup/Restore and download it from there.

Step 2) Add Font Awesome icons to your blogger blog - Find this opening tag <head> and paste the font awesome icons CSS link just below this opening tag.

<link href='http://netdna.bootstrapcdn.com/font-awesome/4.0.3/css/font-awesome.css' rel='stylesheet'/>

Add Google JavaScript Library link too if not already added.

<script src='http://ajax.googleapis.com/ajax/libs/jquery/1.7.1/jquery.min.js' type='text/javascript'/>

Step 3) Now add the CSS code - Find out ]]></b:skin> this code line and paste the whole CSS code just before it as it is.

/*----------------------------------------------------------------------------
Floating Social Media Share Buttons bar With Total Share Count
 and Show Hide Button
Designed by:: http://www.twistblogger.com
Shares Count Code by:: http://donreach.com/social-share-count
 issued under GNU GPL Licence
Icons:: FontAwesome 4.0.3
************** Do Not Remove These Credits *************
-----------------------------------------------------------------------------*/
.twistMe {
  position: fixed;
  bottom: 25%;
  padding: 0;
  background: none;
  text-align: center;
  margin: 0 auto;
  z-index: 99999999;
}
.twistMe label:hover {
  cursor: pointer;
}
.twistMe label {
  text-align: center;
  width: 62px;
  background: #3A3939;
  color: #FFF;
  border: 0;
  font-family: fontawesome;
  display: block;
  font-size: 12px;
  padding: 1px 0px;
  border-radius: 0;
  transition: all .4s ease-in-out;
  position: absolute;
  margin-top: 305px;
}
input.ShowHideButton:checked + label {
  transform-origin: 50% 0%!important;
  -webkit-transform-origin: 50% 0%!important;
  -ms-transform-origin: 50% 0%!important;
  -moz-transform-origin: 50% 0%!important;
  -o-transform-origin: 50% 0%!important;
  opacity: 1;
  transform: translateX(0px) rotateY(-180deg);
  -webkit-transform: translateX(0px) rotateY(-180deg);
  -ms-transform: translateX(0px) rotateY(-180deg);
  -moz-transform: translateX(0px) rotateY(-180deg);
  -o-transform: translateX(0px) rotateY(-180deg);
  transition-delay: 0.2s;
  -webkit-transition-delay: 0.2s;
  -ms-transition-delay: 0.2s;
  -moz-transition-delay: 0.2s;
  -o-transition-delay: 0.2s;
  border: 1px solid #3A3939;
  border-radius: 50px 0px 0px 50px;
  width: 30px;
}
input.ShowHideButton ~ .ShowHideMe {
  transition: .6s all cubic-bezier(0.730, -0.485, 0.145, 1.620);
  -webkit-transition: .6s all cubic-bezier(0.730, -0.485, 0.145, 1.620);
  -ms-transition: .6s all cubic-bezier(0.730, -0.485, 0.145, 1.620);
  -moz-transition: .6s all cubic-bezier(0.730, -0.485, 0.145, 1.620);
  -o-transition: .6s all cubic-bezier(0.730, -0.485, 0.145, 1.620);
}
input.ShowHideButton:checked ~ .ShowHideMe {
  margin-left: -75px;
}
input.ShowHideButton {
display: none;
}
.twistBlogger-Floating-SocialBar {
  display: inline-block;
  margin: 0px;
  float: left;
  background: #DFDFDF;
  padding: 0;
  z-index: 9999!important;
  border-radius: 1px;
}
.twistBlogger-Floating-SocialBar > ul {
  padding: 0;
  margin:0;
}
.twistBlogger-Floating-SocialBar > ul > li {
  margin: 0px 0px 1px -1px;
  position: relative;
  text-align: center;
  list-style: none;
  list-style-type: none;
  padding: 5px 0px 0px 0px;
  height: 70px;
  width: 63px;
  overflow: hidden;
  display: block;
  box-sizing: border-box;
  background: #000000;
}
.twistBlogger-Floating-SocialBar .tab-overlay .fa {
  font-size: 25px;
  text-align: center;
  text-shadow: 0px 0px 20px #FFFFFF;
  color: #FFFFFF;
  padding: 9px 9px;
  line-height: 1.7em;
}
.twistBlogger-Floating-SocialBar .tab-warp {
  perspective: 500px;
  perspective-origin: 0% 50%;
  -webkit-perspective: 500px;
  -webkit-perspective-origin: 0% 50%;
  -moz-perspective: 500px;
  -moz-perspective-origin: 0% 50%;
}
.twistBlogger-Floating-SocialBar .facebook-button-tab .tab-overlay {
  background: #4965B4;
}
.twistBlogger-Floating-SocialBar .googleplus-button-tab .tab-overlay {
  background: #E06352;
}
.twistBlogger-Floating-SocialBar .tweeter-button-tab .tab-overlay {
  background: #00A8E8;
}
.twistBlogger-Floating-SocialBar .linkedin-button-tab .tab-overlay {
  background: #0077B5;
}
.twistBlogger-Floating-SocialBar .tab-overlay {
  margin-top: -5px !important;
  height: 70px;
  width: 63px;
  position: absolute;
  -webkit-box-sizing: border-box;
  -moz-box-sizing: border-box;
  box-sizing: border-box;
  z-index: 99999;
}
.twistBlogger-Floating-SocialBar .tab-wrap {
  position: absolute;
  -webkit-box-sizing: border-box;
  -moz-box-sizing: border-box;
  box-sizing: border-box;
}
.twistBlogger-Floating-SocialBar .tab-flip .tab-overlay {
  display: block;
  transition: all 0.5s ease-in-out;
  -webkit-transition: all 0.5s ease-in-out;
  -moz-transition: all 0.5s ease-in-out;
  -ms-transition: all 0.5s ease-in-out;
  -o-transition: all 0.5s ease-in-out;
}
.twistBlogger-Floating-SocialBar .tab-flip:hover .tab-overlay {
  display: block!important;
  width: 0px;
  opacity: 0.5;
  -webkit-transition: all 0.5s ease-in-out;
  -moz-transition: all 0.5s ease-in-out;
  -ms-transition: all 0.5s ease-in-out;
  -o-transition: all 0.5s ease-in-out;
  transform: translateX(-5px) rotateY(-95deg);
  -webkit-transform: translateX(-5px) rotateY(-95deg);
  -moz-transform: translateX(5px) rotateY(-95deg);
  transform-origin: 0% 100%;
}
.twistBlogger-Floating-SocialBar .count {
  padding-top: 4px;
  height: 25px;
  position: absolute;
  background: #3A3939!important;
  display: inline-block;
  width: 100%;
  text-align: center;
  white-space: nowrap;
  vertical-align: middle;
  bottom: 100%;
  font-family: sans-serif;
  font-weight: bold;
  left: 0;
  right: 0;
  font-size: 15px;
  z-index: 1!important;
}
.twistBlogger-Floating-SocialBar .count.h4:after {
  content: "\f064";
  top: 5px;
  border-radius: 50px;
  font-family: fontawesome;
  font-size: 15px;
  left: 4px;
  position: absolute;
  width: 0;
  height: 0;
}
.twistBlogger-Floating-SocialBar .share-btn {
  margin: 0px 0px 1px 0;
  background: #3A3939;
  position: relative;
  text-align: center;
  font-family: cursive;
  font-weight: bold;
  font-size: 13px;
  padding: 0px 0px 1px 0px;
  border: 0;
  color: #FFFFFF;
}

Step 4) Add HTML code - Find out this closing </body> tag and just before this tag, paste the whole HTML and JavaScript codes given below.

<b:if cond='data:blog.pageType == &quot;item&quot;'>
<b:if cond='data:blog.pageType != &quot;static_page&quot;'>
<div class='twistMe'>
  <input class='ShowHideButton' id='twiSter' type='checkbox'/>
  <label for='twiSter'><i class='fa fa-backward'/></label>
  <div class='ShowHideMe'>
<div class='twistBlogger-Floating-SocialBar'>
<div class='share'>
    <div class='share-btn' data-service='total'>
        <div class='count h4'/>
        <div class='h6'>SHARES</div>
    </div>
    </div>
<ul>
<li>
<div class='facebook-button-tab tab-flip'>
<div class='tab-wrap'>
<div class='tab-overlay'>
<i class='fa fa-facebook'/>
</div>
</div>
<div class='fb-like' data-action='like' data-layout='box_count' data-share='false' data-show-faces='false'/>
</div>
</li>
<li>
<div class='googleplus-button-tab tab-flip'>
<div class='tab-wrap'>
<div class='tab-overlay'>
<i class='fa fa-google-plus'/>
</div>
</div>
<div class='g-plusone' data-size='tall'/>
</div>
</li>
<li>
<div class='tweeter-button-tab tab-flip'>
<div class='tab-wrap'>
<div class='tab-overlay'>
<i class='fa fa-twitter'/>
</div>
</div>
<a class='twitter-share-button' data-count='vertical' data-via='TwistBlogger' href='https://twitter.com/share'>Tweet</a>
</div>
</li>
<li>
<div class='linkedin-button-tab tab-flip'>
<div class='tab-wrap'>
<div class='tab-overlay'>
<i class='fa fa-linkedin'/>
</div>
</div>
<script data-counter='top' type='IN/Share'/>
</div>
</li>
</ul>
  </div>
  </div>
</div>
<script type='text/javascript'>//<![CDATA[
$(document).ready(function () {
  var shareUrl = document.location.href.toLowerCase();
    $.getJSON('http://sharecount.twistblogger.com/?url=' + encodeURIComponent(shareUrl) + "&callback=?", function (data) {
        shares = data.shares;
        $(".count").each(function (index, el) {
            service = $(el).parents(".share-btn").attr("data-service");
            count = shares[service];
            if (count > 1000) {
                count = (count / 1000).toFixed(1);
                if (count > 1000) count = (count / 1000).toFixed(1) + "M";
                else count = count + "k";
            }
            $(el).html(count);
        });
    });
});
//]]></script>
<script src='//platform.linkedin.com/in.js' type='text/javascript'> lang: en_US</script>
<script type='text/javascript'>
window.twttr=(function(d,s,id){var js,fjs=d.getElementsByTagName(s)[0],t=window.twttr||{};if(d.getElementById(id))return t;js=d.createElement(s);js.id=id;js.src=&quot;https://platform.twitter.com/widgets.js&quot;;fjs.parentNode.insertBefore(js,fjs);t._e=[];t.ready=function(f){t._e.push(f);};return t;}(document,&quot;script&quot;,&quot;twitter-wjs&quot;));
</script>
<div id="fb-root"></div>
<script src='http://connect.facebook.net/en_US/all.js#xfbml=1'/>
</b:if>
</b:if>

Editing: You need to edit the above code where you have to replace the highlighted text TwistBlogger with your Twitter USERNAME. It will be added to your tweets whenever someone do share your web page URL on tweeter. This way you will get the notifications about who shared them.

Step 5) Remaining step is to SAVE your template code and you're done. Visit any of your blog post and see the floating social media share buttons bar hanging to the left side of your blog.

Was it a smooth installation? Did it work for you? Please report if you found any bug or you could not make it possible to work for you.

I need your favor, please do share at least on one social media platform you love and spread the word about it. :)

I'll do my best to assist you as soon as you ask for any help. Stay blessed!

Update:- New Version Available
Add Floating Social Media Share Buttons to Blogger Posts Version 2

New Elegant Popular Posts Widget for Blogger

New Popular Posts Widget for Blogger
Show off your golden posts with this new elegant style popular posts widget which is designed for blogger users.
I have shared my 1st popular posts widget to which I am using on this blog (you can see it live hanging into the sidebar) previously in 2 different versions.

But this time I have designed another cool professional looking popular posts widget with lovely hover effect and counter box.

Some Features of New Elegant Style Popular Posts Widget


1) Default Thumbnails used (no JavaScript).

2) Cool Counter Box Hanging Left Side.

3) Simple Neat and Clean Design.

4) Easy Customization.

5) Cool Hover Effect.

6) The whole List item is clickable, that means it will be clickable when the mouse is hovered on the list item area and not only by hovering the mouse over the title link or thumbnail like as other widgets.

7) Using Google fonts.

Note: You do NOT have Permission to share my code on your blog

So Where is Demo Screenshot?

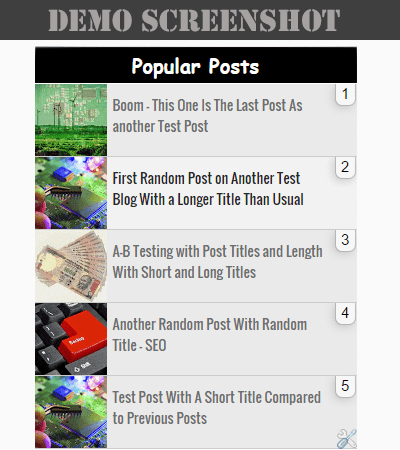
here it is.

Demo of New Elegant Popular Posts Widget for Blogger

You can also check the live demo by visiting here: - Live Demo.

I hope you liked it and we should move on to installation.

Installing New Elegant Style Popular Posts Widget to Blogger

Ready to add? I have used Google font family Oswald (Lovely Font) which gives this widget an elegant look so I recommend you to use this font family. In case you're already using then you can skip this step of adding Google font family to your template.

Add Popular Posts Widget to Your Template Sidebar First

First of all you need to install it from blogger gadgets library.

Go to Blogger - Layout - click on Add a Gadget link into sidebar then add a popular posts widget. In case you have installed it already then skip this step.

Change Configuration Settings

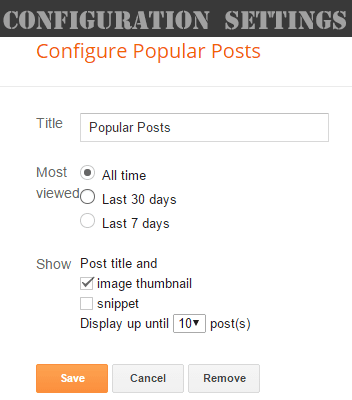
Now just change the configuration settings of newly added popular posts widget where you have to uncheck snippet. See the screenshot below.

Configuration Settings of Popular Posts Widget for Blogger


Adding Google Font Family "Oswald" to Your Blogger Blog

1) Got to Blogger - Template - Edit HTML (Save a backup copy of your template code first)

2) Find out this code <head> and paste the Google font family link just below this code
(Use Ctrl+F or Cmd+F after clicking inside the template code box to open up a search box for searching your code)

<link href='http://fonts.googleapis.com/css?family=Oswald|Open+Sans:300italic,400italic,600italic,400,300,600,700' rel='stylesheet' type='text/css'/>

Adding CSS Code to Your Template

Now all you need to do is add the CSS code of popular posts widget into your template code.
I have made it for using in the sidebar by adding .sidebar class to it, but you can make it work in the footer too. Just change the .sidebar class with your footer id or class name.

Note: If you are using any other popular posts widget already for sidebar then you need to remove that CSS code first otherwise it will not work and you will mess up everything.

If you need my help then leave your message in the comment section with your blog URL.

3) Find out this code ]]:</b:skin> and just before that paste the whole CSS code given below as it is.

/*----Sidebar Popular Posts Widget Style by www.TwistBlogger.com----*/
.widget .widget-item-control a img {
  border: none;
  width: 20px !important;
  height: 20px !important;
  padding: none;
  background: none;
  -moz-box-shadow: none;
  -webkit-box-shadow: none;
  -ie-box-shadow: none;
  box-shadow: none;
}
.sidebar .PopularPosts .widget-content ul li {
  padding: 0px 0px 0px;
  height: 73px !important;
  overflow: hidden !important;
  list-style-type: none !important;
  list-style: none;
}
.sidebar .popular-posts ul {
  padding-left:0px !important;
  list-style-type: none !important;
}
.sidebar .popular-posts ul {
  counter-reset: popcount;
  margin: 0; padding: 0;
}
/*---- Change Counter Box Style Here ----*/
.sidebar .popular-posts ul li:before {
  background: rgba(247, 247, 247, 1);
  color: #000000;
  content: counter(popcount,decimal);
  counter-increment: popcount;
  float: right;
  font-size: 15px;
  line-height: 20px;
  list-style-type: none;
  padding: 0px 6px 1px 5px;
  border-radius: 0px 0px 7px 7px;
  position: relative;
  display: inline-block;
  box-shadow: -2px 2px 10px rgba(187, 187, 187, 0.7);
  font-weight: normal;
  top: 0px;
  right: 1px;
  z-index: 999999999999;
  border: solid #B5B5B5;
  border-width: 0px 1px 1px 1px;
}
.sidebar .PopularPosts .item-thumbnail {
  float: left;
  margin: 0px!important;
}
.sidebar .PopularPosts img {
  padding-right: 0px !important;
  width: 72px;
  height: 72px;
  overflow: hidden !important;
  margin-right: 0px;
}
.sidebar .PopularPosts .item-title a:hover {
  background: #f6f6f6;
  color: #000;
}
/*-----Change Font Family -Background - Style - Size or Color Here-----*/
.sidebar .PopularPosts .item-title a {
  background: #EAEAEA;
  color: #6E6E6E;
  display: block;
  font-size: 14px;
  font-weight: normal;
  line-height: normal;
  font-family: "Oswald",sans-serif;    
  padding: 10px 30px 0px 78px;
  transition: all .4s ease-in-out;
  height: 62px;
  text-decoration: none;
  border-bottom: 1px solid #cccccc;
}

Save your template code now and you're done. Visit your blog to see your new popular posts widget hanging into the sidebar.

If you're not able to get it working then leave your message in the comment box with your blog URL and the problem you're currently facing. Even if you want some changes then you can ask me.

Editing: You can edit this widget the way you want like as changing the font family, font size, background color, hover color or color of the counter box. There is no complicated coding and I have highlighted the comments where you can change the code easily.

Did you like this widget? Do you prefer to use it? Do you want any changes? Your opinions are always welcome. Thanks for reading, Stay Blessed!

20 Ways Students can Make Money Online in 2015

Everyone has the fantasy to live a fun-filled and independent life. But a student almost spends his pocket money in buying notes and other stuff. At the end, he is left with nothing to spend. Here are the top 20 ways through which a student can earn his living. Today in this article, we will show you 20 Ways Students can Make Money Online in 2015.
Read more »

Top 10 Ways How Housewives Can Earn Money Online In 2015

Everyone dreams of becoming independent, leading a luxurious life free of tensions. But the main hurdle to live your life is money shortage. Internet is saturated with websites where freelancers bid and get paid by their clients. It provides various opportunities from copywriting to web developing, writing articles to online tutoring, and data-entry to offering gigs.Since women face difficulties and sometimes strong criticism to do jobs, hence here we furnish way for them to work online from their couch and get paid. Today in this article, we will show you top 10 ways how housewives can earn money online In 2015
Read more »

Feedburner Email Subscription Popup Blogger Plugin

email subscription popup blogger
Feedburner is the only source for most of the bloggers to gain new email subscribers (which is free) so I just came up with another stylish widget for blogger platform and I hope you guys will love it.
This time I have designed a Feedburner email subscription popup box for blogger and its really stylish, professional looking and neat and clean widget.

You might have seen this popup subscription box appearing in your favorite blogs many times. They use it because it tends to convert well and increases the conversion rate on any page of your blog.
It's Nothing like anything and you must use it if you already don't. :)

Features of Email Subscription Popup Blogger Plugin


Believe me, I don't want to preach about it and bore the hell out of you. :)
It has got really good features and you need to know them so that you can alter anything later the way you like to without getting confused.

1) Maximum Width is 600px (when viewed on desktop or laptop display)

2) The subscription box is fully Responsive (when screen width goes down below the 600 pixels, it reduces its size according to the maximum width of the screen).

3) Cookies enabled and you can set any number of expiry days for cookies.

4) Pops up in the center of window screen and remains in the center.

5) Isn't boring at all. :)

6) Using Google font family "Oswald"

7) You can set time delay so that popup box will appear on certain time after loading of your blog like as 20 seconds after loading of your blog.

8) Now it Automatically fades out after someone clicks on "Add Me" button. (Feature added after someone asked in comments). :)

(Note: You don't have permission to copy and share my code on your blog.)

Where is the DEMO Screenshot of Email Subscription Popup Box?

Wait!
There it is.

feedburner email subscription popup blogger plugin screenshot

So did it impress you? Do you want to use it?

Adding Feedburner Email Subscription Popup to Blogger

Let's follow some boring steps as usual:

1) Login to your blogger account.

2) Got to Template section - then click on Edit HTML button.

3) Now please take a backup of your template code first before doing anything with your template code because it's always good to be on safe side. It's a good habit for blogger users and you must develop it.

Installing Google Font Family and JavaScript Codes


4) Look, now we need to install Google font family "Oswald" to your template but in case your blog is already using it, then just skip this step. Don't add same fonts multiple times as they will slow down the page load time.

Search for this opening tag <head> (found at the beginning of the template code)  and paste the Google font family link just after it.

<link href='http://fonts.googleapis.com/css?family=Oswald|Open+Sans:300italic,400italic,600italic,400,300,600,700' rel='stylesheet' type='text/css'/>

5) Now just find out this closing tag </head> and paste these JavaScript links given below just before this closing tag.
(Note: If you have previously installed my widget, "Facebook Popup Page Like Box for Blogger" then you need not to complete this step because these codes were installed into sidebar HTML gadget then and you will be adding them twice. This time I am installing these codes into your blogger template, not into the sidebar so you can remove them from sidebar HTML widget. These are the same codes so make it sure, its your part :)
<script src='http://ajax.googleapis.com/ajax/libs/jquery/1.7.2/jquery.min.js' type='text/javascript'></script>
<script src='https://googledrive.com/host/0B_PLgWpOK_wTazh0MndTeWs3c28' type='text/javascript'></script>

Add CSS Code to Your Template


6) Now you need to add the CSS code to your template.
Find out this code ]]></b:skin>and just before this code, paste the whole CSS code given below.

/*----- Email Subscription Popup Box Coded by www.TwistBlogger.com -----*/
#twist-blogger-subbox {
  display: none;
  background: rgba(0,0,0,0.5);
  width: 100%;
  height:100%;
  position: fixed;
  top: 0;
  right: 0;
  bottom: 0;
  left: 0;
  z-index:99999999;
}
#twist-blogger-subbox .popup-box {
  padding: 0;
  margin: 0 auto;
  max-width: 600px;
  border-radius: 1px;
  border: 2px solid #F5F500;
  background: #3A3939 url('https://blogger.googleusercontent.com/img/b/R29vZ2xl/AVvXsEiS_P4aRPYR2wJCPiWSkJvzV5j9sD53Sd0-smjgx04O-6SaX3yXSe5APgXcCfDwNkL1Im9G0PiA5rxbSTTj7svdtQa1nmdlsj2uxBJQAvzG98Aoub8VXhkwcMGtc-3j5fHGjPgIr2qdgn0/s1600/64.png');
  background-repeat: no-repeat;
  background-position: 100% 45%;
  position:relative;
  top:25%;
  z-index:0;
}
#twist-blogger-subbox .popup-box .exit-button-subbox {
  float: right;
  cursor: pointer;
  position: absolute;
  right: 0px;
  top: 0px;
  margin-top: 2px;
  margin-right: -2px;
}
#twist-blogger-subbox .popup-box .exit-button-subbox:before {
  content: "X";
  padding: 5px 8px;
  background: #FFFFFF;
  color: #000000;
  font-weight: normal;
  font-size: 12px;
  text-shadow: 0px -1px #000;
  font-family: sans-serif;
  border: 4px solid #F5F500;
  border-radius: 50px 0px 50px 50px;
}
/*--Main Headline Style - www.twistblogger.com--*/
#twist-blogger-subbox .popup-box .tagline {
  padding: 0;
  line-height: 2em;
  font-size: 26px;
  height: 50px;
  font-weight: normal;
  font-family: "Oswald",sans-serif;
  text-shadow: 0px -1px 0px #F5F500;
  color: #3A3939;
  text-align: center;
  background: #FFFF00;
  border-right: 7px solid #F5F500;
  border-left: 7px solid #F5F500;
  border-bottom: 15px solid #3A3939;
}
/*--Paragraph Style - www.twistblogger.com--*/
#twist-blogger-subbox .popup-box p {
  font-family: "Oswald",sans-serif;
  font-size: 15px;
  color: #EFEFEF;
  text-shadow: 1px -1px 0px #000;
  line-height: 35px;
  padding: 10px 110px 0px 20px;
  text-align: left;
  letter-spacing: 0.5px;
  margin: 0;
}
#twist-blogger-subbox .popup-box .rssform {
  padding: 15px 20px;
  margin: 15px 0px 0px 0px;
}
/*-- Button Style - www.twistblogger.com --*/
#twist-blogger-subbox .popup-box .rssform .button {
  cursor: pointer;
  margin: 0px 0px 0px 5px;
  border: none;
  overflow: hidden;
  width: 35%;
  height: 37px;
  background-color: #FF0;
  font-size: 14px;
  font-weight: normal;
  color: #121212;
  letter-spacing: 0.5px;
  text-transform: uppercase!important;
  font-family: "Oswald";
  float: right;
}
#twist-blogger-subbox .popup-box .rssform .button:hover {
  background: #FFE800;
  padding: 7px;
  border: 1px solid #fff;
}
#twist-blogger-subbox .popup-box .rssform .email-bg {
  background: #FFE url('https://blogger.googleusercontent.com/img/b/R29vZ2xl/AVvXsEiHqyNocDLLFEAk_Od9hj7B4_778kgQyUS3ITYlU0_oMkHg4f10Ce0YfldRozdizaAlDPa-7zzFTZL2hXd8K-1vqNYw1Q5dWVCU5RFM5HjdOxiQqmiYdxVo-VT17JboaJgVmovvmXhGF5Q/s1600/1envelope.png') no-repeat 5px 8px !important;
  padding-left: 30px;
}
#twist-blogger-subbox .popup-box .rssform input {
  padding: 8px;
  font-size: 13px;
  font-family: Oswald;
  font-weight: normal;
  display: inline-block;
  width: 60%;
  height: 37px;
  text-transform: uppercase;
  outline: none !important;
  border: none;
  border-radius: 1px;
  box-sizing: border-box !important;
}

Ok so now we're done with adding CSS code and only remaining step is to add HTML part of email subscription popup box to your blog template.

Add HTML Code of Subscription Popup to Your Template


7) Now just find out this closing </body> tag which is at the end of your template code and paste the HTML code just before this closing tag after making required changes.

<div id='twist-blogger-subbox'>
            <div class='popup-box'>
<div class='exit-button-subbox'></div>
            <div class='tagline'>
            Wait! Leech off my best
            </div>
                 <p>Get latest Blogger Widgets, Plugins and much more straight into your INBOX for free. Just Enter your email address, Verify and join our Newsletter!</p>
            <div class='rssform'>
            <form action='http://feedburner.google.com/fb/a/mailverify' method='post' target="popupwindow" onsubmit="window.open('http://feedburner.google.com/fb/a/mailverify?uri=TwistBlogger', 'popupwindow', 'scrollbars=yes,width=550,height=520');return true">
            <input type='text' class='email-bg' name='email' placeholder='Enter your email address... :)' />
            <input type="hidden" value="TwistBlogger" name="uri"/>
            <input type="hidden" name="loc" value="en_US"/>
            <input value="Add Me" class="button" type="submit" />
            </form>
            </div>
</div>
</div>
<script type='text/javascript'>
jQuery(document).ready(function($){
if($.cookie('feedburner_popup_box') != 'yes'){
$('#twist-blogger-subbox').delay(25000).fadeIn('medium');
$('.exit-button-subbox, .button').click(function(){
$('#twist-blogger-subbox').stop().fadeOut('medium');
});
}
$.cookie('feedburner_popup_box', 'yes', { path: '/', expires: 15 });
});
</script>

*Required Changes: Now you need to make few changes to the above HTML (you don't have to code anything).

1. Change the Main Headline text "Wait! Leech of my best" to whatever you want.

2. Change the Paragraph text to your own text and that is what where you describe why visitors should become subscribers.

3. Change my Feedburner address TwistBlogger to your blog's address (twice).

4. You can change Add Me button text to your own like as boring as Subscribe.

5. Change the delay time which is 25 seconds by default (I made it default :p) to your own. To change it, just modify the value of 25000 where 1000 value = 1 second.

6. Set the expiry date for cookies which is 15 days by default. To change it, just modify the value 15 to any number where 1 number = 1 day.

That is it!

Visit your blog now and be the first to see it live. :)
It must be working fine if you did not miss any step. The process is little long but well worth the time.

If you're unable to get it working then you can leave a comment with your blog URL and I'll surely check it.

Give me a favor, do share if it really helped you and you liked my Feedburner email subscription popup blogger widget. Stay blessed!

Add Social Media Share Buttons to Blogger Posts

Add Social Media Share Buttons To Blogger
Beautiful and simple Social media share buttons help us to get our well-written content shared on different social media platforms easily. When a piece of content get shared more and more times on different social media platforms, it helps our content to get more links, free traffic and social signals which increase the value of our content in search engines and ultimately it ranks well too.

Today I am going to share a horizontal social media share buttons bar I designed for blogger and currently using it below the post title. However, you can use it in the post footer too if you do not like it appearing below the post title.


I have added a little twist to the default social share buttons and used different colors in the background of each button which makes these buttons colorful, pretty and eye catchy compared to default boring design. :) So I hope you like the design and your visitors would love to click on them to get you more shares, likes, and tweets.

Recommended:-  Add Custom Social Media Share Buttons to Blogger Posts Below Title or in Post Footer Fully responsive along with total shares count.

I have used four different social media share buttons which are as follow:
-Twitter
-Facebook
-Google Plus
-Stumble Upon

I have used only four buttons because the space is limited, but you can add more if you like or remove the one you do not want and add yours. All you need to have is fair knowledge of HTML and CSS. You can grab the code of any social media share button from the respected social media platform's website.

You can see the live demo of this social media share buttons bar in my blog itself and if you liked it, let us begin the installation process.

Adding Social Media Share Buttons to Blogger - Below the Post Title

Step 1) Go to BloggerTemplate → Edit HTML

Step 2) Click inside the Template code box  → Press Ctrl+A and copy your template code to a notepad file and have a Backup of it in case you did something wrong, you can revert it back to original.

Step 3) Ok, so now you have the backup so again click inside the template code box, Press Ctrl+F or Cmd+F (for mac) and find out this closing tag </head>

Step 4) Now just before this </head> tag, paste the whole CSS code given below as it is.

<b:if cond='data:blog.pageType == &quot;item&quot;'>
<style type='text/css'>
/*----Social Share Buttons Bar Coded By TwistBlogger.com----*/
#twistBloggerSocialbar {
  float: left;
  width: 100%;
  padding-bottom: 7px;
  margin-top: 15px;
  padding: 5px 0px 5px 0px;
  border-bottom: 1px solid #F2F2F2;
  border-top: 1px solid #F2F2F2;
  margin-bottom: 15px;
  height: 28px;
  background: #FFF9F9;
  position: relative;
  z-index: 9999;
  overflow: hidden!Important;
}
.shareBox {
  float: left;
  padding: 0px;
  margin-right: 10px;
  height: 20px;
}
.titleBox {
  background: #5F5F5F;
  border: 1px solid #000000;
  height: 100%;
  text-transform: uppercase;
  padding: 3px 10px;
  margin-right: 5px;
  font-size: 15px;
  font-family: sans-serif;
  line-height: 1.4em;
  font-weight: bold;
  color: #EFF9FD;
  border-radius: 0px 2px 2px 0px;
}
.titleBox:before, .titleBox:after {
  left: 74px;
  top: 50%;
  border: solid transparent;
  content: &quot; &quot;;
  height: 0;
  width: 0;
  position: absolute;
  pointer-events: none;
}
.titleBox:before {
  border-color: rgba(245,0,0,0);
  border-left-color: #000000;
  border-width: 6px;
  margin-top: -5px;
}
.titleBox:after {
  border-color: rgba(245,0,0,0);
  border-left-color: #5F5F5F;
  border-width: 5px;
  margin-top: -4px;
}
.twitterBox {
  width: 77px;
  background: #00A8E8;
  height: 100%;
  padding: 4px 10px;
  border: 0;
}
.googlePlusBox {
  width: 57px;
  background: #E06352;
  height: 100%;
  padding: 4px 10px;
  border: 0;
}
.stumblupon {
  width: 75px;
  background: #5F5F5F;
  height: 100%;
  padding: 5px 10px 3px 10px;
  border: 0;
}
</style>
<script type='text/javascript'>
//Stumble Upon Script
(function (){var a=document.createElement("script");a.type="text/javascript";a.async=true;a.src="https://platform.stumbleupon.com/1/widgets.js";var b=document.getElementsByTagName("script")[0];b.parentNode.insertBefore(a, b)})();
// Twitter Script
window.twttr=(function(d,s,id){var js,fjs=d.getElementsByTagName(s)[0],t=window.twttr||{};if(d.getElementById(id))return t;js=d.createElement(s);js.id=id;js.src="https://platform.twitter.com/widgets.js";fjs.parentNode.insertBefore(js,fjs);t._e=[];t.ready=function(f){t._e.push(f);};return t;}(document,"script","twitter-wjs"));
</script>
<script src='http://connect.facebook.net/en_US/all.js#xfbml=1'/>
</b:if>

Did you complete the above steps? Let's move on to next step which is adding HTML part of social media share buttons below the post title.

Step 5) Now Search for this code line <div class='post-header-line-1'/>  and paste the HTML code just below it.

Note: You may find this code line appearing more than once (usually twice) so you have to paste the HTML code after its second appearance in your template code.

<b:if cond='data:blog.pageType == &quot;item&quot;'>
<div id='twistBloggerSocialbar'>
<div class='shareBox'><div class='titleBox'>SHARE</div></div>
  <div class='shareBox'> <div class='twitterBox'><a class='twitter-share-button' expr:data-text='data:post.title' data-via='TwistBlogger' expr:data-url='data:post.url' href='https://twitter.com/share'>Tweet</a></div></div>
<div class='shareBox'>
   <div class='fb-like' data-action='like' data-layout='button_count' data-share='false' data-show-faces='false' style='background: #4965B4; width:80px; height: 100%; padding: 4px 10px; border: 0;'/>
  </div>
<div class='shareBox'>
   <div class='googlePlusBox'><div class='g-plusone' data-size='medium' expr:data-href='data:post.url'/></div>
  </div>
 <div class='shareBox'>
   <div class='stumblupon'>
<su:badge expr:location='data:post.url' layout='1'/>
  </div>
  </div>
 </div>
</b:if>

Important: Change the highlighted text TwistBlogger with your Twitter username. It will be added to your tweets in the end and you'll be able to trace your tweets easily about who shared them.

Ok so now we are done with it. Save your template code and visit any 1 of your blog posts to see the cute social media share buttons appearing just below the post title. :)

So did it work for you? It should work if you haven't skipped any one of the steps I mentioned above. I am always free to help you BDW :) so you can ask me in the comment box if you need my help.

Making Social Media Share Buttons Responsive - Optional

So you want to make these social media share buttons screen responsive? Well, it depends on your template code and your @media screen queries you have used in your template code (in case you're using a responsive template) so I can not make these buttons responsive according to My template code for You but I can give you an example so that you can work around to make them responsive according to your template.

I have made these buttons responsive for my blog and this code may not work for you perfectly the way you want, but It will give you a head start to make them work for you. Below is the responsive code I have made for my template where I disabled StumbleUpon Button, Share Title Text and Decreased the margin and padding of buttons accordingly.

@media only screen and (max-width: 979px) and (min-width: 768px) {  .shareBox {
    margin-right: 1px; }   /*---- Decreased the margin to 1px from 10px  ----*/
}
@media only screen and (max-width: 767px) and (min-width: 480px) { .titleBox {
display: none;  /*---- Disabled The Share Text From Displaying ----*/
  }
  .shareBox {
    margin-right: 8px; /*---- Decreased the margin to 8px from 10px   ----*/
  }
}
@media only screen and (max-width: 479px) {  .titleBox {
    display: none;   /*---- Disabled The Share Text From Displaying ----*/
  }
  .shareBox {
    margin-right: 1px; /*---- Decreased the margin to 1px from 10px  ----*/
  }
  .stumblupon {
    display: none;   /*---- Disabled Stumble Upon Button ----*/
  }
  .twitterBox {
    padding: 4px 8px;  /*---- Decreased the padding  ----*/
  }
  .googlePlusBox {
    padding: 4px 5px; /*---- Decreased the padding  ----*/
  }
}

Note: You have to add the responsive CSS code with the CSS code given above.

Did you get it? Have some questions? Feel free to ask for help and I'll do my job. I hope you liked these social media share buttons for blogger and added successfully to your blogger blog.

Recommended:- Add Floating Social Media Share Buttons Bar to Blogger

Did you like this post? Please do share and show me that you care. :) Stay blessed, peace upon all.