Showing posts with label Webmaster Tools. Show all posts

How To Forward Gmail Emails To Any Other Email Account

Forward All Gmail Emails To Another Email Account
This tutorial is all about forwarding our emails from one Gmail account to another email account. There may be so many reasons behind doing so as hiding your main email address from spammers etc and that's a complete different story so coming back to our topic.

We can easily transfer/forward our emails from Gmail to any other single or multiple email accounts within a span of few clicks. The whole process takes no more than 5 minutes and voila, you can simply forget about missing any email or opening multiple email accounts each time. It saves hell lot of time, no? :)


Steps To Forward Gmail Emails To Another Email Account

Just follow these easy steps given below [Note: I am using "basic HTML view" of Gmail rather than "Standard view" as it loads faster].

Step 1) Be Logged into your Gmail account if not already then click on the Settings link on the top left the side.

Step 2) After that you will be headed over to the Settings Area where you can do a lot more than email forwarding alone. This time you will see General settings so click on Forwarding and POP/IMAP link on the left side.

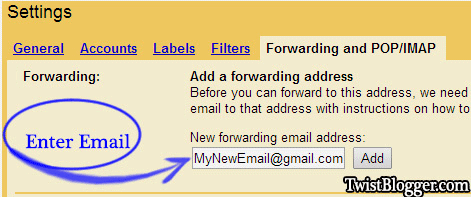
Step 3) Enter your new Email address where you want all your emails to be forwarded and click on Add button.

Gmail Forwarding


Step 4) After that you will be asked to enter the CODE which has been sent to your Email address to verify  it so add it there and click on verify button as you can see in the screenshot below. This step is to verify that you own this email account and no mistake has been made. In any case, the rare one although, you do not receive any verification email from google then just click on Resend Email button and this time you will definitely receive the verification email.

Enter Code To Verify Email


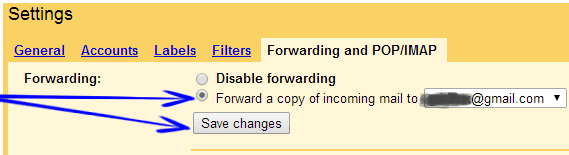
Step 5) Almost done! This time you will see a new option which will let you choose the email accounts you have verified to use for forwarding. Select your email from the drop down list and click on save button.

Select Forwarding Email And Save

You can add more than one email account and the process is same as above. This is really simple and useful feature of gmail which lets us forward our emails to a new email address. If I missed something or did not explain thoroughly then let me know.

Did I use It Myself?

Yes of course, I am using it for more than a year and the half and I never missed any email but it takes little more time to reach in our inbox after it is received in older email account. However, the emails which are caught up in spam folders would not be forwarded. I am happy with this service and I log back in my old accounts on free time to check if any important emails are caught up in spam. Any other question remaining would be answered in comments as soon as time allows. See you in comments :) and also let me know if you're using it or not.

How To Backup All Blogger Blogs in One Go - Google Takeout

How To Backup Blogger Blog Via Google Takeout
Creating a backup of your one blogger blog is a easy task to do from your blogger dashboard but if you are managing more than one blog on blogger platform then this process might take you several minutes to create backup of your all blogs one by one manually. But by using Google Takeout service you can create the backup of your all blogs with one click and download the archive on your desktop instantly or else you can download the backup later as it would not get deleted once it is created. So isn't it useful? For free? :)

Why Should You Create Backup Of Your Blog?

Why? Even I would say you that you should make a regular habit of doing this. The main reason for doing this is that you are blogging on "Blogger" platform where you have no control on your blog hosting as it is provided to you for free. Who knows when your blog might come under "not comply" with blogger's "TOS" and voila, your blog got deleted without any prior notice. Can you feel the pain? Suppose you logged in to create a new post and found that there is no existence of your blog like it was never been there ever before. So? Would you get it back anyhow? The answer is BIG NO! No matter how hard you try to convince them in forums. It happened with me before. Although, I was just playing around blogger to learn HML/CSS and blogging life then :) so it did not hurt me that much. When you have a backup of your blog, you can simply upload your blog to another blogging platform like as WordPress.

How To Backup All Blogger Blogs Using Google Takeout

Step 1): Login to your blogger account then follow this link to Google Takeout!
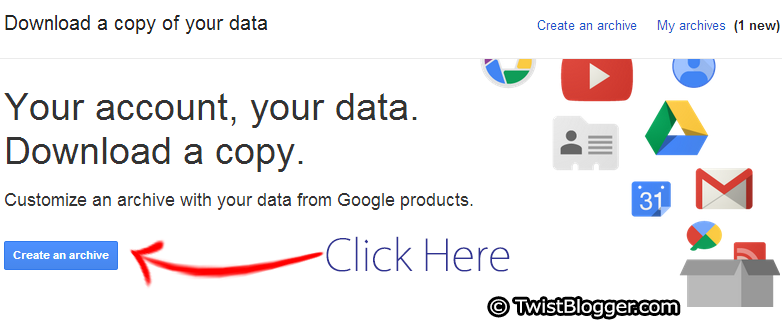
Step 2): Let the page load then click on blue color Create Archive button.

Click On Creat An Archive

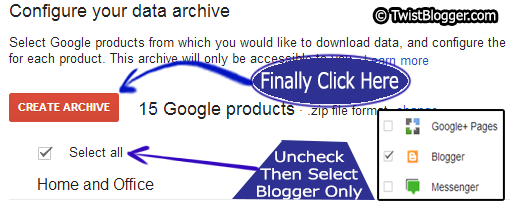
Step 3): Now you can see the huge list of Google services for creating the backup of them all but we are going to create the backup of our blogs only. By default all the services would be selected so click on "Select all" check box to uncheck all, then scroll down and select "Blogger" only, then click on red color Create Archive button on top.

Uncheck all then select blogger only

Step 4): Download the backup to your desktop once it is created. Before letting you download, Google may ask you to re-enter your password so do as it says then your downloading will start. It will be in a ZIP file format so to open these files, you can use any free tool like WinRAR or 7Zip. Search on google for it to download and install.

Click on Download Backup

Congrats buddy, finally you have created the backup of your all blogs successfully! Note that if you do not download the backup, it will not be deleted and you can still download it later at convenience. You can find all your backups data file archives under "My Archives" link on the top left side on Google Takeout dashboard. Do not wait and do it right now. Even you should do it once in a week if you are on Blogger Platform.

Did this post help you? Kindly do share buddy as sharing is caring :). You may also join other readers by subscribing to our blog via email. Did you experience any problem? Let me know in comments. I am always there to help you on demand.

How To Add Google Analytics On Blogger Blog

Google Analytics or GA, in short, is a free (basic) service by Google for webmasters for detailed tracking of traffic to one's website/blog. It is also available in premium, but we do not need it as basic service, which is free, shows us everything we need to know. It shows us a number of useful stats which are crucial to succeed in our online business. Beside the number of pageviews, unique visitors or bounce rate, it also shows the keywords data, page load time, from where visitor landed, which browser they used, what error they encountered, real-time reporting, event tracking, campaign tracking, flow visualization and much more. Do you have any reason not to use Google Analytics on your blogger blog? Every other individual blogger or big companies use Google Analytics on their web pages so that they can do better in their market and provide maximum user-friendly experience to their visitors.

Steps To Add Google Analytics On Blogger Blog

1) Setting Up your account with Google Analytics!

  • Go to Google Analytics Page and click on Sign in Link (Top Left Side). Your existing Gmail account to sign into Google analytics account.
  • After Sign in, click on Sign Up button (in left side corner) to begin with setup process of your account.
  • Now you will have to fill up the necessary data required to set up your account like as; Account Name, Website Name, Website URL, Category, Time Zone etc. (see image below). Fill up all the required data and proceed.
Provide Details To Setup Your Google Analytics Account

  • After that scroll down to the end of the page and click on the blue button "Create Account", then a pop dialog box of  "Terms and Conditions" will appear. Accept their terms and conditions to proceed with the account setup.
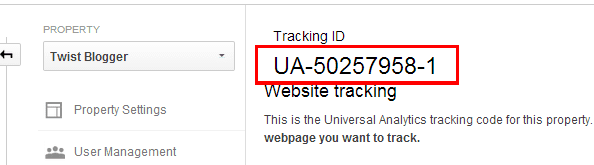
  • As soon as you will accept the terms and conditions, you will be redirected to the page where you will get the Tracking id starts with UA and a JavaScript code. We need the tracking id only because blogger has its own feature which allow us enter our ID. Avoid JavaScript code.
Copy Your Google Analytics Tracking ID

2) Adding Google Analytics To Your Blogger Blog

This process is of just two steps. First we need to add the Tracking Id we have recently copied and secondly we need to add the code to our template but instead of adding the JavaScript code, we will add a <include> Tag which will do the magic of importing Google Analytics Code into our template  automatically on every page of our blog.
  • Go to Blogger → Settings → Other and then scroll down to the end.
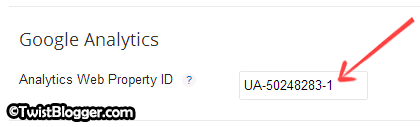
  • You will see there is an option to add our UA id in "Analytics Web Property ID" box so paste your UA tracking id you had copied from Google Analytics account (See image below). Then save these settings and move on to next step.
Add Google Analytics Tracking ID to Blogger

  • Now go to Template → Edit HTML then wait to load the template code box.
  • Click anywhere inside the template code box, press Ctrl+F or Cmd+F so that a search box will appear.
  • Enter </body> code line to search box and hit enter. 
  • If you found that ending </body> tag in your template code, then just before this </body> tag line, paste this little code line <b:include name='google-analytics' data='blog'/>
  • Now save your template code because we are done with the installation process.

Easy Enough?

Everything is setup by now, but it might take few hours for Google Analytics to show the data in your account so do not worry about that, just simply give it at least 24 hours of time. Next day login back and check the stats and start playing around :). You can also link your Google webmasters account and Google Adsense account with your Google Analytics account so that you can get the more out of it. You can do much more with your Analytics account so just keep exploring its new features to learn more and get the more detailed analysis of your blog traffic, keywords etc. In case you face any problem in installing then just ask in the comment below. I will get back to help you. Always there :)

7 Best Tools For Bloggers To Correct Grammatical Mistakes

Best Tools For Bloggers To Correct Grammatical Mistakes
Grammar errors are common issues while writing a long article because when we sit down to write, we don't look at mistakes and continue writing until finish. Then when we get the article written, we don't go for proofreading thoroughly because this is the process we don't love to do :) So how do you manage to get your articles grammar errors free? Even if you are a native English speaker, does not guarantee 100% accuracy every time. And the process becomes more tedious for those all having to write in English as their 2nd language. Well, we have the right tools for you to get over this problem for free.

List of Best Tools For Bloggers To Correct Grammatical Mistakes Free

These tools listed above shall make you feel like having an English Teacher sitting right next to you, helping you for free.

[Note: You can not expect 100% Accuracy From These Tools As They Are Automated Software Available For Free. They Are Good For Vocabulary Mistakes and Finding Synonyms.]

1) Grammarly

This is the only tool I use personally for correcting my articles on the fly. I have its chrome extension installed and its works anywhere on the web. Whether I am writing an article, posting a tweet, facebook status or leaving a comment on other blogs, it works like a life saver.
It has the pro version of it too so you can have the total control of over 250 grammar mistakes you can possibly make. This one is highly recommended.

2) GingerSoftware

Ginger Software is very much flexible when it comes to using it. You can use it with MS office, Wordpad, Notepad, Browsers or even in "Blogger Post Editor" too. You need to download it to you desktop and then install. Installation may take few minutes as it will download the stuff and install the extensions to your browsers so that it can work in your browsers too. It is totally free. We recommend you to download this software if your English is very weak as it will help you to improve your English a lot.

3) PolishMywriting

This is a very nice, user-friendly and professionally designed tool. The best part is, "This Is Completely Free". Simply copy paste your article inside Text Box and hit "Check writing" button. All the grammatical mistakes will get highlighted in few seconds. Click on highlighted texts to see the suggestions to correct or ignore.

4) SpellChecker

One of my favorite tools because it gives us truckloads of suggestions to correct our mistakes. Just paste your text inside text box, click on Spell Check button then a pop-up dialog box will appear so wait for few seconds to load then start correcting your grammatical mistakes for free and wait, did i mention that it has 125+ languages to choose and work with? It is simply an awesome tool.

5) GrammarBase

Another high quality of free grammar check tool available online. Simply copy paste your text, click on Start Checking and within few seconds it will highlight for the errors. Click on highlighted text to see the suggestion and apply or ignore it.

6) PaperRater

PaperRater Grammar check does its job beautifully. Scan your text online for grammar errors, proofreading & spelling check. This tool is suitable for scanning long articles, essays, text documents etc and the same time you get improvement suggestion too.

7) Proofreadbot

Proofreadbot is free for 1 proofreading per week (limited to 600 words) and for unlimited use, you can go to the premium. In its premium features (Purchase a package), it includes many other tools like as Plagiarism Checker Tool, Style, Grammar Check etc. You can get 25 free Proofread credits if you share it on your Facebook with friends! 

Another Addition:

8) Blogger Post Editor

You may have tried it because it is inside your Blogger Post editor. It checks for the spell mistakes only. You can find this on the right side of post editor toolbar named "ABC".

Why Should You Use A Tool For Grammatical Mistakes?

Whether you are a Blogger or Freelance writer, you will have to take it seriously that your articles do not include most common grammatical mistakes because it affects you in a number of ways:
  • 1) Authority: If you are a blogger then it is crucial for you to write grammar error free article because your readers will notice the most common grammar errors you are making. They will not become your readers and next time when they will see your blog link in search results, they will not click it.
  • 2) Rankings: Search engines will notice the grammar errors in your articles while crawling and ultimately your rankings will go down. Your articles will get indexed but never appear in SERPs even on the 2nd page. So it is important from SEO point of view
  • 3) Advertisements: Why do you blog? To make money along with sharing useful stuff? Then who will opt your blog for advertisements? It will be very difficult to get approved for major ad programs like as Adsense, Infolinks, BuySellads or Individuals.
So this is why you need to take care of it every time before publishing your articles. We hope this article was useful and you got what you were looking for. Now take a minute and show your love by Liking, sharing and subscribing us :) Thank you, Take care and Happy Blogging Pals!!

Top 5 Free SEO Testing Tools

Top 5 SEO Testing Tools
SEO is acronym for Search Engine Optimization which means optimization of webpages in a way to affect the visibility of these webpages in search engines in response to a search query. If you do it in Good way, it will reward the webpages with higher rankings, improved CTR and free visitors from organic search results. If you do not follow the SEO techniques or Good SEO practices, you are stepping back from your competition because your website will receive several penalties from Google algorithm updates and all other major search engines. Here we are going to provide you 5 free seo testing tools to check your blog's or website's on page SEO. By testing your website's SEO with the tools given below, you will get to know the overall score, errors and suggestions for improvements.

1) WooRank

WooRank is free to generate 1 report weekly. It does the premium job for free. However, if you need some more detailed in-depth analysis of your website then you can signup for premium services starting at 49$ per month. We don't think you need to signup because the free report includes a comprehensive data as you can see in the image below we have checked our blog with it. On right side, you will see the overall score and on left side you will see the points of review woorank has completed analysis of. Scroll down to see the details of the report with improvement suggestions to follow.

WooRank

2) Pingdom

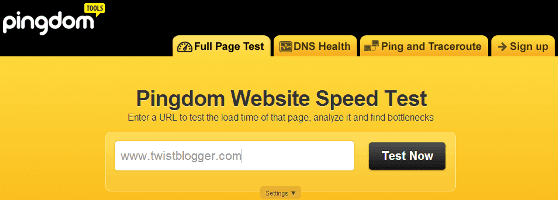
Pingdom website speed test tool is available free to check the speed of your website. You can also sign up free to receive the alerts if anytime your websites goes down. Pingdom checks the servers from different places around the world. With pingdom speed test tool, you will get plenty of information like as load time, CSS, JavaScripts, images, tips on how to improve the speed of your website, testing from different locations around the world with real browsers to know how fast it loads on different locations and share your results with friends.

Pingdom

3) SEObin

SEO Bin is free tool to optimize the Title and Description tags of your website in a better way. Watch the video tutorial to know how to use this free tool.


4) WebPageTest

WebPage Test is another amazing free tool to test the speed of your website from different locations around the globe with different browsers. In your report you will get the whole information of load time with waterfall charts, speed optimization checks and suggestions for improvements.

WebPageTest


5) Virante SEO Tools

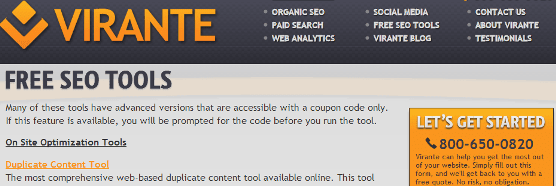
On Virante SEO Tools page, you will find a huge list of SEO tools which were not available for public before but now they are available to use publicly. However, use of some advanced tools require coupon code.

Virante SEO Tools

Conclusion: These tools provided above are free to use and every tool gives us comprehensive and useful report regarding SEO of our website. By using these tools, we get to know what we are missing and how can we improve. These free tools not only provide us the detailed in-depth review but also provide the suggestions to improve. The best things online are free :) If you know some more free tools then please recommend them in comments.

Top 5 Best Free Plagiarism Checker Tools

5 Best Free Plagiarism Checker Tools
Checking our content for Plagiarism is the need of every blogger today. So many content thieves are increasing rapidly (mostly newbies) which are shamelessly copying the copyrighted material of real blog writers and getting higher rankings in search engines which are a matter of serious concern for every blogger. Here we are going to give you a list of top 5 best free plagiarism checker tools available online to scan the web for duplicate content of your original content to help you find those stealers.

Why should I Check For Plagiarism?

That could be the most idiotic question but let we answers it briefly. If anyone else is copying your content and using it on their blog or website then your blog or website will have duplicate content because same content is available on 2 different sites and search engines would not fall in love with it so simply your website or blog will receive one or more Google animal penalty. When visitors will notice that the same content of your blog is available elsewhere they will lose faith and you will have to lose your loyal readers too. Next time in search results, visitors will give importance to others sites then your's.

1) CopyScape Plagiarism Checker Tool (visit)

CopyScape plagiarism checker tool is available to use free of limited features because it also offers the premium version which really worth the money. Mostly you need not to go and subscribe for premium version, simply go to the tool and enter your blog URL or blog post URL you want to check. It works like as search engine and displays the results of the web pages having same content if matches as the case may be.

2) Plagium Plagiarism Checker Tool (visit)

Plagium is really well worth the time and offers the different ways to check the content. Here on Plagium you will find mainly three options of checking for duplicate content, "Via Check Text, Via Check URL and Via Check File" so you can simply copy the text to the text box where the limit is 25000 characters or Check by entering the URL of your published content or finally by uploading a doc or text file.

3) PlagSpotter Plagiarism Checker Tool (visit)

Plagspotter is another good one but it does not allow us to check the whole blog or website and instead we have to go entering URLs one by one to check them for Plagiarism. But if you will sign up for a free 7 days trial, you can check for a batch of URLs in one go.

4) Duplichecker Plagiarism Checker Tool (visit)

Duplichecker is another best ever free Plagiarism checker tool which allow us to check our content by copying the text to their text box or simply uploading the doc or text file. The maximum words limit is 1500 words. Duplichecker does not allow us to check via URL.

5) Manual Search

Lastly you can search manually on search engines by entering some lines of your content in the search box then check the results if anything matches or not. This is the last method for checking the duplicate content.

How To Deal With It?

So finally if you have discovered that someone else has copied your content without your permission then now you have to fight for taking this down. Usually, what will you do? I guess you will try to contact them via their contact us page if it exists? But believe me it works only in less than 5% cases because they simply do not reply and ignore our messages or emails. Then you have to fight with them for your right and best options are filing a DMCA report on DMCA.org, Contacting with the hosting provider of the website/blog or reporting to Google DMCA. DMCA.org charge 10$ per month and it offers only 1 take down the request for free after implementing their banner in our site. Contacting with the hosting provider of that site will solve the problem mostly but the challenge is to know Who is the hosting provider because in some cases these people use some premium services to hide their hosting provider. So lastly Google has its own DMCA complaint procedure where you can submit the URL Removal Request. That is a long tutorial and we will cover it thoroughly in the upcoming post.

Do You Use More Plagiarism Checker Tools? Best, Easy and Free?
Then add in comments and help each other. Till then stay safe and enjoy.

How to Get Google To Index Your New Website & Blog Quickly

Webmaster Tools Kit
Does Google not index your website/blog or articles as fast as you publish them? Is your blog or website new? Do you think that the articles you published are not being indexed even after hours or days of their publication? Then there is another way to get your blog articles or website indexed within seconds of you publish them. Actually this is the power to each and every blogger or website owner given by Google via Webmasters Tools. You may be using these tools already but did you know you can use these tools too index your new website/blog or articles within seconds of using it? So this is what we are going to know step by step with examples.

Login To Webmasters Tools

To use the webmasters tools you need to login to your webmasters tools account with your gmail account. If you are loged in to your Gmail account, you will automatically be logged in. Now if you are using blogger.com platform then you will see your blog already listed but in case there is no blog listed, just click on Add A Site red color button on left side then a dialog box will appear where you need to add the URL of your blog or website for example: www.twistblogger.com (do not use http:// and www is must). In case you are using a Subdomain like as example.blogspot.com or example.weebly.com then you need to enter your subdomain name without www as it is. Incase you are not using Blogger.com blogging platform, you need to verify the ownership of your domain so open the Verify Ownership section then you will see too methods of verifying (Recommended and Alternate) but we suggest you to use the Alternate method and in alternate method select the second option of HTML tag  to verify in which you will get a Meta Tag to insert in HTML of your website/blog. Copy the Meta Tag code and paste it after the <head> section in the HTML of the blog/website and after that click on red Verify Now button and you will see a congratulation message saying that your site is verified and added. That is it now you are ready to use the magical features of Google webmasters Tools.

Click on Your Added Site

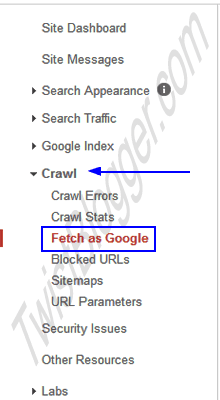
After Adding your site successfully it will appear in homepage so click on it to use the inside features. After that on left side you will see a number of useful links and one of them is Crawl. Click on it to expand it then click on the Fetch as Google link. See the image to understand in a better way.
Webmaster Tools Links

Enter Your Site URL and Click on Fetch Button

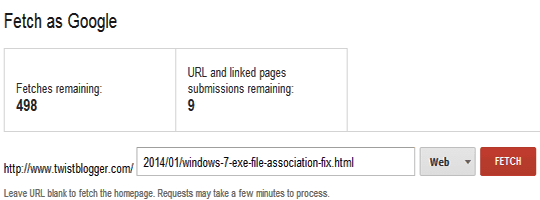
After clicking on Fetch as Google link you will get option of entering the URL of your site to fetch as Google. If your site is new and not indexed then you need not to enter any URL just click on Fetch button but if your site is indexed but you want to get your new article/web page indexed then enter the URL of that page.
Please Note:- You have to enter the URL starts after http://www.yourdomain.com/ and not the full URL because your main Domain URL is already entered which is fixed up to http://www.yourdomain.com/ see the image below.
Enter URL to Fetch

Now Click On Submit To Index

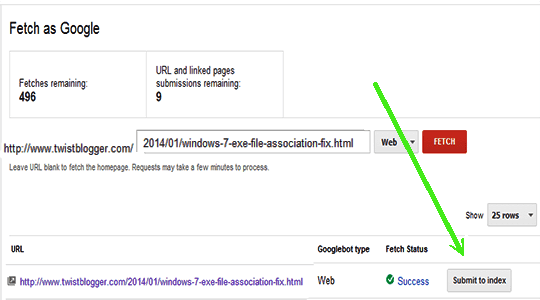
After Clicking on Fetch button, you will get the Fetched URL listed below with URL's fetch status. It the URL you entered is correct and found Fetch status will display ✓success otherwise Link not found. If everything is ok then in front of fetch status you will see a link button "Submi to index"  just click it then a dialog Box will appear to choose URL type to index. If it is homepage then select second option and if it is the article or any other webpage then select second option.
Click Submit Button

Check The Indexed URL in Google

So finally you have successfully submitted the URL and it is real time indexed. But how would you believe whether it is indexed or not? just copy the whole URL you submitted to index in Google search box (including http://www) and see live. You will see the time stamp like as 2 minutes ago, 20 seconds ago as the case may be. See image below.
Check Index Status In Google

Conclusion:- This is the fastest way to get your new articles, blog, webpages or new websites indexed by Google quickly. This way you can do it manually if Google does not do it. It usually takes less then two minutes and results you know, are Great. We hope this way we helped you but if anything goes wrong or does not work please let us know in comments and also share your views or experience with Google Webmaster Tools. Thank You.