Stylish Popular Posts Widget With Counter Box For Blogger

Yeah! I am PopularPopular posts widget is used to showcase those golden posts which are performing well and getting more page views everyday compared to others posts on your blog. So to show users which posts are most popular on your blog this week or month or all in all time history, popular posts widget comes handy. There are a lot of widgets out there shared by people all over the internet and therefore I am sharing mine to which I am using on this blog. However, I am offering this stylish popular posts widget with counter box and thumbnails feature in two different styles and choice is yours :)

Features of Stylish Popular Posts Widget With Counter Box For Blogger:

✔ It shows post thumbnails along with post titles.
✔ Beautiful image zooming effect on mouse hover.
✔ Post titles are shown on the images with transparent dark color.
✔ Beautiful Counter Box on top left side of the images.
✔ No Blurry Images, you can re-size the thumbnails without losing the quality as compared to default blogger post thumbnails which are generated in 72x72 pixels in size.
✔ Available in two different styles.
✔ Easy customization of colors, width, height.
✔ And its free :) See the screenshot of two different styles below.

Popular Posts Widget With Counter Box and Thumbnails in Two Styles


See Live Demo 1 - Live Demo 2 is On This Blog Itself

Add Popular Posts Widget To Your Blogger Template

Note: You may have already installed other popular posts widget and if this is the case, you need to remove the CSS code of those previously installed popular widgets to your sidebar. Otherwise you will screw it all.

This popular posts widget has two styles so I am going to break them down one by one. However, the JavaScript code will be same for both designs so you need to install it once only.

Add JavaScript Code First

Do not worry about this JavaScript code because this widget works without JavaScript code too. But the thumbnails quality will be only 72x72 pixels without using it. So to replace the default thumbnail size with our own desired size, we need to use this little piece of JavaScript code.

Step 1) Login back to your blogger account > Select your blog > Template > Edit HTML
Step 2) Save a backup of your blog template code first, now click inside the template code box.
Step 3) Find out this ending </body> tag and just before this, paste the JavaScript code given below

<script src='http://ajax.googleapis.com/ajax/libs/jquery/1.7.1/jquery.min.js' type='text/javascript'/>
<script type='text/javascript'>//<![CDATA[
$(document).ready(function() {
  var tbn = 150;
  $('#PopularPosts1').find('img').each(function(n, image){
    var image = $(image);
    image.attr({src : image.attr('src').replace(/s\B\d{2,4}/,'s' + tbn)});
    image.attr('width',tbn);
    image.attr('height',tbn);
  });
});
//]]></script>

Customizing Thumbnail size: If you need bigger thumbnail size, just change the value highlighted in yellow color which is 150. It means our thumbnail size will be 150x150 pixels. Now we are done with JavaScript code so lets move on to adding CSS style one by one. Choose one you liked either Demo 1 or Demo 2.

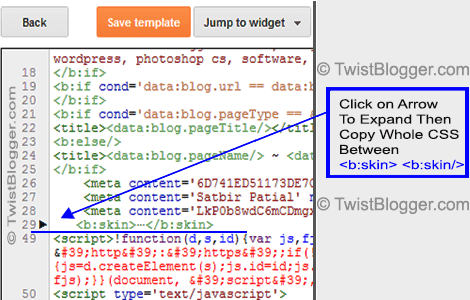
Step 4) Find this little piece of code ]]></b:skin> and just before this code line, paste the CSS code given below (Choose one only ie. Demo 1 CSS code or Demo 2)

Popular Posts Widget Demo 1 Style CSS Code

/***** Sidebar Popular Posts - Style 1 *****/
.sidebar .popular-posts ul {
  counter-reset: popcount;
  margin: 0;
  padding: 0;
  }
.sidebar .popular-posts ul li:first-child {}
.sidebar .popular-posts ul li {
  font-family:'Oswald','Open Sans','Helvetica Neue',Arial,Tahoma,sans-serif;
  height: 130px;
  list-style: none !important;
  overflow: hidden;
  padding: 0 !important;
  position: relative;
  margin: 2px;
  border: 0;
  width: 48%;
  float: left;
  }
.sidebar .PopularPosts .item-thumbnail {margin: 0; width: 100%;}
.sidebar .PopularPosts ul li img {
  display: block;
  float: left;
  padding: 0;
  width: 100%;
  height: 130px;
  -webkit-transition-duration: 1.0s; /*Webkit: Animation duration*/
  -moz-transition-duration: 1.0s; /*Mozilla Animation duration*/
  -o-transition-duration: 1.0s; /*Opera Animation duration*/
  transition:1.0s;
  }
.sidebar .PopularPosts ul li img:hover {
  -webkit-transform:scale(1.06); /*Webkit: 0.5 times the original Image size*/
  -moz-transform:scale(1.06); /*Mozilla 0.5 times the original Image size*/
  -o-transform:scale(1.06); /*Opera 0.5 times the original Image size*/
  transform:scale(1.06);
  overflow: hidden;
  }
.sidebar .PopularPosts .item-title {
  bottom:0;
  left: 0;
  right: 0;
  padding-bottom: 0;
  position: absolute;
  z-index: 999;
 }
.sidebar .PopularPosts .item-title a {
  background: rgba(32, 32, 32, 0.77);
  color: #FFFFFF;
  display: block;
  font-size: 12px;
  line-height: normal;
  padding: 5px 0px 2px 5px;
  text-transform: capitalize;
  transition: all .4s ease-in-out;
  }
.sidebar .popular-posts ul li:hover .item-title a {
  color: rgba(255, 255, 255, 1);
  background: rgba(231, 76, 60, 0.88);
  text-decoration: none;
  }
.sidebar .popular-posts ul li:before {
  background: rgba(255, 252, 8, 1);
  color: #000;
  content: counter(popcount, decimal);
  counter-increment: popcount;
  float: left;
  font-size: 14px;
  line-height: 20px;
  list-style-type: none;
  padding: 0px 8px 1px 1px;
  border-radius: 0px 0px 10px 0px;
  position: absolute;
  top: 0;
  z-index: 4;
  border: solid #FFF;
  border-width: 0px 2px 2px 0px;
  }

Popular Posts Widget Demo 2 Style CSS Code

/***** Sidebar Popular Posts *****/
.sidebar .popular-posts ul {
  counter-reset: popcount;
  margin: 0;
  padding: 0;
  }
.sidebar .popular-posts ul li:first-child {}
.sidebar .popular-posts ul li {
  font-family: "Oswald",sans-serif;
  height: 130px;
  font-weight: bold;
  list-style: none !important;
  overflow: hidden;
  padding: 0px !important;
  position: relative;
  margin: 2px;
  border: 0;
  width: 100%;
  float: left;
}
.sidebar .PopularPosts .item-thumbnail {margin: 0; width: 100%;}
.sidebar .PopularPosts ul li img {
  display: block;
  float: left;
  padding: 0;
  width: 100%;
  height: 130px;
  -webkit-transition-duration: 1.0s; /*Webkit: Animation duration*/
  -moz-transition-duration: 1.0s; /*Mozilla Animation duration*/
  -o-transition-duration: 1.0s; /*Opera Animation duration*/
  transition:1.0s;
  }
.sidebar .PopularPosts ul li img:hover {
  -webkit-transform:scale(1.06); /*Webkit: 0.5 times the original Image size*/
  -moz-transform:scale(1.06); /*Mozilla 0.5 times the original Image size*/
  -o-transform:scale(1.06); /*Opera 0.5 times the original Image size*/
  transform:scale(1.06);
  overflow: hidden;
  }
.sidebar .PopularPosts .item-title {
  bottom:0;
  left: 0;
  right: 0;
  padding-bottom: 0;
  position: absolute;
  z-index: 999;
 }
.sidebar .PopularPosts .item-title a {
  background: rgba(32, 32, 32, 0.77);
  color: #FFFFFF;
  display: block;
  font-size: 16px;
  font-weight: bold;
  line-height: normal;
  font-family: "Oswald",sans-serif;
  padding: 10px 0px 5px 10px;
  text-transform: capitalize;
  transition: all .4s ease-in-out;
}
.sidebar .popular-posts ul li:hover .item-title a {
  color: rgba(255, 255, 255, 1);
  background: rgba(231, 76, 60, 0.88);
  text-decoration: none;
  }
.sidebar .popular-posts ul li:before {
  background: rgba(255, 252, 8, 1);
  color: #000;
  content: counter(popcount, decimal);
  counter-increment: popcount;
  float: left;
  font-size: 14px;
  line-height: 20px;
  list-style-type: none;
  padding: 0px 8px 1px 1px;
  border-radius: 0px 0px 10px 0px;
  position: absolute;
  top: 0;
  z-index: 4;
  border: solid #FFF;
  border-width: 0px 2px 2px 0px;
  }

Now save your template code and see if your popular posts widget with thumbnails is working or not. It must be working.

Change Settings of You Popular Posts Widget Form Layout Area

Now when everything is done, only one major step is remaining which is changing the settings of your popular posts widget because without changing these settings, it will definitely not work the way it is supposed to be working. Follow the settings as show exactly in the image below and save these settings.

Popular Posts Widget Settings

Troubleshooting Popular Posts Widget On Sidebar is Not Working

There may be the case that after following all the steps accordingly, your popular posts widget did not work and is showing in its default settings. This is because of the use of different CSS class for sidebar on your template. In our case above, I used .sidebar because this the class I have used in my template for sidebar wrapper. Your template may be using different so you just need to figure it out and just change the .sidebar class appearance in the above CSS code with your blogs sidebar CSS class or id.

For Example: .sidebar .PopularPosts { will be .sidebar-wrapper .PopularPosts { or #sidebar .PopularPosts {

I hope you got the idea and you will find it out or else just share your blog URL in the comment box and I'll check it manually. Stay blessed.

Top 5 Must Do SEO Things Before Publishing Your Articles

5 Must Do SEO Things Before Publishing Your Articles
Today Search Engine Optimization is the life of every blog or website and there are thousands of articles written on this topic alone. SEO techniques are changing by the time as search engines have become more intelligent by their algorithm updates overtime. Apart from other SEO things we try to do, there are some basic, simple, effective and must do SEO things which did not change by the time. Performing these tasks is not compulsory for anyone to get the articles ranked in search engines but compulsory to get the higher rankings with increased Click Through Rate from Search Engine Result Pages (SERPs). Only ranking in the first page of Big G will not get you high volume of traffic because it depends solely on the title and description of your article/page which increases the CTR. If it does not entice the reader enough, he is not going to click. So you need to take care of these things listed below.

1) Optimized Eye Catchy Title

Title of a post plays the most important role in SERPs and generates the CTR (Click Through Rate). It doesn't matter that your article got ranked in first page of Google SERPs if it does not attract visitors and make them click. Believe me, it happens and the pages ranked below/above which are having the eye catchy post title reap the juice even if you have written so good in-depth and informative article, it is not shown in the search results, it is only the title and description what matters. There will always be 9 other results on Google's first page along with your article so what makes your article different than others' and drive loads of traffic is the Title of The Article. So next time while crafting titles, think more than twice about it.

Let me give you an example of two results on Google SERPs for a search query "Horizontal Subscription Box":
1) "Horizontal Subscription Box Widget For Blogger"

Above between these two results, which one seems to be eye catchy? Of-course 1st result is tend to generate more clicks as it sounds more delicious because of "Stylish". Always keep in mind while you have to craft the title of your article that you need to keep title short, keywords in title and not only set of keywords but overall an eye catchy title. See the image below.

Stylish Horizontal Subscription Box

2) URL Optimization

URL can be and must be optimized as search engines pay attention to URLs, mostly Google. It is easy for the users of Blogger.com platform because of blogger's Permalink feature. It was introduced in 2012 but only a few bloggers use this feature because they don't know what it is meant to be or why to edit URL yourself when blogger does it automatically and they don't give it a single try. Blogger's Permalink feature is to edit the post's URL. When you enter the title of a new post, blogger automatically generates the post URL but it may not include the main keywords of your post because there are only first 30 characters picked from the title so better way is to edit the Permalink manually (can be found on right side in blogger post editor under the Post Settings) and make it simple, keywords optimized and as short as you can.


Blogger Will Generate The URL Automatically: http://www.example.com/2014/01/How-To-Use-FontAwesome-Icons.html

As you can see the the URL above generated by blogger automatically is missing some of our main keywords "Blogger Template" so the URL is not as relevant as the post title and we can make it relevant by editing in Permalink: http://www.example.com/2014/01/How-To-Use-FontAwesome-Icons-Blogger-Template.html

By editing the URL permalink above, I added "Blogger-Template" keyword which makes sense, is short and perfect according to the title of the post because this post tells about using Font Awesome icons in Blogger.

3) Your Blog Images Can Do More

Most of the bloggers whether newbies or pro, use images in the articles as they play important role in understanding what post is all about in one go and let your readers read your articles thoroughly because images also increase the interest, excitement and creativity. But there is another way by which the images of your blog can bring extra visitors to your blog and that is possible with image alt attribute. Daily thousands of search queries performed in Google to search images and Alt attribute helps Google to index your images and display in SERPs. So next time do not forget to use the alt attribute which is the short description of the image using alt tag as shown below:
example
<img alt="SEO Tips" src='http://www.example.com/images/SEO.png'/>
Use some keywords in alt tag so that Google will rank and display it accordingly.

4) Interlinking To Older Posts

Interlinking means to link back from a post to another older posts of your blog. This is most important task every blogger must practice as it has delicious benefits. When you write an article, it is possible that it contains the bunch of other keywords on which you have already written some articles so on the same time you have the opportunity to link back to those older posts from these words. When you do that on your blog, it helps search engines to crawl your blog thoroughly and it works like as a sitemap of your blog and it also helps the readers to read the most relevant posts they might be interested which overall lowers the bounce rate and rapidly increases the page views many times. So make a habit of doing it regularly and your blog will gain more user engagement and increase the trust in the eyes of search engines.

5) Grammar Checking

When we start writing an article, usually we don't review the most common grammar mistakes manually and instead we hit the Auto Grammar Check Option in blog editor but let me tell you that they do not review your sentences or right words and instead they check for spellings. So along with that option, never forget to review your article manually. Give it a fresh look and read thoroughly and loudly by which you will get to know what makes sense or not then edit it as you think fits best.  You can use synonyms of the words which are breaking the flow of your article. Writing is an art and it can be learnt by the time but you have to put efforts.

Conclusion: If you have never been to these things then you are advised to rethink and use the aforesaid 5 must do SEO things before publishing your articles.

What do you think about these 5 must do seo things? Do they worth in the list? Did I leave anything in our must do list? What are some other things from the SEO point of view?

Top 5 Free SEO Testing Tools

Top 5 SEO Testing Tools
SEO is acronym for Search Engine Optimization which means optimization of webpages in a way to affect the visibility of these webpages in search engines in response to a search query. If you do it in Good way, it will reward the webpages with higher rankings, improved CTR and free visitors from organic search results. If you do not follow the SEO techniques or Good SEO practices, you are stepping back from your competition because your website will receive several penalties from Google algorithm updates and all other major search engines. Here we are going to provide you 5 free seo testing tools to check your blog's or website's on page SEO. By testing your website's SEO with the tools given below, you will get to know the overall score, errors and suggestions for improvements.

1) WooRank

WooRank is free to generate 1 report weekly. It does the premium job for free. However, if you need some more detailed in-depth analysis of your website then you can signup for premium services starting at 49$ per month. We don't think you need to signup because the free report includes a comprehensive data as you can see in the image below we have checked our blog with it. On right side, you will see the overall score and on left side you will see the points of review woorank has completed analysis of. Scroll down to see the details of the report with improvement suggestions to follow.

WooRank

2) Pingdom

Pingdom website speed test tool is available free to check the speed of your website. You can also sign up free to receive the alerts if anytime your websites goes down. Pingdom checks the servers from different places around the world. With pingdom speed test tool, you will get plenty of information like as load time, CSS, JavaScripts, images, tips on how to improve the speed of your website, testing from different locations around the world with real browsers to know how fast it loads on different locations and share your results with friends.

Pingdom

3) SEObin

SEO Bin is free tool to optimize the Title and Description tags of your website in a better way. Watch the video tutorial to know how to use this free tool.


4) WebPageTest

WebPage Test is another amazing free tool to test the speed of your website from different locations around the globe with different browsers. In your report you will get the whole information of load time with waterfall charts, speed optimization checks and suggestions for improvements.

WebPageTest


5) Virante SEO Tools

On Virante SEO Tools page, you will find a huge list of SEO tools which were not available for public before but now they are available to use publicly. However, use of some advanced tools require coupon code.

Virante SEO Tools

Conclusion: These tools provided above are free to use and every tool gives us comprehensive and useful report regarding SEO of our website. By using these tools, we get to know what we are missing and how can we improve. These free tools not only provide us the detailed in-depth review but also provide the suggestions to improve. The best things online are free :) If you know some more free tools then please recommend them in comments.

How to Host CSS And JavaScript Files on Googe Drive For Blogger?

host files on google drive
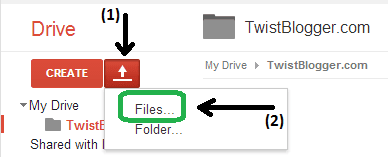
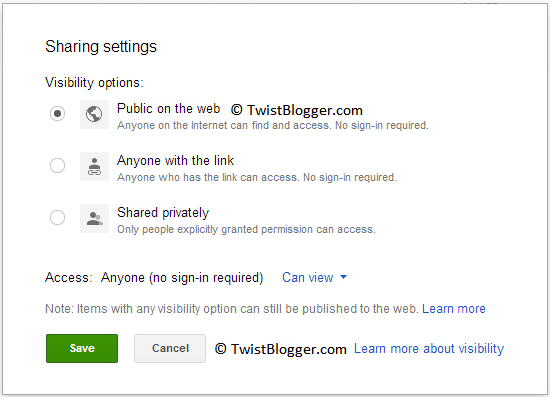
Blogger itself does not provide hosting of CSS and JavaScript files separately instead they are included in our template code which is a matter of concern for every blogger who knows how they have impact on our blog. We have many options to host our JavaScript and CSS files outside for blogger like as on Dropbox, Appbot, Google Apps, Googlecode or any other paid hosting provider.
But these all other places are having complex methods of uploading with one or other limitations. So luckily google has brought us the most awaited opportunity to host our any kind of files in one place called Google Drive.

Now we can use Google drive to host our CSS stylesheets or JavaScript code files to use them on blogger. Before when Google drive was launched, it allowed us 5 GB of free space to upload files but on May 13 2013, company announced 15 GB of free space which is beyond limit to host normal files in case you do not upload some Games :)

Why Should We Host Files On Google Drive?


More Space:- Currently Google Drive is offering 15 GB of free space which can be extended by upgrading your basic Google drive account to premium one.

Versatile:- You are not limited to upload only some specific documents and this time instead you are free to upload different kind of files whether text, movies, music, CSS, JavaScript or games etc.

Reliability:- Google Drive is a service of Google which is most reliable and gives you 100% up-time to access your files from anywhere in the world.

Reverse Changes:- This is one of the amazing features of Google drive which keeps track of every change you make after uploading files and gives you a clean way to reverse changes to back if anything goes wrong.

Share in Public or Make Files Private:- When you upload files to your Google Drive account, it gives you the option to make these files private, invite people to access the files or make them totally private.

Secured Files:- Ultimately you do not have to worry about the security of your files because your files are secured with 128-bit encryption and Google Drive uses Https connection.

Totally Free:- And yes, these all amazing features are for free so is there any one point not to use Google Drive free hosting to host our files?

Advantage of Hosting Css or JavaScript Files on Google Drive

As we mentioned earlier that we do not have any choice to host CSS files or JavaScript files in separate files or folders on Blogger and instead of this we have to use CSS and JavaScript codes in our template HTML. This way it makes our blog's loading speed very low and search engine crawlers can not crawl our blog smoothly. Load time of a blog plays very important role in SEO. When we will upload our all CSS and JavaScript codes outside on Google Drive, we will use only 2 links of CSS and JavaScript file in our Template below <head> section instead of using long codes of CSS and JavaScript inside all over the HTML. It will increase the load speed plus most copycats (Dumb Newbies) can not duplicate your template because CSS and JavaScript code is hidden. 

How To Host CSS or JavaScript On Google Drive

Copy The CSS Code
Go to Blogger → Template → Edit HTML → Click Any Where Inside Template code. Fist of all just make a backup of your template by copying whole template code to a notepad file. Now we will copy the whole CSS code from our blog template to host outside on Google drive. In your template, CSS code is written between <b:skin> CSS Code </b:skin> see image below how to find CSS in your template.

Click On Arrow To Expand CSS

Copy the whole css code to notepad and save as Style.css or Blogname.css (.css is file extention for CSS) to your desktop. See image below how to save with notepad:-

Save CSS in Notepad

Login to your Google Drive Account

First login to Google Drive account with your gmail account then Click on create button (can be found on left side) to create a separate folder for your blogger blog CSS and JavaScript files.

Create New Folder


Click On Upload Button → Select Files

We just created a new folder so now click on Upload Button and select Files... from drop down menu to upload files to this folder.

Click On Upload Files


Select CSS File We Saved Earlier

Now you will be prompted to select a file to upload so choose the CSS file from desktop we have saved earlier with name Style.css or Blogname.css then click open and it will start uploading.

Select CSS File From Desktop


Click on Share Button

Now when file is uploaded, you will see a share link on left side of the uploaded file. Click share link then a dialog box with the file sharing link will appear. This link is private by default so you need to make it public to use on your blog otherwise it will not work.


Click on Change Link

To change the share type from private to public just click on link Change... then a dialog box will appear with three options.

Click Change to Make it Public


Select Public And Hit Save

Select first option which says public and save.

Select Public and Save

Copy The Link Address You Have Got

Now after making it public, copy the shared link you got. You need to change the original link to get it work for us. Your link will look like:-
(Note- below in example is the link of our .exe file association fix .reg file)
Original Linkhttps://drive.google.com/file/d/0B_PLgWpOK_wTRVhDWTdTSkY4MW8/edit?usp=sharing
Change it tohttps://googledrive.com/host/0B_PLgWpOK_wTRVhDWTdTSkY4MW8
As you can see above that the Yellow colored text in original and new link remains same because this is unique id of your uploaded file. So just make your first link like as second one and you are done.

Using This Link On Our Blog

By now we are almost done. Now you can delete all that long CSS code from your template you had just copied to Style.css or Blogname.css file we uploaded to Google drive. This time we are going to use css file we hosted on Google Drive in our template. To use the above link of CSS file we have got, put the above link inside:-
<link href='Your-File-Link' rel='stylesheet'/>
For Example
<link href='https://googledrive.com/host/0B_PLgWpOK_wTRVhDWTdTSkY4MW8' rel='stylesheet'/>
and paste it just after the <head> then save your template. Now visit your blog to see whether you did it right or not. If it worked, Congratulations but if not then revise the steps to see what you did wrong or ask in comments to get instant help.

How To Host JavaScript Files.

JavaScript code are used in our template with <script type="text/javascript"> You JavaScript Code </script> so copy these all codes inside You JavaScript Code to your notepad file and save as Blogname.js (.js is the extension for JavaScript Codes) then revise the above steps we did for uploading CSS file to get the public sharing link. So after that put this link inside:-
<script src='Your-JS-File-Link' type='text/javascript'></script>
For Example<script src='https://googledrive.com/host/0B_PLgWpOK_wTRVhDWTdTSkY4MW8' type='text/javascript'></script>
Now paste it after <head> and save your template (just remove the javascript codes from template you copied)

Important Note:- JavaScript codes can be uploaded using one .js file if they do not contradict each other otherwise they will end up not working.
If you need some more help or did we miss anything then let us know via comments.

Top 5 Best Free Plagiarism Checker Tools

5 Best Free Plagiarism Checker Tools
Checking our content for Plagiarism is the need of every blogger today. So many content thieves are increasing rapidly (mostly newbies) which are shamelessly copying the copyrighted material of real blog writers and getting higher rankings in search engines which are a matter of serious concern for every blogger. Here we are going to give you a list of top 5 best free plagiarism checker tools available online to scan the web for duplicate content of your original content to help you find those stealers.

Why should I Check For Plagiarism?

That could be the most idiotic question but let we answers it briefly. If anyone else is copying your content and using it on their blog or website then your blog or website will have duplicate content because same content is available on 2 different sites and search engines would not fall in love with it so simply your website or blog will receive one or more Google animal penalty. When visitors will notice that the same content of your blog is available elsewhere they will lose faith and you will have to lose your loyal readers too. Next time in search results, visitors will give importance to others sites then your's.

1) CopyScape Plagiarism Checker Tool (visit)

CopyScape plagiarism checker tool is available to use free of limited features because it also offers the premium version which really worth the money. Mostly you need not to go and subscribe for premium version, simply go to the tool and enter your blog URL or blog post URL you want to check. It works like as search engine and displays the results of the web pages having same content if matches as the case may be.

2) Plagium Plagiarism Checker Tool (visit)

Plagium is really well worth the time and offers the different ways to check the content. Here on Plagium you will find mainly three options of checking for duplicate content, "Via Check Text, Via Check URL and Via Check File" so you can simply copy the text to the text box where the limit is 25000 characters or Check by entering the URL of your published content or finally by uploading a doc or text file.

3) PlagSpotter Plagiarism Checker Tool (visit)

Plagspotter is another good one but it does not allow us to check the whole blog or website and instead we have to go entering URLs one by one to check them for Plagiarism. But if you will sign up for a free 7 days trial, you can check for a batch of URLs in one go.

4) Duplichecker Plagiarism Checker Tool (visit)

Duplichecker is another best ever free Plagiarism checker tool which allow us to check our content by copying the text to their text box or simply uploading the doc or text file. The maximum words limit is 1500 words. Duplichecker does not allow us to check via URL.

5) Manual Search

Lastly you can search manually on search engines by entering some lines of your content in the search box then check the results if anything matches or not. This is the last method for checking the duplicate content.

How To Deal With It?

So finally if you have discovered that someone else has copied your content without your permission then now you have to fight for taking this down. Usually, what will you do? I guess you will try to contact them via their contact us page if it exists? But believe me it works only in less than 5% cases because they simply do not reply and ignore our messages or emails. Then you have to fight with them for your right and best options are filing a DMCA report on DMCA.org, Contacting with the hosting provider of the website/blog or reporting to Google DMCA. DMCA.org charge 10$ per month and it offers only 1 take down the request for free after implementing their banner in our site. Contacting with the hosting provider of that site will solve the problem mostly but the challenge is to know Who is the hosting provider because in some cases these people use some premium services to hide their hosting provider. So lastly Google has its own DMCA complaint procedure where you can submit the URL Removal Request. That is a long tutorial and we will cover it thoroughly in the upcoming post.

Do You Use More Plagiarism Checker Tools? Best, Easy and Free?
Then add in comments and help each other. Till then stay safe and enjoy.