No matter how big the industry or how specialized the product, every business needs the expertise of a graphic designer eventually. Even if the entrepreneur in charge has the skills necessary to bring a brand image to life, more often than not these men and women are driven to other goals such a increasing sales or the overall management of the business. There comes a time where you can’t do everything on your own, and that’s the time a graphic designer needs to be brought onto the team—even if only for a short period of time. Today we will tell you, the 5 things to consider before Hiring a graphic designer,
Read more »
How to Add Whatsapp Share Button in Blogger
Blogger gives you the opportunity to promote your content via many social networks. Back in year 2009, when WhatsApp was launched, no one knew that it would challenge the graph of Facebook. In the year 2013, WhatsApp was declared as the most used social network, leaving Facebook behind. Today in this article, we will show you how to add whatsapp share button in blogger.
Read more »
MyBloggerLab Added to DMOZ Directory - How to Get Listed?
Getting your website listed in DMOZ directory is considered as one of the biggest achievement of a webmaster. Luckily, last night MyBloggerLab.com is successfully added to DMOZ Web design / Development Weblogs category where only 30 other blogs are listed out of millions. It is indeed a great achievement for MyBloggerLab.com team and readers who supported us throughout these 3 years. But the question is, how MyBloggerLab made it to DMOZ, what are the factors to get your website listed in DMOZ?
Read more »
How To Create A Landing Page/Squeeze Page On Blogger
We need to handle everything manually from a to z to make our custom landing page on blogger where there are numerous plugins and templates available to create stunning landing pages on other CMS platforms such as WordPress or Joomla. Click Click and there you go with your highly dedicated professional landing page on these platforms.
So in this post, I am going to deal with it and make it easier for everyone to create landing pages on your existing blogger blog.
By the end of this post, you'll have your own landing page ready, I hope so. :)
Wait! Why Do You Even Need A Landing Page?
Landing pages are designed to focus only on one particular goal you want to achieve – whether you want to capture emails to grow your email list, promote your own products or anything else. On a landing page, everything else which can distract the visitors attention like as sidebar, footer, header or navigation area is hidden except your landing page content.Below are a few types of landing pages you can create on your blog to get the maximum user engagement and ROI.
1. Coming Soon Landing Page
Coming soon page is designed to let your audience know that we are launching our blog/website/service soon. So you just put an email opt-in form and let your visitors subscribe to get notified when your blog/website/service is launched.2. Thank You Landing Page
A Thank you page is what you might have seen most of the time on other blogs. How and when did you land on a thank you page last time? Probably either you had commented on a blog post or downloaded a digital product.3. Start Here Landing Page
A Start Here page is designed specially for the first-time landing visitors on your blog and link to it is included in the main navigation bar. On a Start Here page, you can offer your all the relevant information and links they need to get started. Include your call to action buttons above the fold so that they know what is the next step to do.4. Promotion-Specific Landing Page
Do you promote some affiliate products or your own? Then you need to have a special dedicated promotion-specific landing page for that particular product to get the maximum conversion rate on it. You don't have any other choice. :)5. Other
You can create your landing pages according to your purpose. Like as for the visitors landing on your blog from your social network profile links, you can create a special landing page welcoming the visitor, telling about yourself and what you have to offer with a strong call to action button.So now you want to create your first landing page on your blogger blog? Curious enough to know how? Keep your curiosity alive and let's begin. :)
Live Demo of My Landing Page On This Blog Itself.
So did it impress you? You can achieve the same results on your existing blogspot blog whether you're using a custom domain name or a free blogspot sub-domain name. Although you need to to take care of some things on a free sub-domain name so please read carefully all the steps given below.
Ready To Design Your First Landing Page On Blogger?
Before we start the process, let's have a bird's-eye view on creating our landing page in a separate page of our blogger blog.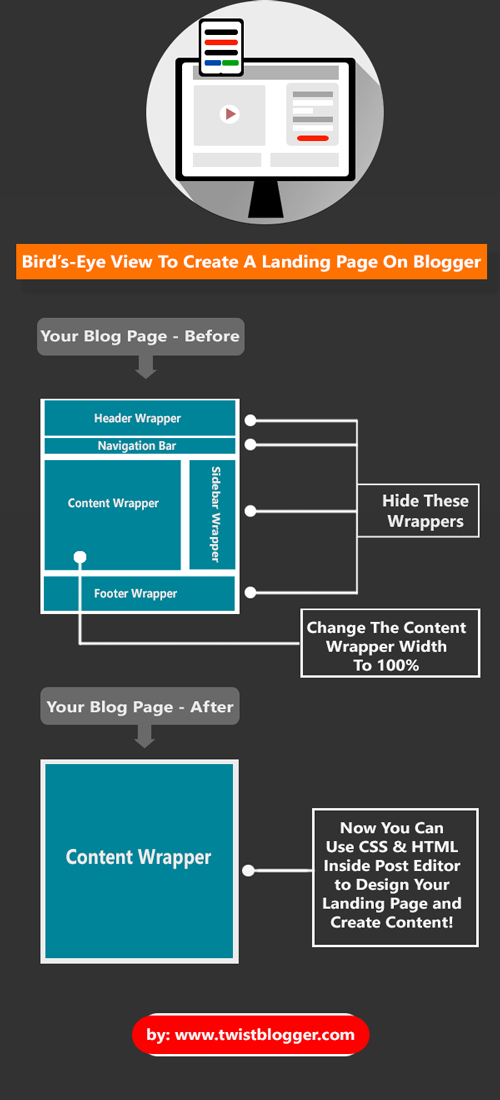
Step 1. Create a new Page
First of all you need to create a new page so just Login to Blogger account > Select your blog > Go to Pages section and on top of it, you'll see a link "New Page" so click on it.
Now enter your Page Name in the title area (be careful about the title text because you'll get the same Permalink address for your page) and publish it. See the screen shot below to create a new page.

Now visit your new page and copy the URL of page from the address bar of your browser.
Note: If you are using a custom domain name then copy your page URL as it is but, if you're using a free blogspot sub-domain name then you need to make few changes as given below:
Changing the country specific extension to .com
For example: If you're from India then your sub-domain name will be http://example.blogspot.in so you need to change the .in to .com at the end of the URL (do not add www after http://). Got it? Good. :)
Step 2. Add The CSS to Style Your Landing Page Using Conditional Tag
Now we will add a conditional tag to our template code and inside it, we will put our CSS code to hide the other unwanted wrappers except the content area. This CSS style will override the main CSS style of our template and it will be applied to the new page only.
Go to Template section > Click on Edit HTML (backup your template code first) now click inside the code box and press Ctrl+F to open up a search box.
Now find out this code line
</b:skin> and just below it, paste the code given below after making the required changes (required changes to make are given below the code in Editing step so read them carefully). After adding the code just save your template and visit your page again to see the results you have accomplished. Don't expect too much at this stage. :p<b:if cond='data:blog.url == "YOUR-BLOG-PAGE-URL"'>
<style type='text/css'>
/*--- Find out all the ids or classes of the main wrappers and add them in below code to hide them---*/
.sidebar-wrapper, .header-wrapper, .post-title, #blog-pager, .post-footer, #footer-wrapper, .comments {
display: none !important; /*-- This will hide those main wrappers--*/
}
/*---If you're using one of the default blogger templates---*/
.header-outer, .column-right-outer, .tabs-outer, .footer-outer {
display: none !important; /*-- This will hide header, footer, navbar and sidebar--*/
}
/*---Changing the Content Width to 100%---*/
#content {
width: 100% !important; /*---This will change the content area width to 100%--*/
}
/*---Changing The Body Background Image And Color---*/
body {
background: #FFF url('YOUR-IMAGE-URL') no-repeat scroll top center !important;
margin:0;
padding:0;
}
</style>
</b:if>
Editing: Change YOUR-BLOG-PAGE-URL with the page URL you had copied earlier. I have added the detailed comments in the above code to make things easier. If you're using a custom third party template then you need to find out all the classes or ids of the wrappers like as Header, Navigation Bar, Sidebar, Footer etc. to which you want to hide on your landing page.
These ids or class names may be different used by their respected developers so please don't expect my above CSS code to work for you completely. Take it as a reference and a quick head start.
Finding The Class/Id Names Using Developers Mode in Your Browser
You can find all these ids or classes simply by visiting any existing page of your blog then start the developer mode (Ctrl+Shift+I for Chrome) and inspect the elements in your browser. For example, after starting the developers mode just right click on sidebar then choose inspect element and you will see the id or class name of the inspected element into right side under Styles tab.
Now to make sure that you found the right class or id to hide, just add one code line display: none; to the style of particular inspected element. If it ceases to appear then pat your shoulder, you just did a great job. :)
Replace YOUR-IMAGE-URL with the URL of the image you want to use in the background and change the color code #FFF to your choice of color code.
Changing the Content area width to 100% part may work or may not just because of the Id name of it. My template code uses this #content id name for the content wrapper and yours may be totally different. So you gotta find it out in the same way I explained above.
So If you have successfully figured out all the ids or class names to hide and they are working perfectly, just add them to the CSS code above to hide them. By now your landing page is ready. After hiding all the unwanted distractions just go back to edit your page the way you want.
Now what you can do with HTML and CSS inside your post editor is totally depends upon you. I have done the same on my Landing Page. Sky is the limit!
How to use HTML and CSS inside Post Editor?
Switch to the HTML mode and change the page settings from the right side as shown in the screenshot below.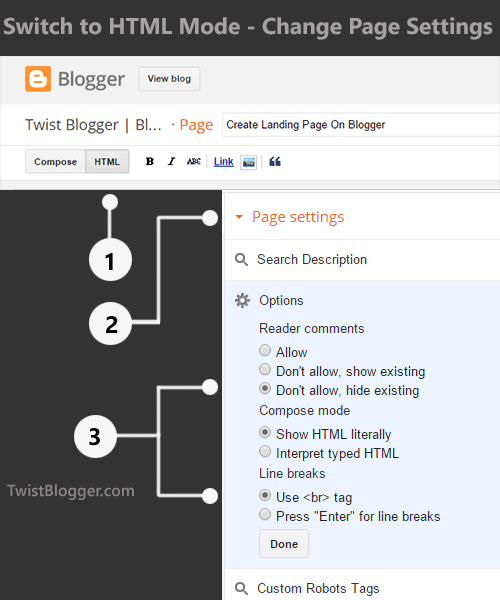
Now to use the CSS then just put your CSS code using the <style> tag. For example:-
<style>
#my-landing-page-header {
width: 100%;
background: #000;
font-size: 20px;
padding: 20px 0px;
color: #FFF
}
</style>
Now you can call the above CSS style in HTML to apply it. For example:-
<div id='my-landing-page-header'> Hello World! This is my First Landing Page</div>
Result is this:-
Hello World! This is my First Landing Page
Wondering if we could use the CSS code we have added to our template code using a conditional tag inside the post editor itself? I did the same while designing my landing page and the result was totally unpleasant.
It worked for sure but the template code is loaded form the root directory first and then it is rendered in the browser immediately. So when you'll use the CSS code inside the post editor to hide the wrappers, they will end up showing for a fraction of second before your CSS code inside the post editor will take effect to override it. Isn't it a bad user experience?
How would you call it a professional looking if it will happen to my landing page I have designed awaking hours late night? :)
So this is how you can design your own custom landing pages on blogspot. All those bloggers who are familiar with the CSS and HTML will find this tutorial super easy and those who are new to it, please feel free to poke me anytime. I'll personally visit your blog and help you out to make things super easy for you. :)
You can also shoot me an email using the contact form in my contact us page.
Right now there is no one click solution for creating your landing page but in future, I'll design my own template and a Landing page will be the integral part of it. Then you'll need not to inspect the elements and mess-up with the code.
Soon I'll design my different landing page templates and share with you if you guys need (let me know in comments :p). You can use them with a simple copy & paste function inside the post editor. Then make a few changes here and there and voila, your landing page is ready so please don't forget to subscribe. :)
Finally I want to thank my best buddies +ROHAN CHAUBEY and +Naveen Kumar for the immediate feedback on my landing page design. :)
Stay Blessed!
How to Add Voice Search Widget in Blogger
A good blog is the one which is not only saturated with good content but also it eases the difficulties of its fans by providing them alternative ways to make their work easier and quicker. Being a blogger, you should have enough potential to keep your fans in your hands and not letting them to wander for other blogs. Never letting your fan base decrease has been the greatest achievement of everyone’s bright career. Be it blogging or music, your work or speech, one should never let the people, who adore them, slip out of their hands. A fully customized blog is the foremost recommended way to keep your fans stick to your blog.
Read more »
How to Add Facebook Page Plugin in Blogger
Do you want to attract more and more subscribers to your blog? Here, we will tell you how to do that by just adding a simple Facebook widget to your blog. Since Facebook is one of the most used social networks, it helps your subscribers to get recent updates of your blog via their Facebook accounts. Once they log in to their account they are able to know all about the recent activities of your blog which is twinkling on their newsfeed. Recently, Facebook released a new page like box widget. In this article, we will show you How to add Facebook Page Plugin in blogger.
Read more »
Add Floating Social Media Share Buttons Widget For Blogger - Version 2
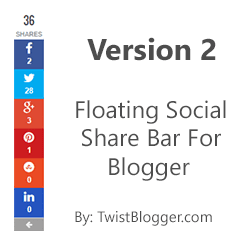
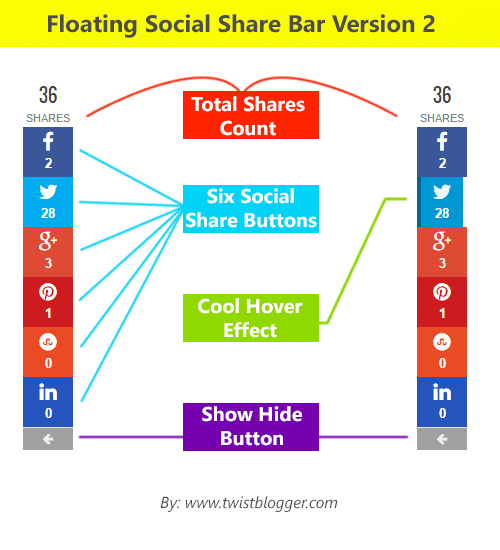
This version is totally different from the previous version because this time I did not use the official buttons of social networks and instead I used own custom social buttons.
Along with Total shares count box, every button shows the number of total shares on that particular social media platform.
Previous Version: Floating Social Media Buttons Bar For Blogger With Total Shares Count
Please Read This Note Carefully Given Below!
Important Update (Must Read) :- I am using FREE hosting provided by OpenShift.com for hosting my PHP scripts which are liable to fetch the total shares count on different social media platforms.So there is monthly bandwidth limit on free packages and whenever it will cross the limit of free bandwidth, it will stop working. I can not upgrade from free hosting package to premium because I earn nothing from this blog. That is all to it.
One more thing. Free package is enough for one blog and you can upload these PHP files yourself on their server but it works on Git and Ruby. You have to install them on your computer then use the command mode to create your PHP application and upload those files. Please for more info create your account on OpenShift.com and learn from there.
If you need my services then you can contact me using contact form page. I'll create a separate domain name for you and upload these scripts so they will not stop working.
Step 3) For icons, I have used FontAwesome 4.2.0 so just find out opening
Please note that this is the latest version of FontAwesome icons CSS link and you need to update if you are using old version because, in old versions StumbleUpon icon is not included.
Add Google JavaScript Library Link also if not already added to your template.
Step 4) Click inside the code box, press Ctrl+f or Cmd+f and find out this closing tag
Update: 8/17/2016
Just updated the sharecount API URL and it'll be working now for everyone.
Just updated the sharecount API URL and it'll be working now for everyone.
Features with Demo Screenshot
I tried my best to give it the look of other leading free and premium share buttons like as SumoMe. I have disabled it on mobile devices with CSS, but you can make it appear on mobile too simply by deleting the little CSS code.
However, this is not recommended because there is really little space on mobile screens and users will be not be able to read your content properly as buttons bar will be covering around 50px space on the left side of screen.
Of course, it includes a show hide button but it's always good to be on the safe side rather than losing visitors.
But you can install the social share buttons below the post titles I have released before and I use on this blog itself.
I could have made it mobile compatible like as SumoMe too, but this is really too much work for a one man army. ;) I wish I had someone to do it, but still I got no one lol.
Overall I am happy with it because it includes no forced button for branding, only what we need. All other major industry leading plugins like SumoMe are really great and packed with amazing features, but you have to go with pro version otherwise there will always be one button of their own in the end for branding.
Note: You do NOT have Permission to copy and share my code on your blog.

Its Live demo is on this blog itself so are you impressed? Want to use it?
Adding Floating Social Share Buttons Bar to Blogger
Step 1) As always, login to your blogger account - Select your blog - go to Template area and download your template backup first. You'll find a Backup/Restore link on the top right side in Template area.
Step 2) Now click on Edit HTML and wait for your template code box to load.
Step 3) For icons, I have used FontAwesome 4.2.0 so just find out opening
<head> tag and just after it, paste the FontAwesome icons Link given below.<link href='http://netdna.bootstrapcdn.com/font-awesome/4.2.0/css/font-awesome.css' rel='stylesheet'/>
Please note that this is the latest version of FontAwesome icons CSS link and you need to update if you are using old version because, in old versions StumbleUpon icon is not included.
Add Google JavaScript Library Link also if not already added to your template.
<script src='http://ajax.googleapis.com/ajax/libs/jquery/1.7.1/jquery.min.js' type='text/javascript'/>
Step 4) Click inside the code box, press Ctrl+f or Cmd+f and find out this closing tag
</head> then just before it paste the whole CSS code given below. <b:if cond='data:blog.pageType == "item"'>
<style type='text/css'>
/*------------------------------------------------------------
Floating Social Share Button Bar Version 2.0
Designed by:: http://www.twistblogger.com
Shares Count Code by:: http://donreach.com/social-share-count
issued under GNU GPL Licence
Icons:: FontAwesome 4.2.0
**************** Do Not Remove These Credits *****************
------------------------------------------------------------*/
.twistBlogger_SocialBar {
position: fixed;
bottom: 30%;
padding: 0;
left:0;
background: none;
text-align: center;
margin: 0 auto;
z-index: 99999999;
}
.twistBlogger_SocialBar label:hover {
cursor: pointer;
opacity:1;
}
.twistBlogger_SocialBar label {
text-align: center;
opacity: 0.4;
width: 50px;
background: #3A3939;
color: #FFF;
border: 0;
font-family: FontAwesome;
display: block;
font-size: 12px;
padding: 0px 0px;
border-radius: 0;
-webkit-transition: all .4s ease-in-out;
-moz-transition: all .4s ease-in-out;
-ms-transition: all .4s ease-in-out;
-o-transition: all .4s ease-in-out;
transition: all .4s ease-in-out;
position: absolute;
line-height: 1.5em;
margin-top: 346px;
}
input.ShowHide_Button:checked + label {
transform-origin: 50% 0%!important;
-webkit-transform-origin: 50% 0%!important;
-moz-transform-origin: 50% 0%!important;
-ms-transform-origin: 50% 0%!important;
-o-transform-origin: 50% 0%!important;
opacity: 1;
-webkit-transform: translateX(0px) rotateY(-180deg);
-moz-transform: translateX(0px) rotateY(-180deg);
-ms-transform: translateX(0px) rotateY(-180deg);
-o-transform: translateX(0px) rotateY(-180deg);
transform: translateX(0px) rotateY(-180deg);
-webkit-transition-delay: 0.2s;
-moz-transition-delay: 0.2s;
-ms-transition-delay: 0.2s;
-o-transition-delay: 0.2s;
transition-delay: 0.2s;
border: 1px solid #3A3939;
border-radius: 50px 0px 0px 50px;
width: 30px;
max-width: 30px;
}
input.ShowHide_Button ~ .ShowHideMe {
-webkit-transition: .6s all cubic-bezier(0.730, -0.485, 0.145, 1.620);
-moz-transition: .6s all cubic-bezier(0.730, -0.485, 0.145, 1.620);
-ms-transition: .6s all cubic-bezier(0.730, -0.485, 0.145, 1.620);
-o-transition: .6s all cubic-bezier(0.730, -0.485, 0.145, 1.620);
transition: .6s all cubic-bezier(0.730, -0.485, 0.145, 1.620);
}
input.ShowHide_Button:checked ~ .ShowHideMe {
margin-left: -75px !important;
}
input.ShowHide_Button {
display: none;
}
.twistBlogger_SocialBar .social_menu {
display: inline-block;
float: left;
list-style:none;
max-width:50px;
margin: 0;
padding: 0;
}
.twistBlogger_SocialBar .social_menu .button_facebook {
background: #3a579a;
}
.twistBlogger_SocialBar .social_menu .button_facebook:hover {
background: #314a83;
}
.twistBlogger_SocialBar .social_menu .button_twitter {
background: #00abf0;
}
.twistBlogger_SocialBar .social_menu .button_twitter:hover {
background: #0092cc;
}
.twistBlogger_SocialBar .social_menu .button_googleplus {
background: #df4a32;
}
.twistBlogger_SocialBar .social_menu .button_googleplus:hover {
background: #be3f2b;
}
.twistBlogger_SocialBar .social_menu .button_pinterest {
background: #cd1c1f;
}
.twistBlogger_SocialBar .social_menu .button_pinterest:hover {
background: #ae181a;
}
.twistBlogger_SocialBar .social_menu .button_stumbleupon {
background: #ea4b24;
}
.twistBlogger_SocialBar .social_menu .button_stumbleupon:hover {
background: #c7401f;
}
.twistBlogger_SocialBar .social_menu .button_linkedin {
background: #2554BF;
}
.twistBlogger_SocialBar .social_menu .button_linkedin:hover {
background: #224EB4;
}
.twistBlogger_SocialBar .social_menu .button_facebook .count,
.twistBlogger_SocialBar .social_menu .button_twitter .count,
.twistBlogger_SocialBar .social_menu .button_googleplus .count,
.twistBlogger_SocialBar .social_menu .button_pinterest .count,
.twistBlogger_SocialBar .social_menu .button_stumbleupon .count,
.twistBlogger_SocialBar .social_menu .button_linkedin .count {
color: #fff!important;
padding-top: 4px;
font-size: 13px !important;
line-height: 1.2em;
font-family: sans-serif;
font-weight: bold;
}
.twistBlogger_SocialBar .social_menu > ul {
margin: 0;
padding: 0;
list-style: none;
}
.twistBlogger_SocialBar .social_menu .share {
background: #FFF;
color: #807F7F;
font-size: 11px;
height: 45px !important;
}
.twistBlogger_SocialBar .social_menu .share .count.h4 {
font-size: 18px;
font-family: sans-serif;
color: #424242;
height: 25px !important;
line-height: 1.5em;
font-weight: bold;
margin: 0px !important;
}
.twistBlogger_SocialBar .social_menu .share .h6 {
padding-bottom: 3px;
font-family: sans-serif;
margin: 0px !important;
line-height: 1.5em;
font-size: 11px;
}
.twistBlogger_SocialBar .social_menu > ul > li {
margin: 0px 0px 0px 0px;
position: relative;
text-align: center;
list-style: none;
list-style-type: none;
padding: 0px;
border: 0px;
border-left: 0 solid rgba( 0,0,0,.4);
height: 50px;
width: 50px;
overflow: hidden;
display: block;
box-sizing: border-box;
background: none;
box-sizing: content-box;
-webkit-transition: all 0.3s ease-in-out;
-moz-transition: all 0.3s ease-in-out;
-ms-transition: all 0.3s ease-in-out;
-o-transition: all 0.3s ease-in-out;
transition: all 0.3s ease-in-out;
}
.twistBlogger_SocialBar .social_menu > ul > li a {
display: block;
width: 100%;
height: 100%;
box-sizing: border-box;
padding: 5px 0px;
cursor: pointer;
text-decoration: none;
}
.twistBlogger_SocialBar .social_menu > ul > li:hover {
border-left: 5px solid rgba( 0,0,0,.3);
width: 40px;
}
.twistBlogger_SocialBar .social_menu > ul > li i {
color: #fff !important;
font-family: FontAwesome;
font-size: 20px;
font-style: normal;
font-weight: normal;
line-height: 1em;
-webkit-transition: all 0.3s ease-in-out;
-moz-transition: all 0.3s ease-in-out;
-ms-transition: all 0.3s ease-in-out;
-o-transition: all 0.3s ease-in-out;
transition: all 0.3s ease-in-out;
}
.twistBlogger_SocialBar .social_menu > ul > li:hover i {
opacity: 0.9;
}
@media only screen and (min-width:768px) and (max-width:979px) {
.twistBlogger_SocialBar {
bottom: 20% !important;
}
}
@media only screen and (min-width:480px) and (max-width:767px) {
.twistBlogger_SocialBar {
bottom: 15% !important;
}
}
@media only screen and (max-width:479px) {
.twistBlogger_SocialBar {
bottom: 10% !important;
display: none !important; /*---delete this code line to make it appear on mobile--*/
}
}
</style>
</b:if>
Editing: If you want to make appear on mobile devices too, then just delete this code line
display: none !important; and you are done.Step 5) Now you need to add the HTML and JavaScript API part so find out this code line
<div class='post-footer-line post-footer-line-3'> and just below that, paste the whole HTML code given below as it is.Note: You will find the above code line two times in your template, but you have to paste the HTML code and JavaScript API of share counts just after the 2nd appearance of this code line.
<b:if cond='data:blog.pageType == "item"'>
<b:if cond='data:blog.pageType != "static_page"'>
<div class='twistBlogger_SocialBar'>
<input class='ShowHide_Button' id='twiSter' type='checkbox'/>
<label for='twiSter'><i class='fa fa-arrow-left'/></label>
<div class='ShowHideMe'>
<div class='social_menu'>
<div class='share'>
<div class='share-btn' data-service='total'>
<div class='count h4'/>
<div class='h6'>SHARES</div>
</div></div>
<ul>
<li class='button_facebook'>
<a expr:href='" http://www.facebook.com/share.php?v=4& src=bm& u=" + data:post.url + " & t=" + data:post.title' onclick='window.open(this.href," sharer" ," toolbar=0,status=0,width=626,height=436" ); return false;' rel='nofollow'><strong><i class='fa fa-facebook'/>
<div class='share-btn' data-service='facebook'>
<div class='count'/></div></strong>
</a>
</li>
<li class='button_twitter'>
<a expr:href='"https://twitter.com/intent/tweet?url=" + data:blog.url + "&text=" + data:post.title + " via @TwistBlogger - "' onclick='window.open(this.href," sharer" ," toolbar=0,status=0,width=626,height=436" ); return false;' rel='nofollow'><strong><i class='fa fa-twitter'/>
<div class='share-btn' data-service='twitter'>
<div class='count'/></div></strong>
</a>
</li>
<li class='button_googleplus'>
<a expr:href='" https://plus.google.com/share?url=" + data:post.url' onclick='javascript:window.open(this.href," " ," menubar=no,toolbar=no,resizbutton_le=yes,scrollbars=yes,height=600,width=600" ); return false; ' rel='nofollow'><strong><i class='fa fa-google-plus'/>
<div class='share-btn' data-service='google'>
<div class='count'/></div></strong>
</a>
</li>
<li class='button_pinterest'>
<a data-pin-config='beside' expr:href='" http://pinterest.com/pin/create/button/?url=" + data:post.url + " &media=" + data:blog.postImageUrl + "&description=" + data:post.title' onclick='window.open(this.href," sharer" ," toolbar=0,status=0,width=626,height=500" ); return false;' rel='nofollow'><strong><i class='fa fa-pinterest'/>
<div class='share-btn' data-service='pinterest'>
<div class='count'/></div></strong>
</a>
</li>
<li class='button_stumbleupon'>
<a expr:href='" http://www.stumbleupon.com/submit?url=" + data:post.url + " & title=" + data:post.title' onclick='window.open(this.href," sharer" ," toolbar=0,status=0,width=626,height=500" ); return false;' rel='nofollow'><strong><i class='fa fa-stumbleupon-circle'/>
<div class='share-btn' data-service='stumbleupon'>
<div class='count'/></div></strong>
</a>
</li>
<li class='button_linkedin'>
<a expr:href='" http://www.linkedin.com/shareArticle?mini=true& url=" + data:post.url + " & title=" + data:post.title + " & summary=& source=" ' onclick='window.open(this.href," sharer" ," toolbar=0,status=0,width=626,height=500" ); return false;' rel='nofollow'><strong><i class='fa fa-linkedin'/>
<div class='share-btn' data-service='linkedin'>
<div class='count'/></div></strong>
</a>
</li>
</ul>
</div>
</div>
</div>
<script type='text/javascript'>//<![CDATA[
$(document).ready(function () {
var shareUrl = $("link[rel=canonical]").attr("href");
$.getJSON('https://count.donreach.com/?url=' + encodeURIComponent(shareUrl) + "&callback=?", function (data) {
shares = data.shares;
$(".count").each(function (index, el) {
service = $(el).parents(".share-btn").attr("data-service");
count = shares[service];
if (count > 1000) {
count = (count / 1000).toFixed(1);
if (count > 1000) count = (count / 1000).toFixed(1) + "M";
else count = count + "k";
}
$(el).html(count);
});
});
});
//]]></script>
</b:if>
</b:if>
Editing: One thing you need to change in above HTML code is my Twitter Username TwistBlogger with your twitter username.
If you want to remove a button then just delete the HTML of that button including <li> </li> plus you need to adjust the margin of show hide button accordingly otherwise show hide button will be 50px below the share buttons with every removal of one button. That means you need to decrease the margin of show hide button by 50px after you remove one social button.
If you want to remove a button then just delete the HTML of that button including <li> </li> plus you need to adjust the margin of show hide button accordingly otherwise show hide button will be 50px below the share buttons with every removal of one button. That means you need to decrease the margin of show hide button by 50px after you remove one social button.
Now save your template code and visit any post on your blog to see it live. If you found any bug or you could not make it work for you, just leave your comment or contact me via the contact us page.
Do you have any improvement suggestion? Your opinions are always welcome. Stay Blessed!
Add Sticky Notification Bar to Blogger With Show Hide Button
You might have seen some pro bloggers using Hello Bar on their blog where they showcase some links of upcoming events or to download some ebooks or even a simple subscription box.
They use it because it makes sure that no visitor of their blog has really missed these important things.
The Hello-Bar comes with a bunch full of great features and includes a show hide button which lets users hide the notification bar if it irritates or simply if they are already aware of those important things.
The major downfall of Hello Bar for a blogger is it includes the link back to their website on the top leftt side which will distract the visitors' attention.
The well-known pro blogger +Mohammad Mustafa Ahmedzai of MyBloggerTricks has changed the way blogger platform used to be and left a benchmark by developing the amazing widgets, plugins, ShortCode for blogger and various SEO Optimized Templates.
Notification bar with show hide button for blogger is one of those amazing widgets Mohammad bro has released so far. Although the only downfall of it was a mbt watermark with a link back to the blog.
You had two choices, one to go with it as it is and second if you want to remove the watermark, go with the pro version.
Today I am releasing my light weight notification bar I designed with the help of CSS3 and HTML. I have used the JavaScript code too, but its purpose is just to make it sticky on the page. I need no backlink so it's totally yours as it is, no backlink included. :)
First Things are First
I have used a third-party JavaScript code so I am providing the credits here.Sticky JavaScript Code by: BloggerSentral.com
Note: You do NOT have Permission to copy and share my code on your blog or changing the class names and bragging about you did it. I have not included any backlink, but you're required to keep the credits given to developers in CSS comments as it is. They do not harm in any case. Respect the copyrights and hard work of developers.
Features of Our Sticky Notification Bar
Let me preach about it first. :)
2) Neat and clean professional looking design.
3) Show Hide Button on the right side of the notification bar.
4) Easy customization of colors.
5) Easy to setup.
6) Super Lightweight and loads very fast.
7) Stays on top of the page even if the user scrolls the page down.
8) Responsive design and it does not appear on mobile devices.
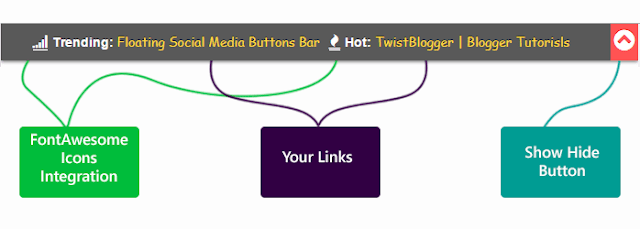
That's it! See the screenshot given below or watch the live demo here on my Test blog.
Adding The Notification Bar to Blogger
So finally if you're interested in adding it to your blogger blog then just follow these steps given below, it would not take much of your time.First of all:-
1) Login to your blogger account.
2) select your blog.
3) Go to Template - Edit HTML.
4) Click inside the template code box and save a backup first.
Integrate FontAwesome Icons to your blog
Search for the code line<head> and just below it paste the FontAwesome icons CSS link given below.<link href='http://netdna.bootstrapcdn.com/font-awesome/4.0.3/css/font-awesome.css' rel='stylesheet'/>
Also add the Google JavaScript Library link just below it if not already added to your blog (rare case) so please check it first and avoid adding same links again.
<script src='http://ajax.googleapis.com/ajax/libs/jquery/1.7.1/jquery.min.js' type='text/javascript'/>
Add The CSS Part to Your Template Code
Now search for the]]></b:skin> code line and just before that, paste the whole CSS code given below./*--------------------------------------------------------------
Sticky Notification Bar For Blogger
Designed by: http://www.twistblogger.com/
Sticky Code By: http://www.bloggersentral.com/
--------------------------------------------------------------*/
#twistBlogger_NotificationBar_wrap {
margin:0;
padding:0;
position:relative;
width:100%;
z-index:9999999;
}
.twistBlogger_NotificationBar {
color: #fff;
position: relative;
background: #595959; /*--Change Background Color Here--*/
width: 100%;
padding: 0;
text-align: center;
font-family: Arial Black, sans-serif;
text-shadow: 0px -1px 0px #000;
margin: 0px auto;
height: 40px;
box-shadow: 0px 1px 5px #616161;
}
.twistBlogger_NotificationBar label:hover {
cursor: pointer;
}
.twistBlogger_NotificationBar label {
text-align: center;
background: #FF5353; /*--Change Button Background Color Here--*/
color: #FFF;
border: 0;
font-family: fontawesome;
text-shadow: 0px -1px 0px #EC0000;
font-size: 26px;
-webkit-transition: 0.3s all ease-in-out;
-moz-transition: 0.3s all ease-in-out;
-ms-transition: 0.3s all ease-in-out;
-o-transition: 0.3s all ease-in-out;
transition: 0.3s all ease-in-out;
position: relative;
transition-delay: 0s;
margin-top: 0;
float: right;
height: 35px !important;
width: 30px;
overflow: hidden !important;
z-index: 9999;
padding-top: 5px;
}
input.TwistBlogger_ShowHideButtonBar:checked + label {
transform-origin: 12% 50% !important;
transform: translateY(0px) rotateX(190deg);
-webkit-transform: translateY(0px) rotateX(190deg);
-moz-transform: translateY(0px) rotateX(190deg);
-ms-transform: translateY(0px) rotateX(190deg);
-o-transform: translateY(0px) rotateX(190deg);
-webkit-transition-delay: 0.3s;
-moz-transition-delay: 0.3s;
-ms-transition-delay: 0.3s;
-o-transition-delay: 0.3s;
transition-delay: 0.3s;
margin-top: 47px;
border: 0;
}
input.TwistBlogger_ShowHideButtonBar ~ .twisteBlogger_ContentArea {
position: relative;
overflow: hidden;
height: 40px;
-webkit-transition: 0.5s all ease-in-out;
-moz-transition: 0.5s all ease-in-out;
-ms-transition: 0.5s all ease-in-out;
-o-transition: 0.5s all ease-in-out;
transition: 0.5s all ease-in-out;
}
input.TwistBlogger_ShowHideButtonBar:checked ~ .twisteBlogger_ContentArea {
margin-top: -50px;
}
input.TwistBlogger_ShowHideButtonBar {
display: none;
}
/*--Change FontAwesome Icons Style Here--*/
.twisteBlogger_ContentArea .fa {
font-size: 16px;
font-weight: normal;
color: #FFFFFF;
font-family: FontAwesome;
border-bottom: 1px solid #FFFFFF;
margin-right: 5px;
}
.twisteBlogger_ContentArea ul {
margin: 0;
padding: 0;
list-style: none;
list-style-type: none;
height: 100%;
}
.twisteBlogger_ContentArea ul > li {
list-style: none;
font-size: 14px;
font-weight: bold;
font-family: sans-serif;
text-decoration: none;
padding-top: 10px;
margin-right: 10px;
display: inline-block;
}
.twisteBlogger_ContentArea ul > li > a {
color: #FFD946; /*--Change Links Color Here--*/
text-decoration: none;
font-family: cursive;
font-weight: normal;
-webkit-transition: all 0.4s ease-in-out;
-moz-transition: all 0.4s ease-in-out;
-ms-transition: all 0.4s ease-in-out;
-o-transition: all 0.4s ease-in-out;
transition: all 0.4s ease-in-out;
}
.twisteBlogger_ContentArea ul > li > a:hover {
color: #EFCB41 !important; /*--Change Links Hover Color Here--*/
}
.bs_sticking {
position:fixed !important;
width: 100% !important;
}
@media only screen and (max-width:479px) {
#twistBlogger_NotificationBar_wrap, .twistBlogger_NotificationBar {
display: none !important;
}
}
Add The HTML Part
Ok so now the next step is to add the HTML part of Notification Bar to your blogger template.This time search for opening tag
<body> and just below it paste the whole HTML code given below after making the required changes (changes to make are given below the HTML code in Editing Step).<div id='twistBlogger_NotificationBar_wrap'>
<div class='twistBlogger_NotificationBar'>
<input class='TwistBlogger_ShowHideButtonBar' id='tbn' type='checkbox'/>
<label for='tbn'><i class='fa fa-chevron-circle-up'/></label>
<div class='twisteBlogger_ContentArea'>
<ul>
<li>
<i class='fa fa-signal'/> Trending: <a href='#Your-Link1'>Floating Social Media Buttons Bar</a>
</li>
<li>
<i class='fa fa-fire'/> Hot: <a href='#Your-Link2'>TwistBlogger | Blogger Tutorisls</a>
</li>
<li>
<i class='fa fa-rss'/> Rss: <a href='#Your-Link3'>Subscribe to RSS</a>
</li>
</ul>
</div>
</div>
</div>
Editing: I have highlighted above HTML code in different colors. You have to edit it according to your needs. So read below carefully to make changes easily.
This Color = Code of your FontAwesome icon.
This Color = Text String which appears before the link.
This Color = Here goes your link so replace it with your link.
This Color = Anchor Text for the link.
How to Add More Links to Notification Bar in nut-shell
<li> <Font Awesome Icon Code/> Text String: <a href='Your-Link'>Anchor Text For Link</a></li>
Final Step to Add The JavaScript Code
This is the last step which is compulsory otherwise your Notification bar would not be sticky and it will not scroll down to the page.
Now for last time, search for the ending
</body> tag and just before that paste the JavaScript Code given below as it is.<script type='text/javascript'>
// Sticky widget by Bloggersentral.com
// Tutorial at http://www.bloggersentral.com/2013/04/how-to-make-any-widget-sticky.html
// Free to use or share, but please keep this notice intact.
//<![CDATA[
bs_makeSticky("twistBlogger_NotificationBar_wrap"); // enter your widget ID here
function bs_makeSticky(elem) {
var bs_sticky = document.getElementById(elem);
var scrollee = document.createElement("div");
bs_sticky.parentNode.insertBefore(scrollee, bs_sticky);
var iniClass = bs_sticky.className + ' bs_sticky';
window.addEventListener('scroll', bs_sticking, false);
function bs_sticking() {
var rect = scrollee.getBoundingClientRect();
if (rect.top < 0) {
bs_sticky.className = iniClass + ' bs_sticking';
bs_sticky.style.width = "100%";
} else {
bs_sticky.className = iniClass;
}
}
}
//]]>
</script>
Finally save your template and visit your blog to see it live hanging on the top of the page. If you're facing any kind of problem or found any bug then please feel free to poke me and I'll do my best.
Do you have any suggestion for its improvement? Do you want any other feature to be added? Your opinions are always welcome.
You can share, subscribe and like my Facebook page if you liked this tutorial, just reminding. :) Stay Blessed!
5 Quality Ways to Promote your Posts in Blogger
You want to increase your blog’s website? We know it, we see it every day. The best way to attract some new visitors is to promote your old under the hood articles that are rolling somewhere around your blog’s archive. In this article, we will show you 5 quality ways to promote your posts in blogger.
Read more »
Subscribe to:
Posts (Atom)


