How to Get Google To Index Your New Website & Blog Quickly

Webmaster Tools Kit
Does Google not index your website/blog or articles as fast as you publish them? Is your blog or website new? Do you think that the articles you published are not being indexed even after hours or days of their publication? Then there is another way to get your blog articles or website indexed within seconds of you publish them. Actually this is the power to each and every blogger or website owner given by Google via Webmasters Tools. You may be using these tools already but did you know you can use these tools too index your new website/blog or articles within seconds of using it? So this is what we are going to know step by step with examples.

Login To Webmasters Tools

To use the webmasters tools you need to login to your webmasters tools account with your gmail account. If you are loged in to your Gmail account, you will automatically be logged in. Now if you are using blogger.com platform then you will see your blog already listed but in case there is no blog listed, just click on Add A Site red color button on left side then a dialog box will appear where you need to add the URL of your blog or website for example: www.twistblogger.com (do not use http:// and www is must). In case you are using a Subdomain like as example.blogspot.com or example.weebly.com then you need to enter your subdomain name without www as it is. Incase you are not using Blogger.com blogging platform, you need to verify the ownership of your domain so open the Verify Ownership section then you will see too methods of verifying (Recommended and Alternate) but we suggest you to use the Alternate method and in alternate method select the second option of HTML tag  to verify in which you will get a Meta Tag to insert in HTML of your website/blog. Copy the Meta Tag code and paste it after the <head> section in the HTML of the blog/website and after that click on red Verify Now button and you will see a congratulation message saying that your site is verified and added. That is it now you are ready to use the magical features of Google webmasters Tools.

Click on Your Added Site

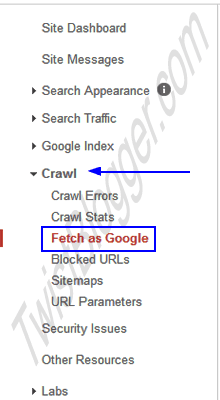
After Adding your site successfully it will appear in homepage so click on it to use the inside features. After that on left side you will see a number of useful links and one of them is Crawl. Click on it to expand it then click on the Fetch as Google link. See the image to understand in a better way.
Webmaster Tools Links

Enter Your Site URL and Click on Fetch Button

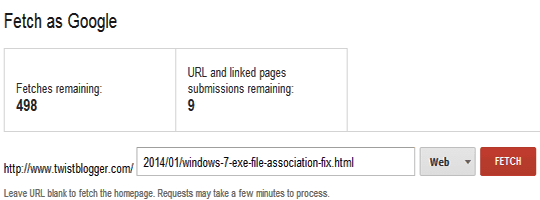
After clicking on Fetch as Google link you will get option of entering the URL of your site to fetch as Google. If your site is new and not indexed then you need not to enter any URL just click on Fetch button but if your site is indexed but you want to get your new article/web page indexed then enter the URL of that page.
Please Note:- You have to enter the URL starts after http://www.yourdomain.com/ and not the full URL because your main Domain URL is already entered which is fixed up to http://www.yourdomain.com/ see the image below.
Enter URL to Fetch

Now Click On Submit To Index

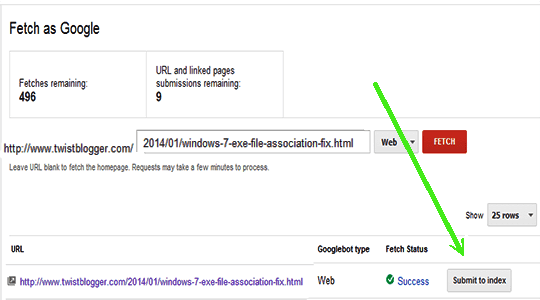
After Clicking on Fetch button, you will get the Fetched URL listed below with URL's fetch status. It the URL you entered is correct and found Fetch status will display ✓success otherwise Link not found. If everything is ok then in front of fetch status you will see a link button "Submi to index"  just click it then a dialog Box will appear to choose URL type to index. If it is homepage then select second option and if it is the article or any other webpage then select second option.
Click Submit Button

Check The Indexed URL in Google

So finally you have successfully submitted the URL and it is real time indexed. But how would you believe whether it is indexed or not? just copy the whole URL you submitted to index in Google search box (including http://www) and see live. You will see the time stamp like as 2 minutes ago, 20 seconds ago as the case may be. See image below.
Check Index Status In Google

Conclusion:- This is the fastest way to get your new articles, blog, webpages or new websites indexed by Google quickly. This way you can do it manually if Google does not do it. It usually takes less then two minutes and results you know, are Great. We hope this way we helped you but if anything goes wrong or does not work please let us know in comments and also share your views or experience with Google Webmaster Tools. Thank You.


Windows 7 .Exe File Association Fix Download Here

.Exe Fix For Windows 7
If you are reading this article then chances are that you are facing the problem of .exe file association not working or opening with other program. It is more like nightmarish situation for everyone when they first encounter this kind of terrific and horrible problem with their computer. You almost lost the control on your computer because .exe files does not work or .exe files open with notepad, adobe reader or Internet explorer as the case may be. It happens when you, without knowing the results, choose the default program from open with menu for .exe files. Once you chose the default program by yourself, next time all the .exe files will open with that chosen program whether it is notepad, chrome, word, adobe reader or Internet explorer. If it is the problem with you then you are on right web page where you will get Windows 7 .Exe File association Fix .Reg file to download and run on your computer to fix this problem within seconds.

Steps To Run The .Exe File Association Fix .Reg File

We have included two files with direct download links, one for win7 32-bit and another for both 32-bit and 64-bit. Just download both files on your device then right click on .reg file and click on Merge. Now a pop up warning message will appear just click on Yes and you are done.

Win7 32-Bit .Exe File Fix Download

File Type: .reg File size: 2kb

Win7 32-Bit and 64-Bit .Exe File Fix Download (Zip File)

File Type: .Zip File size: 1kb Unzipped File Size: 6kb

Still if you have more "open with" problems in win7 like .JPEG Fix, Folder Fix, .Bat File Fix, .TXT Fix, .URL Fix, .HTML Fix or anything else just follow this link given below and download the fix related to your problem.

If this problem is with any other windows operating system from XP to Windows8, 32-bit or 64-bit just download FixExec from the link given below. Select your window version (32 or 64) and download the file.
FixExec Program File Size: Around 850kb

Anytime if anything goes wrong or does not work or links are not working or there is any kind of confusion/question, then please let us know in comments and we will serve you even better. Thank You.

How To Add Meta Tags To Blogger Posts

Mata description Tags For Blogger

Meta tags play an extremely important role in your blog's SEO. If you are new to this part of SEO then you may have faced the problem of, "Very Low Click Through Rate from SERPs" even when you have written so good, long, keywords optimized and informative article.

This is not the fault of search engine crawlers but you have made it bound to happen because of not using the META tags for your articles. SO take it as serious step and move on to the implementation of META tags Step By Step while understanding "?" about META tags.

What are meta Tags?

Meta tags are the precise explanations of the HTML document. Meta data means data about data. These tags provide the structured data about a web page such as Description, Title, Date, Keywords, Author Name etc.

Where are these tags placed?

These Tags are placed in the Header section of HTML document at top of the page.

Who read these Meta Tags?

Search Engine Meta Spiders use META tags to index the HTML document in appropriate way. These tags are not visible to the visitors.

Why Meta tags are important?

1. Click Through rate
While These tags are not important for Search Engine Rankings but they play an important role in Click-Through Rate from Search Engine Result Pages. Because when you do not use Meta Description Tag for a web document/article/post, search engines will pick some random words from the the article to display as description in search results which may seem awkward to person searching and chances are that he will not click on your link and move on to other. Below is the example of our blog URL when Meta Description tag is used.

Description in Search Results

2. Relevant Ads By Ads Network
When you will use the meta keywords tags, your adsense ads will be relevant to the content on the web page because ads are displayed on the basis of keywords found on web page.

How To Add Meta Tags In Blogger?

So now you are ready to add meta tags to your blog then let us implement these tags in every area we should step by step.

Add Meta Description Tags For Main Blog URL

Go to Blogger → Settings → Search Preferences → Meta Tags → Click On Edit → Click On Yes. Now add your meta description about your blog and click save.
Note:- The description meta tag should be equal to 150 characters or less (including spaces). see image below.

Add Your Meta Description

Note:- If after adding the meta description, it does not work/show up in SERPs then you need to insert a code inside your template HTML and everything will work fine. Use this free tool to check whether these tags are working or not. Use This Code After <head> if your meta description tags are not working/showing up in SERPs. Go to Blogger → Template → Edit HTML then click inside template code. Now press Ctrl+f or Cmd+f and a search box will appear. Then search for <head> and after this <head> tag paste the code given below.
<b:if cond='data:blog.metaDescription != &quot;&quot;'>
<meta expr:content='data:blog.metaDescription' name='description'/>
</b:if>

Add Meta Description Tag For Each Post In Blogger

You  should add separate eye catchy and relevant meta description for each post to increase the CTR from SERPs. You do not have to edit your HTML code of template for that. This function is available in let side of blogger post editor. See Below:-

Adding Meta Description To Each Post

Add Separate Meta Keywords Tag To Each Post In Blogger

Now this time you have to edit the template to add the Meta Keywords tag because blogger have no option of adding Meta Keywords in dashboard. Again go to Blogger → Template → Edit Html. Now click anywhere inside the template code and press Ctrl+A → Copy → Paste in Notepad (You Just Did The Backup of Template Code ;).

It is better to have backup to restore if anything went wrong. Just copy the code given below, replace YOUR-PAGE-URL with the URL of the post you are adding keywords to and YOUR-PAGE-KEYWORDS with the relevant keywords people will use to search along with the main Keyword you have used in Title of the post.

Paste it before the <b:skin><![CDATA[ and save your template.
Note:- The keywords Meta Tag should be equal to 256 characters or less (including spaces) and you have to repeat this code for every post your want to add separate Keywords Tag.
<b:if cond='data:blog.url == &quot;YOUR-PAGE-URL&quot;'><meta content='YOUR-PAGE-KEYWORDS' name='keywords'/></b:if>

Meta Author Tag

Meta Author tag is also useful which describes about the author of a web document. Use this tag after the <head> tag. Just replace McDonald with your name.
<meta content='McDonald' name='author'/>
Final Words:- This is the simple yet effective way to use these meta tags and will surely help in your blog SEO. If we missed anything or you are facing problem while implementing these tags, let us know and help you in more better way. Thank You.

How To Use FontAwesome Icons In Blogger Template

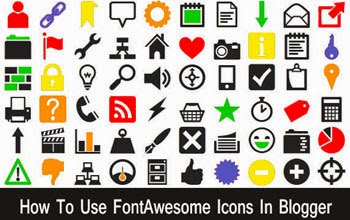
FontAwesome icons as name suggests, are awesome and piece of cake for all designers. You can use these icons on your blog, web apps, graphic designs and much more. These icons are extremely useful and that is why these icons are being used by many people day by day. By now most of the popular bloggers are using these icons on their blogs and apps. These icons are getting more popular every next day. So what are these FontAwesome icons, how you can use and what will be the benefit of using these icons to you is what we are going to explain in this tutorial.

1. What are these FontAwesome Icons?

FontAwesome Icons are vector icons means these icons are scalable to any size and display perfect in high resolutions.

2. Can we customize these icons on our template?

These icons can be customized in size, shadow, color and everything which can be achieved via using CSS font style. All you have to do is add these styles to your blog template CSS stylesheet using class "i".

3. Is any JavaScript required to get these icons work on my blog?

That is the beauty of these icons that you need No JavaScript code to get these icons work on your blog. No more load time and works on all devices perfectly

4. Are these icons free or premium?

These icons are totally free for use in any way (personal or commercial use). Good deal, no?

5. Why should I use these icons? Why not PNG or other images?

This is the excellent question and answer is Awesome. These icons load with 10x speed than your PNG or other image files and minimize the number of HTTP requests of loading images on your blog. These icons load as other text/fonts of your blog. Ultimately they boost the loading speed of your blog, gains more visitors, gives awesome look to your blog and help you in blog SEO in a way or other.

How To Use These Icons On My Blog?

To use these icons on your blogger blog, you need to edit template just a little. Go to Blogger → Template → Edit Template → Click Inside Code (backup your template code before editing by copying code to notepad). Now press Ctrl+f or Cmd+f then search for <head> tag and after this <head> tag paste the code given below.
<link href="//netdna.bootstrapcdn.com/font-awesome/4.0.3/css/font-awesome.css" rel="stylesheet">
 Above code is the CSS stylesheet of FontAawesome icons. Now you can place any icon to appear anywhere with simple <i> tag in your HTML e.g. inside <div>, <a>, <li> or <p>. See the example below how we used icons in our navigation menu links.
<li><a href='http://www.twistblogger.com'><i class='fa fa-home'></i>Home</a></li>
<li><a href='http://www.twistblogger.com/p/contact-us.html'><i class='fa fa-envelope-o'></i>Contact Us</a></li>
To change/use another icon just replace the icon name in yellow color <i class='fa fa-home'> and icon's name are given above every icon here at FontAwesome Icons Page. Just replace the icon name in yellow with your choice. For example <i class='fa fa-laptop'>. See image of few icons with their name highlighted below. First fa remains same and second comes with icon name.


Customization of Icons With CSS

To customize the color, size, shadow and background, just call the (i) tag in CSS and paint these icons with your creativity. CSS code is given below to simply copy paste and customize. Copy the above code and paste it just before the ]]></b:skin> code line.
i {
    color:#E2FD18;
    font-size:15px;
    padding-right:5px;
    text-shadow: 1px 1px 1px #000;
}
 This above CSS effect will apply to every icon on your blog. But what if you want to give different color, size, shadow etc. to a specific icon? Do not worry, you know what? These are awesome icons so here is the another hack for you. If you want to give separate effect to a icon than others' then you need to apply style inside the HTML <i> tag. Here is example:
<i class='fa fa-heart' style='font-size:18px; color:red;'/>
 After applying the above style inside the HTML <i> tag, your icon size would be 18px and color red while other remains same as per the effect you applied by CSS to (i) tag. Anytime if anything goes wrong, let us  help you. Thank You.

Note:- These icons doesn't work in IE6.

Disable Copy Function On Blogger With CSS or JavaScript

Disable Copy Function

Most of the genuine bloggers on BlogSpot platform face the problem of their blogs' content being copied or duplicated by newbies who are just entering in the blogosphere with the goal of making money without making real efforts and understanding the value of original/unique content. Sometimes the content copied by them gets higher rankings in search engines than your original content and this is unfair which lowers the motivation of genuine bloggers. So it is important to protect your blog content from these content thieves and this is the agenda of this post. We will disable the copy function by disabling the mouse right click and CTRL+A. We have two options for doing this i.e., via a JavaScript Code if you want to disable whole text area of blog or via CSS code if you share some codes/text on your blog posts and your readers need to copy them.


Disable Text Selection On Blogger With JavaScript Code

Recommended Article: Change Scrollbar color and Text Selection Color in Blogger

Go to Blogger→Template→Edit Template→Backup Your Template Code First.
Now search for <head> and copy paste the JavaScript Code given below after <head> tag.
(Note: - use Ctrl+F in Windows and Cmd+F in Mac to search for code in template)

<!--Disabe Copy Paste--- TB-->
<script language='JavaScript1.2'>
function disableselect(e){
return false
}
function reEnable(){
return true
}
document.onselectstart=new Function (&quot;return false&quot;)
if (window.sidebar){
document.onmousedown=disableselect
document.onclick=reEnable
}
</script>

Now save your template and view your blog to check the results.


Disable Text Selection Except Specified Codes/Text With CSS


This is the magic code we are using on this blog because we are sharing tutorials where readers need to copy some codes we share like CSS/JavaScript/Html etc. So on the same time we do not let readers copy our posts' text area other than codes/Text we want to share. This is possible with this simple CSS code where we enabled the copy paste of text/code we post in "blockquotes" only. Go to Blogger→Template→Edit Template→Backup.
Now search for ]]></b:skin> this code line and copy paste the CSS code given below before this ]]></b:skin> code line.
(Note:- use Ctrl+F in Windows and Cmd+F in Mac to search in template code)

/*----- Disable Text Selection with CSS Code--- TB----*/
.post blockquote {
-webkit-user-select: text !important;
-moz-user-select: text !important;
-ms-user-select: text !important;
user-select: text !important;
}
body {
-webkit-user-select: none !important;
-moz-user-select: -moz-none !important;
-ms-user-select: none !important;
user-select: none !important;
}

Important Note:- In the above CSS code we have enabled the copy/selection of text/code we post using blockquotes by enabling .post blockquote but it may not work for you if your template is using different CSS class for blockquote for e.g., Our template using .post blockquote where your template may be using .post-body blockquote or blockquote. So in that case you need to replace .post blockquote with .post-body blockquote or blockquote in above CSS code.  If you do not share any codes or content than just copy paste this little piece of CSS code to disable all text area on your blog.

/*----- Disable Text Selection with CSS Code--- TB----*/
body {
-webkit-user-select: none !important;
-moz-user-select: -moz-none !important;
-ms-user-select: none !important;
user-select: none !important;
}

Note:  You can add CSS codes by simply going to Template Designer >> Add custom CSS and paste your code then save.

Benefit of using CSS Code rather than JavaScript ?

1) When we use JavaScript code, do you know what does a copy cat do? Simply disables JavaScript code inside browser and reload the page. Then everything goes into normal and anyone can copy the whole content.

Using CSS code we eliminate this factor as user usually can not disable the CSS. However, an experienced user can do it simply by inspecting elements and finding our CSS code snippet then delete it in browser but this task is far away from newbies. Experienced users rarely do that.

2) CSS codes are far better than JavaScripts as they do not lower the speed of your blog/website where JavaScript codes consume much time to load and make your blog load speed very low and overall you lose Visitors=Money. Avoid using JavaScripts.

Let us know where these codes worked for you or you are having problems with these codes? We will serve you our best. Thank You.