Stylish - Sidebar Subscription Box Widget For Blogger

Stylish Subscription Boxes
A subscription box widget helps blog owners to grow their mailing list and blog readers to get free email updates straight into their inbox. More email subscribers mean more power to you because you don't have to wait or promote the hell out of your new epic blog content to get targeted visitors who are in need of it. They are already there waiting for your email. You get free traffic, social shares, comments, followers and readers for free. So this is how important it is to have a subscription box just below the posts and in your blog's sidebar so that people who are interested in your blog niche, can subscribe with one click.


Although a subscription box is of no use if it is not eye catchy which attracts visitors like a magnet and lures them enough that they can't help but just put their email address and sign up. Overall this is why we use this widget, right?

This widget I am going to share is really unique and I put several hours to design it & make it perfect. A lot of trial and error made it possible for me to come up with this stylish widget working perfectly on every template.

Note:-
New Version 2 Released:- New Stylish Sidebar Subscription Box Widget For Blogger

Previously you may have installed so many other sidebar subscription box widgets and I bet most of them were not in alignment with your template when installed. Because of poor CSS styling and Sidebar Widgets' settings of one's template make these things problematic.

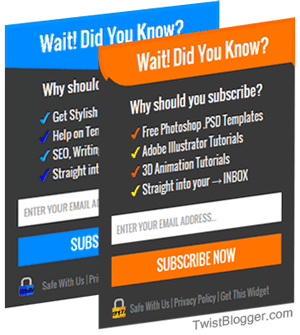
This widget will definitely work with every template as it is shown in the screenshot because I have taken care of everything. I tested it on different templates and made changes accordingly to everything that was preventing it from appearing as I wanted it to be.

A live example of it can be seen there on my blog's sidebar. Although, it is little different but basic theme is same. Older sidebar widgets provided on this blog might not have worked on your blog just because of the same problem but this time I learned it. Let us begin with the process.

(Note:  What You Can and What You Can't?
1) You do not have permission to share my code on your blog or making minor changes to CSS class/id names and saying you did it.
2) You can use this widget on your any (personal or commercial blog) without asking for permission.
3) You can Remove the footer credit link. You heard it right. You do not have to keep intact the footer credit link which is a link back to this post. This is your choice. If you want you can show your gratitude or else just remove it and enjoy as it is. You came to my blog for a reason and if that reason is fulfilled, I got my reward :)
4) You can Not Remove the comments added to CSS style code. Remain them intact, they do not harm in any case.

Recommended: Feedburner Email Subscription Popup Blogger Plugin

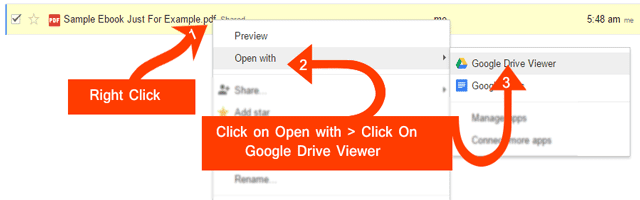
Here is How To Get This Widget Working Step by Step

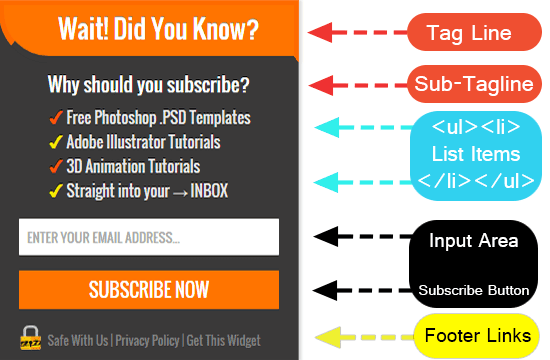
See this screenshot and understand a few things so that you can change them later easily without frustration.

Things to Change in Subscription Box

First of all you must make a habit of taking the backup of your blog's template code before proceeding with the installation of any widget because you may end up doing things wrong and screw it. So it is always better to have a backup so that if in any case you did things wrong or just you did not like your new widget, you can go back quickly.

Important Note: Font family I used in this widget is "Oswald" which is a Google font. You can use this font family on your blog easily. Just follow the steps below.

Installing CSS code and Font Family "Oswald" into Your Blog

Step 1) What it could be other than logging back to your blogger account. :) Select your blog >> Choose Template >> Click Edit HTML and let the template code box load
Step 2) Save your template code into notepad as a backup.
Step 3) Open a search box by clicking inside the code box and pressing Ctrl+F on Windows or Cmd+F on Mac.
Step 4) Find this opening tag <head> and just below that paste the Google font family URL given below.
<link href='http://fonts.googleapis.com/css?family=Oswald%3A400&subset%3Dlatin%2Clatin-ext&ver%3D4.1' rel='stylesheet' type='text/css'/>
Now Google font family, "Oswald" is installed on your blog :)

Note: In-case you do not want to use the Oswald font family then please replace every appearance of the font-family Oswald from the CSS code below and add your own font-family.

If you want to use the default font of your blog then just replace every appearance of font-family: "Oswald",sans-serif; with font-family: inherit; and you good to go with it. Otherwise sans-serif fonts will be applied and it will look awkward to you.

Step 5) Find this code ]]:</b:skin> and just before that, paste the CSS code given below
(Note: To understand how to make changes like colors or font size then just follow the 6th step below the code)

/*------- Stylish Sidebar Subscription Box Widget by TwistBlogger.com------*/
#twist-blogger-sbox {
  padding: 0;
  margin: 0;
  width: 100%; /*---- Change width here - You can use pixels or in percentage -----*/
  height: 355px;
  border-radius: 1px;
  border: 0;
  background: #3A3939; /*------ Change background color of widget here--------*/
}
#twist-blogger-sbox .tagline {
  padding: 5px 0px 0px 0px;
  line-height: 35px;
  height: 45px;
  font-size: 25px; /*----- Change the Font Size of Main Tagline here -----*/
  font-weight: normal;
  font-family: "Oswald",sans-serif;
  text-shadow: 0px -1px 0px #999;
  color: #FFF;
  text-align: center;
  background: #FF7400; /*---- Change background color of Tagline here -----*/
  border: 5px solid #FD6A00;
  border-bottom: 7px solid transparent;
  border-bottom-left-radius: 50px;
}
#twist-blogger-sbox .sub-tagline {
  font-family: "Oswald", sans-serif;
  font-size: 19px;      /*--Sub Tagline Font Size - Change here ---*/
  color: #FFF;
  text-shadow: 0px -1px 0px #000;
  line-height: 30px;
  padding: 0px 10px 0px 10px;
  text-align: center;
  margin: 0;
}
#twist-blogger-sbox .item-list {
  margin: 10px 0px 0px 0px !important;
}
#twist-blogger-sbox .item-list > ul {
  padding: 0px 0px 0px 50px !Important;
  margin: 0 !important;
}
#twist-blogger-sbox .item-list > ul > li {
  font-family: "Oswald", sans-serif;
  font-size: 15px; /*----- Change Font Size of List here ------*/
  margin-left: 10px;
  color: #E8E8E8; /*------ Change font color of List here ----*/
  line-height: 24px;
  text-align: left;
  text-shadow: 0px -1px 0px #000;
  list-style: none !important;
  list-style-type: none !important;
  margin: 0px !important;
  padding: 0px !important;
  border: 0 !important;
}
#twist-blogger-sbox .rssform {
  padding: 0px 20px;
  margin: 16px 0px 16px 0px;
}
#twist-blogger-sbox .rssform input {
  padding: 8px;
  font-size: 13px;
  font-family: "Oswald", sans-serif;
  font-weight: normal;
  width: 100%;
  text-transform: uppercase;
  outline: none !important;
  border: none;
  border-radius: 1px;
  box-sizing: border-box !important;
  -moz-box-sizing:border-box;
}
#twist-blogger-sbox .rssform .button:hover {
  background: #ED6D00; /*----- Change Subscribe button hover color here -----*/
}
#twist-blogger-sbox .rssform .button {
  background: #FF7400; /*----- Change Subscribe button background color here -----*/
  color: #FFF!important; /*------ Change Font color here ------*/
  border: 0;
  margin-top: 15px;
  outline: none !important;
  transition: all .3s ease-in-out;
  width: 100%;
  padding: 6px !important;
  float: none;
  text-transform: uppercase;
  font-family: "Oswald", sans-serif;
  font-size: 18px;
  font-weight: normal;
  cursor: pointer;
}
#twist-blogger-sbox .lock-policy a {
  color:#818181;
  text-decoration:none !Important;
}
#twist-blogger-sbox .lock-policy {
  font-family: "Oswald",sans-serif;
  background: url(https://blogger.googleusercontent.com/img/b/R29vZ2xl/AVvXsEgZT1rsby_1hjuS_tFZW_6nWFc9caIY5q5zxelXoqMC4DCWwX6Qedh1wBri5Wym-ztRFvcPyMxLVqqzxbz2G94AMbPHlBHsK2wFYk952O202VzhjsL6IHpksQFAtHZv86yrVUemSiVzFEs/s1600/Lock-twistblogger.png) no-repeat 10px -2px; /*--- image URL of Lock appears in footer ---*/
  color: #818181;
  text-align: center;
  font-size: 12px; /*--- Font size of footer line ----*/
  margin-left: 10px;
  padding: 0px;
  line-height: 30px;
  margin-top: -5px;
}

Step 6) So you want some changes to this widget? In the above code, I have added proper comments in front of CSS code line where you can change what comment says. Read the comments and change what you can do for font family, color, size, width etc.

Save you template code now because HTML part will be added to the sidebar via template Layout Section.

Installing HTML Part of Widget - In Template Layout Section

Now we are done with CSS code so now it's time to add HTML part of this widget through Template Layout section.

Step 1) Go to Layout area of your blog then on the sidebar just add a new HTML/JavaScript widget.
Step 2) Now paste the HTML code after making compulsory Changes to it.

<div id='twist-blogger-sbox'>
            <div class='tagline'>
            Wait! Did You Know?
            </div>
                <div class='sub-tagline'>Why should you subscribe?</div>
<div class="item-list">
<ul>
<li><div style='color: #FF5700; display: inline-block; font-size:17px; letter-spacing: 4px;'>&#10004;</div> Free Photoshop .PSD Templates</li>
<li><div style='color: #FFE800; display: inline-block; font-size:18px; letter-spacing: 4px;'>&#10004;</div> Adobe Illustrator Tutorials</li>
<li><div style='color: #FF5700; display: inline-block; font-size:19px; letter-spacing: 4px;'>&#10004;</div> 3D Animation Tutorials</li>
<li><div style='color: #FFE800; display: inline-block; font-size:20px; letter-spacing: 4px; letter-spacing: 4px;'>&#10004;</div> Straight into your &#8594; INBOX</li>
</ul>
</div>
            <div class='rssform'>
            <form action='http://feedburner.google.com/fb/a/mailverify' method='post' target="popupwindow" onsubmit="window.open('http://feedburner.google.com/fb/a/mailverify?uri=TwistBlogger', 'popupwindow', 'scrollbars=yes,width=550,height=520');return true">
            <input type='text' name='email' placeholder='Enter your email address...' />
            <input type="hidden" value="TwistBlogger" name="uri"/>
            <input type="hidden" name="loc" value="en_US"/>
            <input value="Subscribe Now" class="button" type="submit" />
            </form>
            </div>
<div class="lock-policy">
   Safe With Us | <a href="http://twistblogger.com/p/privacy-policy.html">Privacy Policy</a> | <a href="http://www.twistblogger.com/2015/03/stylish-sidebar-subscription-box-widget-for-blogger.html">Get This Widget</a>
</div>
            </div> 
Step 3) Tired? Now just change the highlighted things accordingly. Most important step to change is my Feedburner address TwistBlogger to yours otherwise you will be giving free subscribers to me :p

In the footer of the widget, I have used a Privacy Policy link so please change it to your blog's privacy policy page URL. This is highlighted in RED color at the bottom of HTML code. Green Color link is a link back to this post as a Credit, but I have allowed you to remove this link if you want.

Save this HTML/JavaScript widget and check out your blog for the changes. It must be working perfectly.

Wait, You might be thinking that why the heck did not I tell you to put the whole CSS+HTML to sidebar HTML/JavaScript widget, right? Well, there is no good reason or bad but I like to put the whole CSS code inside the template code altogether. We had installed the Google font too :)

So did this widget work for you? Was it as clean as shown in the Screenshots? Did you face any problem? Need help on template customization? Just ask me in comments and I'll do my best. Thanks for reading and using my widget for free. :p
Share this post, do comment and Stay blessed!!

Change "0 Comment" or "Post a Comment" Message in Blogger

Changing Comment Messages in BloggerWe all love the feeling of having new comments below our blog posts and to increase the chances of having more comments, we install many other third party commenting systems like as Facebook comment system, Google+ comment system, and Disqus comment system . 
But still the majority of bloggers who blog on Blogger platform prefer using blogger's default system of commenting. Even this blog also uses only blogger's default commenting system. Although we have changed a few things to make it look better and meet the theme design.


The most annoying thing we need to change is those text strings appear before the comment box like as "0 Comments" when there is no comment, "2+ comments:" and "Post your comment". This is what we are going to deal with thoroughly in this post. We will change them to whatever Message we want to appear in whatever style using CSS. We can use the images too.

Here is How You Can Change These Default Text Strings

First of all be ready and just login to your blogger account >> select your blog >> go to Template section >> click on Edit HTML >> . Now click anywhere inside the template code box and save a backup of your template in your desktop. Now press Ctr+F on Windows OS or Cmd+F on Mac OS to open up a search box inside the template code box (Click inside code box first to open search box inside it).

Note: Please, have patience and read carefully otherwise you'll face problems of not working. I am providing a solution for both templates. I mean third party custom template or blogger's default template.

Demo of the Final Result we will achieve with this Twist

Note: You can change these messages to your own, this is just a demo to show you as a proof. Scroll down to the end of the post and see ours' too :)

Demo of Changed Blogger Comment box Messages


Disabling "0 Comments" Message When There is No Comment

This message appears along with another message "Post a Comment" so first of all we will disable "0 Comments" text string when there is no comment. Then the only left message is "Post a Comment" and it disappears when there are some comments. Will change it too, just take baby steps :)

Find this HTML code in your blog template given below:
(Tip: type <h4> in search box, hit enter until you find this code)
   <h4>
        <b:if cond='data:post.numComments == 1'>
          1 <data:commentLabel/>:
        <b:else/>
          <data:post.numComments/> <data:commentLabelPlural/>:
        </b:if>
      </h4>
This above code is liable to generate 0 Comments message. You will find this whole code two times so you have to take care of it that you do change as given below to both codes. Now we will wrap it up with a conditional tag so that this message only appears if there is one comment or two and disappears when there is no comment. Please read editing step carefully given just below the code.
<b:if cond='data:post.numComments != 0'>
<h4><span>
<b:if cond='data:post.numComments == 1'>
1 Reply so far - Add your comment
<b:else/>
<data:post.numComments/> Replies so far - Add your comment
</b:if>
</span></h4>
</b:if>
Editing: Conditional tag is highlighted in YELLOW color which will not let the message "0 Comment" appear when there is no comment. Code highlighted in RED color is the very important step to edit. This is the message you want to appear when there is 1 comment or more than one. First Highlighted message is singular means for one comment and the second message is for plural means when there are more 2 or more comments. So change them as you like it replace the code above with this one.

Wait, Did you find the code above or Not?

If you're using a third party template code then you must find out this code. Just type <h4> in search box and hit enter. Did you find this code now? If not then just search for another code given below and replace it with the code given above. This time you can't really miss it.
<h4><data:post.commentLabelFull/>:</h4>
Replace this whole code if found with the code given above it. You may find this code twice so do the same for two times.

Changing "Post a Comment" Message in Blogger

Now this message will appear when there is no comment to your blog post, right? You can change it too with whatever text you like or even you can use an image instead. You need to find out the HTML code given below.
Tip: Press Ctrl+F and paste this code <h4 id='comment-post-message'> in search box to find this long piece of code easily.
<h4 id='comment-post-message'>
        <a expr:id='data:widget.instanceId + &quot;_comment-editor-toggle-link&quot;' href='javascript:void(0)'><data:postCommentMsg/></a></h4>
      <p><data:blogCommentMessage/></p>
      <data:blogTeamBlogMessage/>
      <a expr:href='data:post.commentFormIframeSrc' id='comment-editor-src'/>
      <iframe allowtransparency='true' class='blogger-iframe-colorize blogger-comment-from-post' frameborder='0' height='410' id='comment-editor' name='comment-editor' src='' style='display: none' width='100%'/>
    <b:else/>
      <h4 id='comment-post-message'><data:postCommentMsg/></h4>
      <p><data:blogCommentMessage/></p>
      <data:blogTeamBlogMessage/>
      <a expr:href='data:post.commentFormIframeSrc' id='comment-editor-src'/>
      <iframe allowtransparency='true' class='blogger-iframe-colorize blogger-comment-from-post' frameborder='0' height='410' id='comment-editor' name='comment-editor' src='' width='100%'/>
Editing: Now just delete the highlighted Code in Red and write your message in normal text like as "Leave a comment", excluding quotes. Did you get it? Cool, so now we are almost done with it and you just move on to next step which is adding CSS style to make these messages appear in eye catchy way rather boring and dull. Do you like it? Else-wise you're done if you like to read boring messages :)

Add These CSS Styles to Comment Messages

This is simple step compared to above steps. You need to find this class of CSS in your template's CSS code >> .comments h4 then delete it and paste the code given below or just replace it. Make sure that this class is alone/separate before deleting it or replacing it. There may be the case that this class is used with other classes together to apply a common style to them. If this is the case then just remove this class from other class and then paste the code separately. If you did not get it then I am waiting in the comment section. :)
/*---Comment Box Message CSS Style by TwistBlogger.com---*/
.comments h4 {
  background-color: #05A0FF; /*--- Change Background color Code ---*/
  font-weight: normal;
  color: #ffffff;                         /*--- Change Text Color Code ---*/
  padding: 0px;
  text-align: center;
  line-height: 2em;
  border-radius: 2px;
  font-size: 17px;                 /*--- Change Font Size ---*/
  font-family: sans-serif;     /*--- Change Font Family ---*/
  width: 100%;
  position: relative;
}
Editing: To make changes, just follow the comments I have added to CSS style code in front of every line which says itself what you can change there.

Final Step: Do not forget to save the template :) and please Do Reply whether it worked for you or not. I wait eagerly to help you as soon as you post in comments. If you want to use images instead of these texts messages, then let me know. I will surely come up with another twist for you. Stay blessed.

6 Better Ways to Get Facebook Likes Using Blogger Site

Are you looking for more Facebook Likes? In the past, we have shown you quite a few ways to get easy genuine Facebook Likes. However, what if I told you there are a few more simple ways to get quality Facebook Likes. Here, if you think this article will give some software generated paid like then you’re wrong this time. In this article, we will share 6 better ways to get Facebook Likes Using Blogger site.
Read more »

Responsive - Author Box Widget With Social Buttons for Blogger

Author Box Icon
An author box below every blog post is one of the must have widgets for blogger which shows the author bio to blog readers. This little author box does amazing things to one's blog. It increases the credibility and trust of an article and people are always curious to know who on the earth has written this article I am reading right now.

You might have seen this author box appearing below every post on every other popular blog. If you're not using it, you're really missing something important. It's never too late so in this tutorial, I have designed a new responsive author box with three major social buttons to which I am using on this blog itself so you can see the live demo of it in action, just scroll down to the bottom of this post. If you liked it, then let us proceed toward its installation on your blog.

Note: You can share this code on your blog ONLY if you provide a working link back to this original post from your blog post on which you shared my code. Fair deal, right? We should respect copyrights and hard work of others'. Play safe.


Installation Process For Author Box CSS | Part-1

Let us begin with boring steps as usual :) and you can't skip any one of them lol.
Step 1) Just go and login to your blogger account
Step 2) Your Blog >> Template >> Edit HTML
Step 3) Let the template code box load and after loading, click anywhere inside the template code box  >> Have backup of your blog template first
Step 4) Press Ctrl+f on Windows OS and Cmd on Mac OS to open a search box inside
Step 5) Find this little piece of code ]]></b:skin>
Step 6) Now paste the whole CSS code given below just before this code

/*-------- Author Box CSS Code by TwistBlogger.com -------*/
#Author-box-outer {
background: #FFFFFF;                  /*----- background color code -----*/
border-top: 10px solid #05A0FF;  /*----- top border -----*/
padding: 16px 10px 16px 10px;
overflow: hidden;
margin: 20px 0px 15px;
box-shadow: 0px 7px 14px -12px #000;
}
.author-box {
float: left;
overflow: hidden;
padding: 0px 15px 5px 0px;
font-weight: 100;
width: 54%;
display: block;
border-right: 1px solid #ddd;
}
.author-box img {            /*----- Author Image Style ------*/
background: #05A0FF;
float: left;
margin: 5px 10px 0px 0px;
border-radius: 50px;
padding: 2px;
}
.author-box p {             /*---- Author Name Style ----*/
margin: 0;
padding: 0px 0px 0px 0px;
color: #3F3F3F;
font-size: 15px;
text-shadow: none;
}
.author-box span {
border-bottom: 2px solid #F9FF00;  /*--- border below author name ---*/
}
.author-box-social {
float: right;
text-align: left;
width: 40%;
overflow: hidden;
padding: 0px;
}
.intro-style {          /*---- Author bio text Style -----*/
text-align: left;
font-family: sans-serif;
color: #333;
font-size: 13px !important;
margin-top: 5px;
margin-left: 0px;
}
Editing: To edit the CSS code and change its colors, I have provided proper comments so that you know what you're editing while doing it. You can almost change anything like text size, color, background, width, image style etc.

Installation Process For Author Box HTML | Part-2

I have done all the major work for you so that you do not have to visit Facebook Developers Page, Google Developers Page, and Twitter Developers Page. Why? Simple, to get the social buttons for your blog. I worked on these codes and made them simple where if you will try to get them manually and copying and pasting, as they say, you will get a major error saying unable to save, an error occurred while parsing XML code of your template. :) All you need to do is just replace my social pages URLs, Image, Author bio, and name etc. with your own. I have highlighted these all the URLs in above HTML so it is easier to you. Follow the steps given below the HTML for better understanding.

Step 1) First of all just find out this closing </head> tag and just before it, paste the Google+ JavaScript Code as it is given below.

<script async='defer' src='https://apis.google.com/js/platform.js'/>

Step 2) Find out this code line <div class='post-footer-line post-footer-line-3'> and paste this HTML code given below after editing it as needed just after this code line.
Note:  If you're unable to get me then please do comment and I'll help you manually.
<b:if cond='data:blog.pageType == &quot;item&quot;'>
<div id='Author-box-outer'>
<div class='author-box'>
<b:if cond='data:post.author == &quot;Satbir Patial&quot;'>
  <img alt='' class='avatar avatar-78 photo' height='78' src='http://lh5.googleusercontent.com/-av0YwQXWnHo/AAAAAAAAAAI/AAAAAAAAAs8/E1ch3IOBo1E/s100/photo.jpg' width='78'/><p><span>Article By: Satbir Patial</span></p>
<div class='intro-style'>
I manage this blog and post tutorials related to Blogger, SEO, Software Tools, Windows, CSS and Social Media. Did you find this blog helpful? Please socialize with us !!
</div>
</b:if>
</div>
<div class='author-box-social'>
<div style='padding-bottom:0px !important; font-size: 11px !important;'><a class='twitter-follow-button' data-lang='en' data-show-count='true' href='https://twitter.com/twistblogger' rel='nofollow'>
Follow @TwistBlogger
</a></div>
<script>window.twttr=(function(d,s,id){var js,fjs=d.getElementsByTagName(s)[0],t=window.twttr||{};if(d.getElementById(id))return;js=d.createElement(s);js.id=id;js.src=&quot;https://platform.twitter.com/widgets.js&quot;;fjs.parentNode.insertBefore(js,fjs);t._e=[];t.ready=function(f){t._e.push(f);};return t;}(document,&quot;script&quot;,&quot;twitter-wjs&quot;));</script>
<br/>
<div style='padding-bottom:0px !important;'>
<div class='fb-like' data-action='like' data-href='https://www.facebook.com/pages/Twistbloggercom/740638259280667' data-layout='button_count' data-share='false' data-show-faces='false' rel='nofollow'>
</div>
</div>
<div id="fb-root"></div>
<script src='http://connect.facebook.net/en_US/all.js#xfbml=1'/>
<br/>
<div style='padding-bottom:0px !important;'>
<!-- Place this tag where you want the widget to render. -->
<div class='g-follow' data-annotation='bubble' data-height='20' data-href='//plus.google.com/u/0/101011957743985467270' data-rel='author'/>
</div>
</div>
</div>
</b:if>
 Editing: In the above HTML code, I have highlighted everything you need to change before saving your template so do the changes step by step. Don't cry, just do it. :) Here is the list of things you need to change so make sure you did it.
1) Author Name
2) Author Image
3) Again Author Name
4) Author Bio
5) Twitter User Name
6) Facebook Page URL
7) Google Plus Profile URL

Making It Responsive - Optional Step

Are you using a responsive blogger template? Then this step becomes necessary lol. Don't worry, I have done all the work for you and if you're not sure, just re-size your browser window and see the author box on this blog. It changes accordingly to the screen sizes.

What you need to do is just add the responsive styles to CSS3 @media Query in our template. So just add these styles accordingly.

@media only screen and (min-width:980px) and (max-width:1089px) {
.intro-style {
 margin-left: 92px;
}
}
@media only screen and (min-width:768px) and (max-width:979px) {
.author-box {
padding: 0px 0px 0px 0px;
width: 52%;
}
.author-box img {
margin: 5px 5px 0px 0px;
padding: 2px;
}
.intro-style {
margin-left: 0px;
}
.author-box-social {
width: 47%;
padding: 0px;
}
}
@media only screen and (min-width:480px) and (max-width:767px) {
.author-box {
padding: 0px 0px 10px 0px;
width: 100%;
margin-bottom: 10px;
border-bottom: 1px solid #ddd;
border-right: 0px;
}
.author-box-social {
width: 79%;
padding: 0px;
}
}
@media only screen and (max-width:479px){
.author-box {
padding: 0px 0px 10px 0px;
width: 100%;
margin-bottom: 10px;
border-bottom: 1px solid #ddd;
border-right: 0px;
}
.author-box-social {
width: 100%;
padding: 0px;
}
}
Final Note: If you're not using a Responsive Blogger Template, you do not have to do that. Your responsive template might be using different sizes so add these styles accordingly or else you can just copy and paste. That is it in this tutorial.

Did you face any problem? Just ask me in comments for any help, I'll assist you as soon as you ask or contact me via the contact us page. Stay safe, stay blessed.

Download UC Browser for Windows PC (8/8.1/7XP)

UC browser for Windows PC
When it comes to access the internet, an internet connection and a web browser is all we need. In today's world, this is like a basic need of everyone to have access to internet and people are so addicted toward internet that they can not live without it, even for a few minutes let the hours alone. I see people of all ages in buses, metro, train or at public places looking at their mobile screens after every few minutes. So a web browser is what makes everyone to access the Internet anywhere, anytime. Most of the mobiles come with preloaded web browsers but hardly people use them, why? Simple because there are plenty of other third party apps available in the market for them as an alternative and they are much more versatile and powerful than preloaded web browsers. These third party web browser apps provide more user friendly experience and fast access to Internet.

What is UC web browser?

I don't think I have to explain because most of you may be already using this browser app on your mobile. This is the #1 browser for mobile and first choice of millions of people from all over the world. This browser loads web pages very fast even on a slow Internet connection, saves data bandwidth, provides desktop user experience on mobile, multilingual and available on most of the operating systems. Finally its Free too.

Top Features of UC browser:

- Maximum Speed
- Reduces size of web pages to load them faster (almost 80% faster)
- Amazing downloading speed
- Cloud storage
- Parallel downloading
- Copy paste option
- Different modes (Day or night)
- Auto fill
- Password manager
- Incognito mode
- Bookmarking
- Much more...

Download UC browser For PC

So this what made you visit this page, right? We all have used UC on mobile but never used it on PC despite the fact that we really want to use it on PC as well as on mobiles. So below I am going to explain how we can use it on our PC too.

Download UC For Windows 8/8.1

If you're running windows 8 or 8.1 operating system on you PC/Laptop, then this is going to be a smooth installation as it is available on Windows Store itself. All you need to do is head over to Microsoft store via the link below and click on left side Green link. Then wait for Microsoft Store App to open on your PC and click on install button on top left side of the page after loading it.

Note: You need to be logged in or else you have to create a new account with Microsoft store to Install this app. Do not worry as it is free to create a account and takes less time.

Download UC for Windows 7/XP

This is really a pain in the ass to get UC on windows 7 or later. Why ? Because we need a software emulator to get it working. This software is called BlueStacks (Available For Free) which runs with Android OS. You can almost do anything as you do with your android device. You can play all android games or apps same as you do on your Mobile phone. Just Download BlueStacks on your PC & Install it. Offline Installer is around 15 MB but after installation, it will download all the needed data which is around 190 MB. Make sure you have a good internet connection to download fast.

Drawback: RAM consuming. If you have 2 GB ram installed on your PC, you can run this software but if you run some other apps along with it like as music player, VLC or Google chrome, then your PC is definitely going to hang.

Get it here: Download BlueStacks Emulator

Recommended RAM: 3 GB or more is good to run this software smoothly along with other apps.

Note for XP Users - You can use BlueStacks Software Emulator only if you have Service Pack 3 Installed on your machine. It can be done easily by updating your windows from Windows Update center to latest version available.

After successful installation of BlueStacks software emulator, just head over to Google Play Store from its menu and download the UC browser. It will install itself after downloading. But if you're not familiar with it then just use your Google chrome browser on PC and download .apk file of UC then open it with BlueStacks. Just right click on file and open with it. There you go, it will be installed and ready to use.

Did you face any Problem?

If during the installation, you faced any problem or did not understand the steps above, just complain me there in comments. I'll try to solve this as soon as possible. Please share this? Once? Thank you!

How To Customize Blogger Scrollbar and Text Selection Color

Ever thought about if you could customize the text selection color and browser scrollbar color/width on your blogger blog? You can see the live examples on our blog itself. We have changed its text selection color and scrollbar's color & width too. Isn't it nice? :) Follow this simple step by step tutorial and do the same on your blog. Make your blog look more professional, eye catchy, user friendly and of course, colorful too.

Customization of Scrollbar

Default color of scroll bar in every browser is grey which can be customized thoroughly. We can customize our blogger's default scroll-bar by customizing its width, height, scrollbar track color, thumb color, thumb hover color and thumb color when scroll-bar is active. To do so, all we need to do is add these styles to our blogger template's CSS style-sheet. Without further delay, let us do the job.


Step 1) Login to your blogger account >> go to Template >> Edit HTML.
Step 2) Click anywhere inside the template code box then press Ctrl+F on windows and Cmd+F on mac.
Step 3) Find out this little piece of code line ]]></b:skin> and just before that, paste the whole CSS code given below. You can customize its color codes as you wish.
/*--------- Scrollbar Customization by TwistBlogger--------- */
::-webkit-scrollbar {
width:8px;
height:8px;
}
::-webkit-scrollbar-track {
background:#FFF;  /*------This is background color of scrollbar track ------*/
-webkit-box-shadow:inset 1px 1px 2px #E0E0E0;
border:1px solid #D8D8D8;
}
::-webkit-scrollbar-thumb {
background:#c0392b;  /*------Thumb color ------*/
-webkit-box-shadow:inset 1px 1px 2px rgba(155,155,155,0.4);
}
::-webkit-scrollbar-thumb:hover {
-webkit-box-shadow:inset 1px 1px 10px rgba(0,0,0,0.4); /*------Shadow on hover------*/
}
::-webkit-scrollbar-thumb:active {
background:#333;   /*------Thumb color when it is active------*/
-webkit-box-shadow:inset 1px 1px 2px rgba(0,0,0,0.4);
}

Step 4) Hit save button :). In the above CSS code, I have added proper comments to change the color codes to make it easy for every one. If you have further questions, follow the comment route, am eagerly waiting to help you do the job :).

Note: Please do share your blog URL in comments and I'll personally visit every one's blog to check which colors you have chosen. I'll leave a comment too. Fair enough? huh?

Customization of Text Selection Color

By text selection color, what do I mean is whenever someone selects the text with mouse on your blog post then by default its color. Got it? Default background color is always blue and text color is white. Ready to add some more colors to your blog on this HOLI season?

Step 1) Just repeat the previous steps first and find out this ]]></b:skin> code again.
Step 2) As always, paste the code given below after changing the color codes to match with your blog's theme and hit save button.
/*--------- Text selection Customization by Twistblogger------------- */
::selection {
background:#e67e22; /*------This is the background color on selection-----*/
color:#fff; /*------This is text color on selection-----*/
}
::-moz-selection {
background:#e67e22;
color:#fff
}
::-webkit-selection {
background:#e67e22;
color:#fff
}
Final Step:  Do not forget to visit your blog after adding these styles. How can you forget? Right? lol

There is it. These things are of little importance compared to your blog content so do not waste your time on the things like adding every other widget to your blog. Bear with your great content and serve your audience with your best of best. Always give them royal treatment because? They deserve it same as you do. :)

PP: Did you face any problem with your blog template while adding these styles? Just ask me in comments and I'll join you there soon. Now do share, subscribe and like our page buddy, you can do it. :)

How To Embed A PDF & Other Document Files in Blogger Post

Did you ever wonder about embedding a PDF file inside your blog post? Well, we are going to learn how anyone can embed their PDF file inside blogger blog post itself so your readers do not have to leave your blog to view a PDF file. This feature might be helpful for a lot of people who share PDF files on their blogs. We can accomplish this task using Google Drive.

What is Google Drive?

Answer: Google Drive is a free file hosting service by Google with 15GB of storage which allow us to host our files for free. Even you can host a website on it too. This is little intro about Google drive and without taking much of your precious time, let us begin the process.

Note: Browser I used in this whole process is Google Chrome.

Step 1) Sign-in into your Google Drive Account

Just use your Gmail address to sign into Google Drive Free file hosting service.

Step 2) Uploading your PDF file From Your PC on Google Drive.

One you are logged in, just click on Upload Button > then Files Button.
Click on Upload Button

Step 3) Choose your PDF file from your PC

Now You will be asked to choose what files you want to upload from your PC so just locate your PDF file, select it and press "Open button" in windows dialogue box as seen on below screenshot.
Choose your Files To Upload

Step 4) Let The Upload Process Complete

As soon as you hit open button, you will see an Uploading box appears. Let the file upload and wait until it shows Upload Complete as you can see in below screenshot. Upload time depends upon the Size of your PDF file and Speed of your Internet Connection.
Uploading Files

Step 5) Change Its Sharing Settings

Once its Done, just close this box and wait until your PDF file pops up in Google Drive.  Then right click on its name > then click on share link > then again click on the share link. See the screenshot below.
Right Click On Ebook File Name

Step 6) Click on Advanced Link

When you click on Share button, a dialog box appears with no options to change sharing settings of our file. So click on the little "Advance" link on the bottom left side. See this screenshot below.
Click On Advanced Link

Step 7) Click On "Change" Link

After clicking on advance link, we get access to change "Sharing settings". By default this file is Private, means visible to you or those to whom permission is granted. All we have to do is make it "Public on the web" so click on the "change..." link as you can see below image.
Click On Change Link

Step 8) Make It Public On The Web

This time we get three option to share our file. We need to select very first option which is "Public on web" so select it and hit save button.
Select Public On The Web

Step 9) Open PDF File With Google Drive Viewer

So after we are done with sharing setting, now right click on File link again then click on "open with" and select "Google Drive Viewer" and let the PDF viewer load.
Open With Google Drive Viewer

Step 10) Get Code To Embed PDF File

After your PDF file is opened in Google Drive Viewer, just click on "More Actions" link on top. Just hove over top of the ebook and you will see a navbar visible to you. Then click on "Embed item" link as you can see below
Click On More Actions Link

Step 11) Copy The Given Code

Simple step it is :) just copy the code given to you in a dialog box like as below. Then save it to notepad.
Copy The Code

Final Step: Paste Code Inside HTML Editor of Blogger Post

Did you copy this code? Ok so now we are done with Google Drive and its time to actually put this code into work on our blogger blog. Log back to your blogger account, create a new post or open any old post where you wanted this PDF file to be embedded. Select HTML editor of post and paste the code which we had copied.
Paste The Code Inside HTML editor of new Post

We are almost done! Hit publish button and check your post whether it worked or not.

Changing Width and Height of the Embedded Document

Optional step but important one. By default, the dimensions of the PDF document are set to 640px wide in width and 480px wide in height. If these dimensions do not fit according to your post area, then just change these pixels accordingly to make it appear fit on your blog post. All you have to do is edit its iframe code inside post HTML. See the example below.
<iframe src="https://docs.google.com/file/d/0B_PLgWpOK_wTQjNTZTM0bE01Zzg/preview" width="640" height="480"></iframe>
You can change width from 640px wide to 600px or 740px wide and do the same to height.

Live Example of Embedded PDF file


Did you face any problem? Let me know via comments and I'll get back to you with the solution. Do share this post if it helped you.