
How to Setup Custom Domain in Blogger with Namecheap
How to Display Random Posts in Blogger

How to Display Recent comments in Blogger

Motivational Workshop on Blogger at IBA CED By Syed Faizan Ali

How To Forward Gmail Emails To Any Other Email Account

We can easily transfer/forward our emails from Gmail to any other single or multiple email accounts within a span of few clicks. The whole process takes no more than 5 minutes and voila, you can simply forget about missing any email or opening multiple email accounts each time. It saves hell lot of time, no? :)
Steps To Forward Gmail Emails To Another Email Account
Just follow these easy steps given below [Note: I am using "basic HTML view" of Gmail rather than "Standard view" as it loads faster].
Step 1) Be Logged into your Gmail account if not already then click on the Settings link on the top left the side.
Step 2) After that you will be headed over to the Settings Area where you can do a lot more than email forwarding alone. This time you will see General settings so click on Forwarding and POP/IMAP link on the left side.
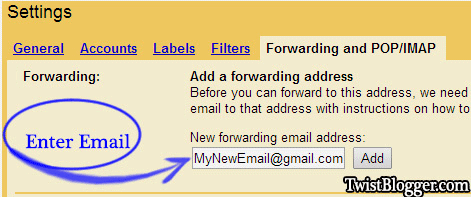
Step 3) Enter your new Email address where you want all your emails to be forwarded and click on Add button.
Step 4) After that you will be asked to enter the CODE which has been sent to your Email address to verify it so add it there and click on verify button as you can see in the screenshot below. This step is to verify that you own this email account and no mistake has been made. In any case, the rare one although, you do not receive any verification email from google then just click on Resend Email button and this time you will definitely receive the verification email.

Step 5) Almost done! This time you will see a new option which will let you choose the email accounts you have verified to use for forwarding. Select your email from the drop down list and click on save button.
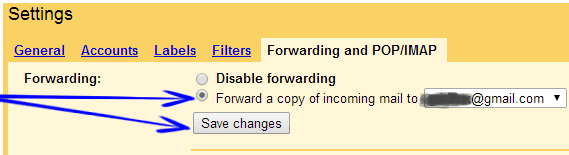
You can add more than one email account and the process is same as above. This is really simple and useful feature of gmail which lets us forward our emails to a new email address. If I missed something or did not explain thoroughly then let me know.
Did I use It Myself?
Yes of course, I am using it for more than a year and the half and I never missed any email but it takes little more time to reach in our inbox after it is received in older email account. However, the emails which are caught up in spam folders would not be forwarded. I am happy with this service and I log back in my old accounts on free time to check if any important emails are caught up in spam. Any other question remaining would be answered in comments as soon as time allows. See you in comments :) and also let me know if you're using it or not.How To Backup All Blogger Blogs in One Go - Google Takeout

Why Should You Create Backup Of Your Blog?
Why? Even I would say you that you should make a regular habit of doing this. The main reason for doing this is that you are blogging on "Blogger" platform where you have no control on your blog hosting as it is provided to you for free. Who knows when your blog might come under "not comply" with blogger's "TOS" and voila, your blog got deleted without any prior notice. Can you feel the pain? Suppose you logged in to create a new post and found that there is no existence of your blog like it was never been there ever before. So? Would you get it back anyhow? The answer is BIG NO! No matter how hard you try to convince them in forums. It happened with me before. Although, I was just playing around blogger to learn HML/CSS and blogging life then :) so it did not hurt me that much. When you have a backup of your blog, you can simply upload your blog to another blogging platform like as WordPress.
How To Backup All Blogger Blogs Using Google Takeout
Step 1): Login to your blogger account then follow this link to Google Takeout!
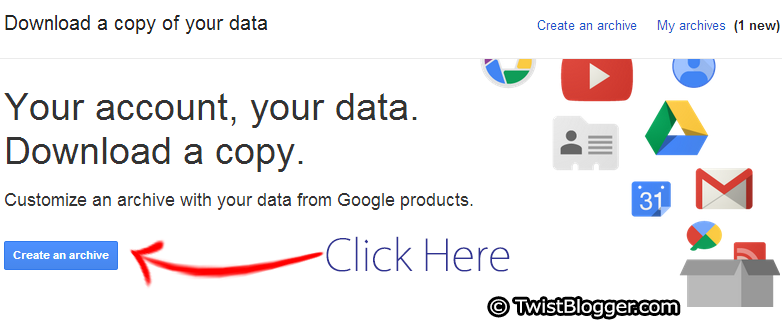
Step 2): Let the page load then click on blue color Create Archive button.
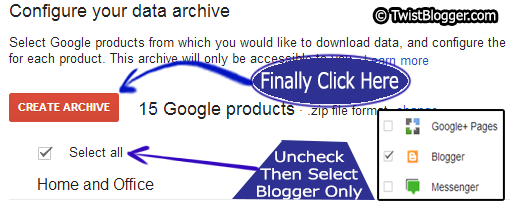
Step 3): Now you can see the huge list of Google services for creating the backup of them all but we are going to create the backup of our blogs only. By default all the services would be selected so click on "Select all" check box to uncheck all, then scroll down and select "Blogger" only, then click on red color Create Archive button on top.
Step 4): Download the backup to your desktop once it is created. Before letting you download, Google may ask you to re-enter your password so do as it says then your downloading will start. It will be in a ZIP file format so to open these files, you can use any free tool like WinRAR or 7Zip. Search on google for it to download and install.

Congrats buddy, finally you have created the backup of your all blogs successfully! Note that if you do not download the backup, it will not be deleted and you can still download it later at convenience. You can find all your backups data file archives under "My Archives" link on the top left side on Google Takeout dashboard. Do not wait and do it right now. Even you should do it once in a week if you are on Blogger Platform.
Did this post help you? Kindly do share buddy as sharing is caring :). You may also join other readers by subscribing to our blog via email. Did you experience any problem? Let me know in comments. I am always there to help you on demand.
Did this post help you? Kindly do share buddy as sharing is caring :). You may also join other readers by subscribing to our blog via email. Did you experience any problem? Let me know in comments. I am always there to help you on demand.
How To Add Google Analytics On Blogger Blog
 Google Analytics or GA, in short, is a free (basic) service by Google for webmasters for detailed tracking of traffic to one's website/blog. It is also available in premium, but we do not need it as basic service, which is free, shows us everything we need to know. It shows us a number of useful stats which are crucial to succeed in our online business. Beside the number of pageviews, unique visitors or bounce rate, it also shows the keywords data, page load time, from where visitor landed, which browser they used, what error they encountered, real-time reporting, event tracking, campaign tracking, flow visualization and much more. Do you have any reason not to use Google Analytics on your blogger blog? Every other individual blogger or big companies use Google Analytics on their web pages so that they can do better in their market and provide maximum user-friendly experience to their visitors.
Steps To Add Google Analytics On Blogger Blog
1) Setting Up your account with Google Analytics!
- Go to Google Analytics Page and click on Sign in Link (Top Left Side). Your existing Gmail account to sign into Google analytics account.
- After Sign in, click on Sign Up button (in left side corner) to begin with setup process of your account.
- Now you will have to fill up the necessary data required to set up your account like as; Account Name, Website Name, Website URL, Category, Time Zone etc. (see image below). Fill up all the required data and proceed.

- After that scroll down to the end of the page and click on the blue button "Create Account", then a pop dialog box of "Terms and Conditions" will appear. Accept their terms and conditions to proceed with the account setup.
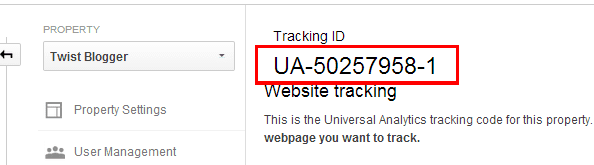
- As soon as you will accept the terms and conditions, you will be redirected to the page where you will get the Tracking id starts with UA and a JavaScript code. We need the tracking id only because blogger has its own feature which allow us enter our ID. Avoid JavaScript code.
2) Adding Google Analytics To Your Blogger Blog
This process is of just two steps. First we need to add the Tracking Id we have recently copied and secondly we need to add the code to our template but instead of adding the JavaScript code, we will add a <include> Tag which will do the magic of importing Google Analytics Code into our template automatically on every page of our blog.
- Go to Blogger → Settings → Other and then scroll down to the end.
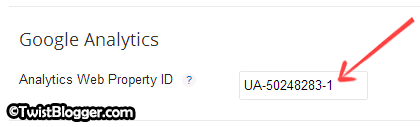
- You will see there is an option to add our UA id in "Analytics Web Property ID" box so paste your UA tracking id you had copied from Google Analytics account (See image below). Then save these settings and move on to next step.
- Now go to Template → Edit HTML then wait to load the template code box.
- Click anywhere inside the template code box, press Ctrl+F or Cmd+F so that a search box will appear.
- Enter
</body>code line to search box and hit enter. - If you found that ending </body> tag in your template code, then just before this
</body>tag line, paste this little code line<b:include name='google-analytics' data='blog'/> - Now save your template code because we are done with the installation process.
Easy Enough?
Everything is setup by now, but it might take few hours for Google Analytics to show the data in your account so do not worry about that, just simply give it at least 24 hours of time. Next day login back and check the stats and start playing around :). You can also link your Google webmasters account and Google Adsense account with your Google Analytics account so that you can get the more out of it. You can do much more with your Analytics account so just keep exploring its new features to learn more and get the more detailed analysis of your blog traffic, keywords etc. In case you face any problem in installing then just ask in the comment below. I will get back to help you. Always there :)
Subscribe to:
Posts (Atom)