But this is not just a service for sending and receiving text emails only, we can do much more with it as it's evolving by the time and becoming more and more features rich.
In Today's post, I am going to share an HTML Signature Template for GMail. Actually many of you might be already using signature in your GMail but I'l show you how you can make it look more professional by using the HTML.
Many people just use their name or few normal text hyperlinks to their social profiles which is not so cool (BDW, I started using it just a few weeks ago lol).
What if you would use an image of you or your brand logo with an attractive bio and links to your social profiles with beautiful icons? That is what I have designed for you guys and I am using for myself now. :)
This is really a good marketing technique to promote yourself or your business because this signature will go with each and every email you send.
Your emails will carry more weight than sending the email normally like as everyone else do. Receivers may end up visiting your social profiles, blog or website. So overall it'll benefit you in multiple ways.
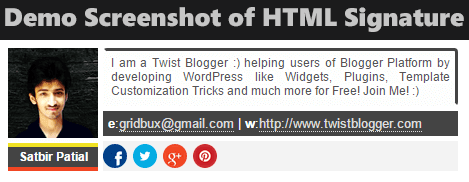
See The Demo Screenshot of HTML GMail Signature
Looks good? Please let me know. :p
Ok so let us begin the process of adding HTML Signature to our GMail.
Follow These Steps To Add HTML Signature In GMail
Google does not allow us to create our HTML signature and instead we can only create Text Hyperlinks inside the Signature box itself. So for adding the HTML signature, we need to create a HTML Signature Template first.Step 1) First of all, just Download HTML Signature template here (I have uploaded it to Google Drive account and in-case it does not work for you, please let me know). If you do not want to download the template from Google drive, just read Step 5.
Step 2) After downloading the Template, just unzip the "GmailSignature.html" file from the zipped folder. Use WinRar or 7-Zip to Unzip the folder if your Operating System does not allow it to unzip normally.
Step 3) Now open the "GmailSignature.html" file with your web browser. Can you see it working as shown in the Demo Screenshot?
Step 4) This time open "GmailSignature.html" file with your favorite Text Editor like as Notepad (don't close it from browser yet). If you would ask for my recommendation, I would suggest you to use Notepad++ which is available for free, just google it. This is the only Text/HTML Editor I ever use for creating all the plugins, widgets or anything else.
Step 5) Now you need to edit the HTML Signature template to add your own Image/Logo, Bio and Hyperlinks.
Below, I am going to share the Full HTML code of this Template to highlight the thinks you need to change. For complete customization of this template, just read the Editing step below the code carefully.
(Note:- You can also save the code given below using the Notepad. Just copy the code, Open your Notepad, paste the code, Press Ctrl+S and Save it as GmailSignature.html so in that case you need not to download the template from Google drive link.)
<!DOCTYPE HTML PUBLIC "-//W3C//DTD HTML 4.01//EN" "http://www.w3.org/TR/html4/strict.dtd">
<html>
<head>
<meta http-equiv="Content-Type" content="text/html; charset=iso-8859-1">
<title>HTML Gmail Signature by www.TwistBlogger.com</title>
</head>
<body>
<table border="0" cellpadding="0" cellspacing="0" style="background-color: white; color: #222222; font-family: arial, sans-serif; font-size: 12px; width: 450px;">
<tbody>
<tr valign="top">
<td style=" margin-top: 0; padding-right: 0; width: 10px; background-color: #FDFDFD;">
<img alt="photo" height="90" src="http://lh5.googleusercontent.com/-av0YwQXWnHo/AAAAAAAAAAI/AAAAAAAABE4/JwYYurSVdis/s104/photo.jpg" style=" max-width: 120px; width: 90px;margin-top: 0;" width="90">
<br>
<div style="background: #444444; margin-top: 2px; bottom: 0;color: #FFF; font-family: sans-serif;font-size: 12px;padding: 3px; text-align: center;border-top: 4px solid #F0E223;border-bottom: 4px solid #F14724;">
<b>Satbir Patial</b>
</div>
</td>
<td style="color: #878787; font-family: Arial; text-align: justify; font-size: 12px; padding-left: 5px;font-stretch: normal; background-color: #FFFFFF;">
<div style="color: #565656;padding: 5px;background-color: #FDFDFD;margin-bottom: 5px;border-top: 3px solid;border-right: 3px solid;border-color: #444444;border-radius: 4px;border-left: 3px solid transparent;border-bottom: 3px solid transparent;">I am a Twist Blogger :) helping users of Blogger Platform by developing WordPress like Widgets, Plugins, Template Customization Tricks and much more for Free! Join Me! :)</div>
<div style="color: #FFFFFF; font-size: 13px; padding: 5px;background-color: #444444;">
<span style="display: inline-block;">
<span style="color: #FFF;"><b>e</b>:</span><a href="mailto:gridbux@gmail.com" style="color: #DDDDDD; text-decoration: none;border-bottom: 1px dotted #DDDDDD;" target="_blank">gridbux@gmail.com</a></span> | <span style="display: inline-block; white-space: nowrap;"><span style="color: #FFF;"><b>w</b>:</span><a href="http://www.twistblogger.com/" style="color: #DDDDDD; text-decoration: none;border-bottom: 1px dotted #DDDDDD;" target="_blank">http://www.TwistBlogger.com</a></span>
</div>
<div style="margin-top: 5px;background-color: #F3F3F3;padding-top: 3px;height: 27px;">
<a href="http://facebook.com/Python.TBN" style="color: #1155cc;" target="_blank"><img height="20" src="https://blogger.googleusercontent.com/img/b/R29vZ2xl/AVvXsEh8uK4JhtnSj3qbfbffTeZMLYGoiBvf_driGYnpCRJwXndnwaen84sbsIwiba08kJ8isnj5tWgxB0TuGr1MVbqGE03uxEufidMx_B0OhkRlgtb9mfcLDKwgAFvIi4IVR7PSxinvPNgyVBk/s1600/fb-icon.gif" style="border-radius: 50px; padding: 2px; background-color: #003F87;" width="20"></a>
<a href="http://twitter.com/TwistBlogger" style="color: #1155cc;" target="_blank"><img height="20" src="https://blogger.googleusercontent.com/img/b/R29vZ2xl/AVvXsEip9k6zwE2ag552Y7xV54dOQmp2ptLAVdL_73fG6bvQ7qAWCjPmCDlmNLrzPE6q7OLaxC8nrcN3LICD-iEQRnoZqAi5riDEYok-LSwP_imUH-OFqxWkSBQsu23UDbUXnq4IFCkvyTJZXZo/s1600/tw-icon.gif" style="border-radius: 50px; padding: 2px; background-color: #00ABE2;" width="20"></a>
<a href="http://plus.google.com/u/0/+SatbirPatial/" style="color: #1155cc;" target="_blank"><img height="20" src="https://blogger.googleusercontent.com/img/b/R29vZ2xl/AVvXsEj1mM6GfWJ9-VSP8W1M2r3KRhMAsnh_1UIgtm8C9FHjd-xuyd2x4NYJoNBhy87O_L5jFltI6QH4c9JPyPeuDD7pptqaeaLvDQtcmstX7zWjf_lEZQSyNte1sqPVuf1yGFeRqcWpqb9haYg/s1600/gp-icon.gif" style="border-radius: 50px; padding: 2px; background-color: #F04623;" width="20"></a>
<a href="http://pinterest.com/twistblogger" style="color: #1155cc;" target="_blank"><img height="20" src="https://blogger.googleusercontent.com/img/b/R29vZ2xl/AVvXsEgppj-29a6NN2gko-P6e17trxMbVM26U-07HA2wq87l2lOvKwKEh5zd41SEbyFTlhc0J9vbDV1tW34NTJkkmrhLQzX7-xfF2-XQG2tqvkT_Lvxc2Zfwx-P5va2057E09DJp4D_1G-vEPT4/s1600/pr-icon.gif" style="border-radius: 50px; padding: 2px; background-color: #CB2D33;" width="20"></a>
</div>
</td>
</tr>
</tbody>
</table>
</body>
</html>
Editing:-
a) Replace my image URL with your own Image or Logo (105x105).
http://lh5.googleusercontent.com/-av0YwQXWnHo/AAAAAAAAAAI/AAAAAAAABE4/JwYYurSVdis/s104/photo.jpg
b) Add your Name and Remove my name "Satbir Patial".
c) Remove my bio and Add yours of around 180 characters (don't add more than that, template layout will breakup). Longer than twitter. :p
I am a Twist Blogger :) helping users of Blogger Platform by developing WordPress like Widgets, Plugins, Template Customization Tricks and much more for Free! Join Me! :)d) Add Email Link And Your Web URL
Please note that I have used the same text for anchor text as of URL. For example my blog address is http://www.twistblogger.com and I have used the anchor text for the hyperlink same as http://www.twistblogger.com so you can choose to do the same or just add your anchor text as your blog title. I could have used Twist Blogger as my anchor text.
I have done the same for the both email and blog URL But, in-case your email address and blog address is long then I would suggest you to use short anchor text for both to make them appear inline. You can use Email Me as your anchor text for email hyperlink and "Your Blog Title" as your anchor text for your Blog/Website's hyperlink. You can also modify the links as per your choice.
e) Last step to edit is my social profile links. Just remove mine and add yours. I have used four social profile links with rounded icons.
This is all you need to edit and now save the file. Now go back to your browser's tab where we had opened this file and refresh the page (Ctrl+f5) to see the final results. Check all the links to see if they are working perfectly or not. If everything is okay then move on to the next step.
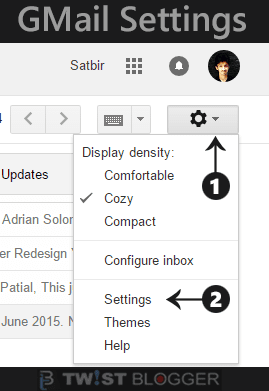
Step 6) Now open your GMail account and click on settings icon link found on top right side then click on settings' link. See the screenshot given below.
Step 7) After that you will be redirected to the Settings' Page of your GMail account. Scroll down to the Signature Box area under General category.
Now you need to copy your HTML Signature from your browser so Go Back to The Browser's Tab of your "GmailSignature.html" file and Select all. Press Ctrl+A to select your HTML Signature then Press Ctrl+C to copy. Please do not use mouse in this process and instead use your keyboard as I suggested.
Now Go Back to The GMail Settings's Tab and Click inside the signature box then press Ctrl+V to paste your recently Copied HTML Signature. It should work fine. If you're using the mouse in this process then you may face some alignment issues. See the screenshot given below where I have pasted my signature using the same process as explained above.
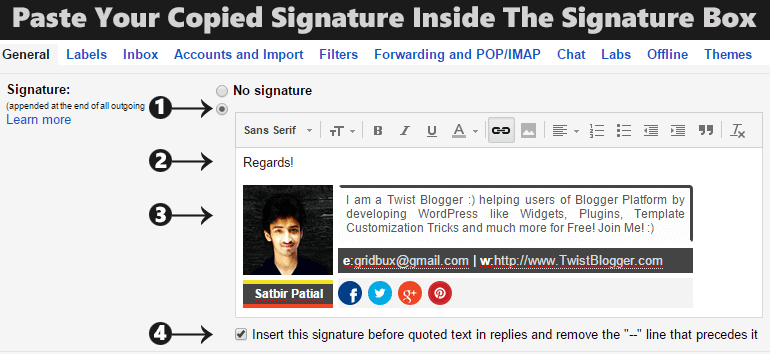
Can you recognize the points I have highlighted in the screenshot? Follow those all and do the same. Now scroll down to bottom of the page then click on Save button.
Want to check your signature live? Just hit the Compose email button and you will see it instantly attached in the bottom line of your email then send it to me, I would love to see it. :)
You can also customize the colors by playing with the CSS and make it more personal. For your further queries, please let me know in the comments. I'll join you there.
I tried my best to explain the things but in-case something is missing then you got to hit me back asap. Do share and join me on social networks. Your support is all I need to serve you by best. :) Stay Blessed!
No comments:
Post a Comment